


Nick Smith - www.climbers.net, Dec 2009
© www.climbers.net
This article is aimed at people who are new to climbing and wish to explore bouldering. It contains hints and tips and is not aimed at seasoned climbers and experienced boulderers. It has gear advice, 'how to' tips and technique advice.
The article is illustrated with photographs from the UKC User Galleries. Thanks go to all the photographers. Check out the bouldering gallery here: UKC Gallery.

What is 'Bouldering'?
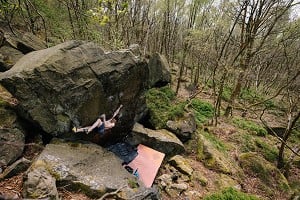
Bouldering is a form of rock climbing. The climber doesn't need a rope, as bouldering is practised on small cliffs and boulders, usually less than 5 metres in height - small enough to jump off if needed.
Bouldering can be done on the base of larger cliffs, by climbing sideways (traversing) or just by climbing up a few metres and then reversing or jumping off.
These short climbs are referred to as 'Boulder Problems' as you have to solve the problem of how to climb the rock. When we say 'problem' in this article, we are referring to a short climb, usually done without ropes – a boulder problem.
You can also go bouldering indoors on artificial climbing walls. Most indoor climbing walls have a bouldering section that is lower than the roped climbing area and has large crash mats at the base. These indoor walls are a good bet if you are climbing alone, don't have much time, or don't live near any real rock.
Bouldering is a popular aspect of rock climbing. It doesn't require vast amounts of technical equipment, is often considered 'safer' than roped climbing (see below) and above all is really good fun.
Many climbers use bouldering as a way of pushing themselves to their physical climbing limit, unencumbered by ropes or fear. But falling-off boulders safely takes a bit of practice and experience. It's best to go steady at first.
Remember: Bouldering is not 100% safe.
It is climbing without ropes and if you fall, you will hit the floor. You can choose not to climb too high, to only climb above good flat ground, to have another climber (a spotter) watch your back and help you to land well, and to use a bouldering pad to protect you if you fall (more on these later). But none of these things will guarantee that you will not sustain an injury.
Be safe: Climb within your limits and don't get too high until you have built up your experience.

So – How do I go bouldering then?
You just go! You need to find either an indoor bouldering wall or a crag. The indoor wall may insist on you undertaking a climbing course first to learn the basics, it depends on the wall.
You can find a local wall here: UKC Classifieds.
Finding a crag:
The UK is blessed with thousands of rocks, all over the country. But not all of them are climbed on, and even the ones that are may not be very suitable for bouldering.
To help you get the most out of your visit to the rock (climbers call each venue 'a crag'), it is worth investing in a climbing guidebook that covers that crag. Guidebooks contain maps, information on the climbs and boulder problems, and photos and text to help you navigate around the rocks and get the most from your visit.
You can climb without a guidebook, which can be good fun and exploratory, but you may find that you don't find many good 'problems' and miss out on the best areas.
There are tonnes of bouldering venues countrywide and you can search the UKC Crag database here: UKC Crag Map. But in case you are overloaded with info, I have selected a few of the best ones for you and categorised them by area. I have also listed which guidebook you need, or where further information is available.
 © Sean Kelly, Feb 2008
UK Bouldering Destinations
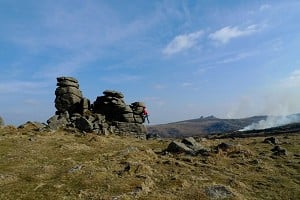
Devon
The granite tors of Devon have some fantastic bouldering. Try Bonehill Rocks.
For full information check out the website: Javu
South East
The southern sandstone is a hugely popular climbing area, being so close to London. Check out Bowles Rocks and also Harrisons Rocks.
The guidebook you need is Southern Sandstone, which covers roped climbs as well as some bouldering. You can read a UKC Review of the guide here: UKC Review
Peak District
The gritstone of the Peak district is perhaps the best known bouldering destination in the UK and is world famous.
Check out the UKC Databases for Stanage and Burbage to get a flavour. Also have a look at the UKC destination article to Stanage.
Guidebooks: There are several guidebooks to this area that include bouldering, but the most up to date bouldering specific guide is: Peak District Bouldering
North Wales
The mountains and coasts of North Wales are popular and varied bouldering spots.
A hardcore steep venue is Parisella's Cave in Llandudno. In the mountains there are more beginner friendly areas such as the RAC Boulders near Plas y Brenin.
For North Wales the guidebook you need is: North Wales Bouldering Guide
Yorkshire
A superb gritstone bouldering area, some say it is way better than the Peak District. And I agree! Top venues include Almscliff, Caley and Brimham.
There are several bouldering guides available. The most up to date one covers half the crags and is here: Total Climbing. There is an older Rockfax Guide that covers more crags but isn't quite as up to date: Yorkshire Grit Rockfax Guide.
A really useful local website is: Yorkshiregrit
 © Jamie Moss
The quiet county of Northumberland is home to lots of superb sandstone bouldering. Spots to check out are Bowden Doors and Kyloe in the Wood.
The guidebook you need is: Northumberland Bouldering Guide
Lake District
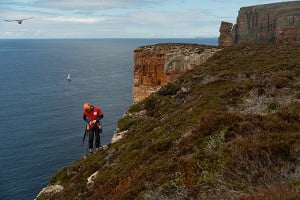
The beautiful mountain landscape of the Lake District is home to a variety of superb boulders. There is also a brilliant coastal venue called St. Bees.
The guidebook you need is: Rockfax Lakes Bouldering. There is also a superb free online guide to St. Bees here: Lakesbloc.
A really useful local website is: Lakebloc
Glasgow
Close to Glasgow is Dumbarton Rock. You can get info on the bouldering there on Dumby.info.
Glen Nevis
The valley of Glen Nevis is home to coutless lumps of perfect rock. There are many bouldering crags in this valley - one of which is: Sky Pilot High Crag.
The guidebook you need is: Bouldering in Scotland.
Torridon
Another venue in Scotland is the super sandstone of Torridon. Check out Torridon Celtic Jumble for some remote tranquil bouldering.
The guidebook you need is again: Bouldering in Scotland.
If you want to travel further afield, then here are some of the best bouldering destinations in the world!

Mammut
© Reinhard Fichtinger
 © Gareth H
World class destinations:
Fontainebleau, France. This is the ultimate bouldering venue anywhere. It is an absolute must visit. See the UKC Article to Fontainebleau.
Cresciano, Switzerland. A stunning alpine granite bouldering venue. See the UKC Article to Cresciano.
Hueco Tanks, Texas, USA. One of the original bouldering Meccas, Hueco tanks is a seemingly endless set of steep boulders. Check out Huecotanks.com for more info.
Bishop, California, USA. Just amazing. Perfect weather and perfect boulders in a perfect place. See the UKC Article to Bishop.
Castle Hill, New Zealand. An out of this world, limestone bouldering venue that has to be seen to be believed. See the UKC Article to New Zealand for a little more information, or - just watch the video below!
Rocklands, South Africa. If golden sandstone in a remote and beautiful location, with perfect weather is your thing - then here you go - see the photo above and the video below.
Albarracin, Spain. Another top class sandstone venue, with gorgeous rock and landscape. Check it out in the UKC Logbooks.
Magic Wood, Averstal, Switzerland. Another stunning alpine granite bouldering venue. UKC Logbooks: Magic Wood.
VIDEOS: Castle Hill and Rocklands
 © Adam Long
GEAR
Don't I need loads of fancy equipment?
Yes and no. You can go bouldering without any equipment, but you will soon feel the restrictions of climbing in normal footwear and without chalk. Depending on your chosen venue, you may also find the rocks to be above uneven ground, which can make falling-off painful and unnerving. This can be improved by using a bouldering pad.
Recommended Equipment (in order of usefulness!)
Thermos Flask and Lunch Box
These should be pretty self explanatory! You could well be outside for several hours, and you will get hungry and thirsty. A top tip is not to wolf down a whole large sandwich and then expect to climb well – you'll be too full. Eat little bits of food throughout the day to keep your energy levels topped up.
Warm jacket / hat / gloves
Bouldering is a highly intensive activity, which means you will get really warm when you are actually climbing, but you will need to rest between tries. Sitting around outside at the crag can be cold – be prepared and keep your body temperature up. Cold hands can lead to finger injuries - gloves, warm jackets and a thermos flask can help!
Rock Shoes
Although it is possible to climb easy problems in normal trainer style shoes, you will soon find that proper rock shoes are essential for bouldering. These are tight-fitting rubber-soled shoes that are designed specifically for rock climbing. They have no tread on the sole, instead the sole is made from high friction rubber that sticks to the rock. Climbers in the military call these rock shoes "Stickies" because of their sticky rubber. This is an old phrase and is very uncool.
There are lots of different types of rock shoes, stiff ones, soft ones, velcro ones etc. The ones you get will no doubt become 'stinky ones'! This is mainly due to the fact that rock shoes are usually worn without socks, so that the climber has more sensitivity and can feel the rock better through the shoe. In cold weather a thin pair of socks are sometimes worn. Many climbers think wearing socks is also 'uncool' – but I sometimes do it – so there!
It is beyond the scope of this article to go in to deep detail about the types of rock shoes available. However, if they are your first pair, don't get them cripplingly tight. Seasoned climbers wear their rock shoes very tight, buying them several sizes smaller than their normal shoe size, but they have built up a pain resistance over many years, something that you have not got. Get them snug, but not painful. If you keep climbing you may get a tighter pair in the future.
- Have a look at these UKC Reviews of Rock Shoes
Undoubtedly though the best way of buying rock shoes is at a specialist climbing shop with knowledgeable staff. They can help you get a pair that will fit you and work for you.
Try these guys:
Photo Gallery - Some current rock shoes:

© Evolv/Metolius |

© La Sportiva |

© Scarpa |

© Wild Country |

© Edelrid |

© Mammut |
 © Phil Ewels, Jan 2008
Older climbers may consider chalk to be cheating and certainly not essential, but for the modern boulderer it is an essential item of gear.
Magnesium carbonate powder is carried in a small bag and used to dry sweat from the hands of the climber. Use it sparingly, as too much chalk on a 'hold' reduces friction and makes the hold feel worse.
(NB. We call the grips on the rock 'holds' – hand holds and foot holds. There are different terms for different types of hold, but 'hold' will cover everything. Never call them grips, that's uncool.)
You can buy chalk at all climbing shops. It comes as 'loose' (in powder form), 'block' (compressed powder that is then broken up by the climber to make powder) and in 'chalk balls'. Chalk balls last longer than loose chalk, as the chalk is held in a porous bag, and cannot be spilt. However, hardcore climbers believe chalk balls to be inferior, as it is slightly more difficult to get chalk on your hands very quickly. Chalk balls are a very good idea for beginners, and I recommended them.
 © Lapis
It is best to use a piece of climbing cord (thin rope) or a nylon chalk bag belt to strap the chalk bag around your waist. This is better than clipping it to the back of your trousers with a carabiner, because A) you don't need to buy a carabiner and B) you can spin the chalk bag around to the front/side for ease of access in awkward climbing positions. Also having your chalk bag on a carabiner is uncool!
For a lot of boulder problems it is possible to leave your chalk bag on the ground, as you only need to 'chalk up' before setting off. Longer boulder problems may require you to 'chalk up' as you go – which is when you need to carry the bag with you.
There are larger 'bouldering buckets' available that are huge chalk bags, designed only for leaving on the ground. These are a good idea for keen boulderers, but not an essential purchase for the beginner.
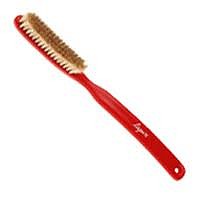
A toothbrush is used to brush excess chalk from the holds. Cleaning holds is good practice and keeps the problems clean and nice to climb. Only use a soft brush (like a toothbrush). Don't use a brush that will damage the rock (like a wire brush). Tooth-brushing holds is perfectly normal and is cool. Do it!
 © Metolius
You can get climbing specific brushes, such as the Metolius M16 Bouldering Brush and the Lapis brush.
Old rag / Piece of carpet / Beer Towel
This is used to clean and wipe your rock shoes. You've paid all that money for high friction rubber, so don't let it get covered in mud! Dirty shoes means your feet will slip and you will dirty up the problem for the next climber. Keep your feet clean. A rag can also be placed at the base of the problem to help with keeping your feet dry.
The next step up from a beer towel is a:
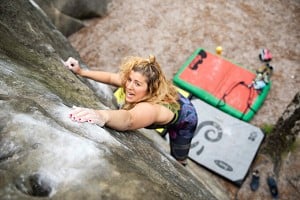
Bouldering pad
 © chris s, Oct 2006
The most expensive item in the boulderer's armoury is the bouldering pad (or bouldering mat or crash pad). This is a purpose designed foam pad that will cushion you if you fall.
There are loads of different types and sizes on the market. Get one that you like, can afford and will fit in the boot of your car! Discussing the exact differences of pads, is beyond the scope of this article but some basic advice is:
You may find yourself sleeping on it, you will definitely find yourself sitting on it while you have lunch, but more importantly, you will find yourself falling off on it! So get one with good quality stiff foam. Your local climbing shop will be able to advise you on which pads are currently available.
Have a look at these UKC Reviews of Bouldering mats:
Photo Gallery - Some Current Bouldering Pads:

© Alpkit |

© Wild Country |

© Metolius |
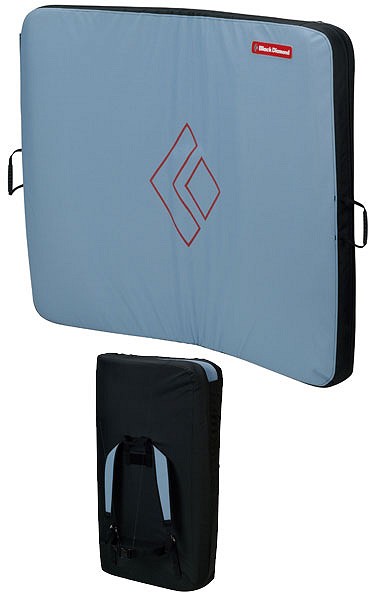
© Black Diamond |

© DMM |

© Moon Climbing |

© Podsacs |

© Beal |
 © A Huddart
Okay – you've got the gear, you're at the crag, what the hell do you do now?!
First of all, have a good look around and find a few of the easiest problems in the guidebook. The guidebook will give each problem a grade. This is a difficulty rating, and will be completely meaningless to you, but use the book to figure out the grading scale, and then find the easiest problems there are. Choose one that is not too high and has a flat landing.
If you want to read more about grades (I wouldn't bother if I were you!) then check this grade comparison table: Rockfax Grade Table
Put your stuff on the ground nearby, and have a good warm up by jogging around, star jumps, any exercises that will increase your pulse for a few minutes.
Then place your bouldering pad at the base of your chosen problem. Sit on it and change your shoes, being careful to keep your rock shoes clean. Chalk up your hands, make sure your climbing partner is stood under you, ready to guide you on the bouldering pad if you fall and..... CLIMB IT!
The best way to learn and improve your climbing is by going climbing. But to set you on the right track here are a few tips that may help you progress with your bouldering a little bit faster.
Five Top Tips
1. Get a 'spotter' and learn how to spot.
A spotter is a friend who stands below you and assists in making your fall safe. It is common to stand under the climber, with your arms outstretched, ready to break the fall of the climber. Good spotting requires a bit of commitment and practice. You are not catching the climber, but reducing their fall force, and guiding them to the bouldering pad, whilst making sure they don't hit their head, land on their back or fly off down the hillside.
Don't just stand there with your hands up like a lemon. Do really get under your partner and help make them feel safe.
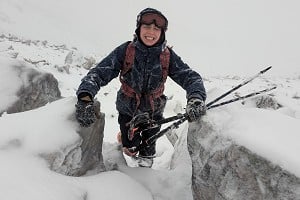
2. Practice falling and learn how to fall off.
This isn't as simple as it sounds. Falling and jumping off rocks is a skill. Practice. Learn where to position your spotter and bouldering mat. Think about what type of move you are most likely to fall off, and what position your body will be in when you fall. Boulder problems that include jamming your feet up high are likely to result in you being flipped upside down when you fall.
Take some practice jumps from a safe height and if you think you might fall badly on a certain problem, make sure your spotter is ready.
Consider having multiple bouldering pads and spotters for any dodgy problems! (Extra tip - high boulder problems are called 'Highballs')

© Paul Phillips - UKC and UKH, Jan 2009
 © chris fox, Oct 2009
Articles like this one are all well and good, and can give technique advice, but you will learn very quickly from another person – one on one. If there is another climber at the crag or climbing wall and they are much better than you then watch what they do and don't be afraid to ask them a few questions. They might be a mine of useful information. They might also be an idiot – so try and filter any info as best you can!
4. Warm up and warm down.
Raising your pulse and getting your body warm before climbing is essential, but what also is essential is doing some easy climbing to ease your body in to the rhythm. After a few easy problems (and if you are a complete beginner, even the easiest problems in the guidebook may not be easy enough – so make up your own on some small nearby rocks) your body will be able to climb harder and you will be less likely to injure yourself. Repeat this process at the end of your session to warm down.
NB. Warming up for climbing is in fact quite a complicated task, and describing it in detail is beyond the scope of this article.
5. Last thing: The devil is in the details.
The smallest things can make a difference when bouldering. Did you lace up your shoes tight enough? Did you get all your fingers on the hold? Did you stand with your foot facing left or right? Did you clean your shoes? Chalk up your hands? Did your foot catch on that tiny lip of rock? Did you look up when you hit the hold, or look down?
Pay attention to the minutiae – being in tune to the tiny differences is what makes a good climber. After years of climbing it all becomes natural. Well, kind of!
GOOD LUCK!
 © Pete Robins, Jul 2008
About the Author:
Jack Geldard is the Chief Editor of UKClimbing.com. He has been climbing and bouldering for seventeen years and has visited most of the world's top bouldering destinations. He has climbed many classic hard problems in the UK such as Brad Pit at Stanage in the Peak District (Font 7C+) and Jason's Roof (Font 8A) at Crookrise in his native Yorkshire.
His most recent bouldering trip was to Petrohrad in the Czech Republic, and he co-wrote this UKC destination article after his visit:
You can see him bouldering in the video below - climbing a Font 8A problem at Parisella's Cave in Llandudno, North Wales.
He takes his bouldering very seriously: "My favourite bouldering area in the world is Fontainebleau. I like the fact that the easy problems are just as good as the hard problems. I love the big trips out to Font - a team of climbers, having fun and eating pastries! Yum Yum!"
UKC Articles and Gear Reviews by Jack Geldard
- SKILLS: Building Fast Belays When Multipitch Sport Climbing 9 Nov, 2016
- SKILLS: Abseil Knots Explained 2 Oct, 2016
- FEATURE: Colm Shannon's Deserted DWS Heaven - Irish West Coast 7 Aug, 2016
- SKILLS: Acclimatising for the European Alps 5 Jun, 2016
- Terra Unfirma! Adventures on the Lleyn Peninsula 1 Jun, 2016
- VIDEO: Fiesta De Los Biceps 8 May, 2016
- REVIEW: Evolv Shaman 2016 18 Mar, 2016
- REVIEW: Doug Scott - Up and About 2 Feb, 2016
- ARTICLE: 12 Climbing Adventures That Won't Break The Bank 26 Jan, 2016
- DESTINATION GUIDE: 10 Routes to Climb in Chamonix in Winter 20 Jan, 2016


Comments