
Joe Heeley has established a bold Peak limestone route - tentatively graded E9 6c/7a - at Dovedale, Derbyshire, named Eyes Wide Shut (E8 6c). It fills a gap on the Watchtower Block and crosses into the classic E3 Adjudicator Wall (E3 5c). The line has come into existence within a year of Tom Randall's addition Final Round HXS 8a+/b (UKC News Report) on Ilam Rock in the same valley.

© Ace Film and Photography
Having grown-up a few villages away from Dovedale, Joe knew the area well and had always considered that there could be potential for new routes at the crag. Joe told UKC:
'Given my interest in the area, I had been scouring the guidebook and noticed that it mentioned the old bolted project which was waiting an ascent. Having abbed in a few times thinking the line would go into the top of Adjudicator Wall, I decided to put some attention into the top headwall which I actually believed wouldn't be possible to climb.'
Joe spent an entire session cleaning the route, which eventually allowed him to find a sequence through to the top and an extra foothold on the bottom crux. In total, Joe spent around ten sessions on the line, rope-soloing and trying to perfect it so that he could comfortably commit to the lead. Just three bolts covered 9 metres of climbing, with no fixed protection from the point where the line crosses into Adjudicator Wall onwards.
Joe told UKC:
'After I spoke to Mark Pretty, who bolted it about ten years ago, it was decided that if the route could be done as a clean trad line then the bolts should be removed and the crag cleaned up back to a true trad crag.'
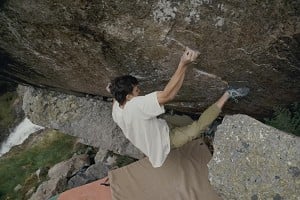
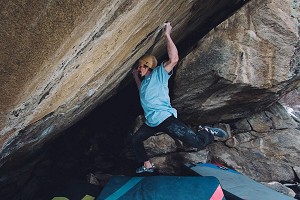
The line trends rightwards through a very thin and technical slab, with poor feet and small undercuts. Joe commented:
'This is by far the hardest move and although not too far off the ground, I'm glad I had a big spotter and I wouldn't like to fall any higher.'
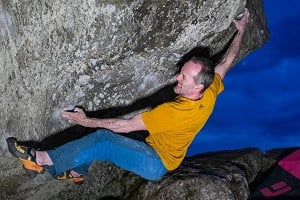
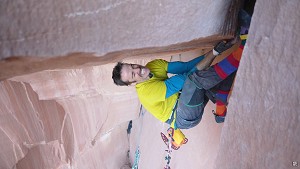
After a difficult reach for a small pocket, the route very quickly changes tempo, with powerful moves through a series of pockets to get through a bulge, with yet more relatively non-existent footholds:
'You manage to place your first piece of gear at around 7 or 8 metres, which protects through the worst of the bulge. Once through the bulge, you arrive at the jugs and a great rest in the centre of Adjudicator Wall. It is 8a+ to this point. From here you are able to pretty much fully recover and place a few good pieces of gear.'
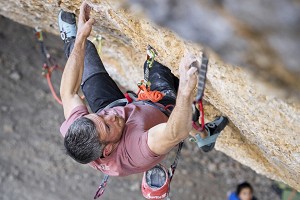
From this rest the route changes pace again, after placing a few small RPs, some relatively easy but teetery moves lead to a large sidepull and to the final gear placements on the route:
'After placing two small and incredibly poor RP's you take a deep breath and commit to the top boulder sequence. The top section works through a series of powerful undercuts and awful slopers on euro-style limestone, leading to a very tension-y set -up with really high feet and then a final large throw off a poor sidepull to some jugs. The throw is close to my full span. In all of my practices, once I worked out the top sequence I probably caught the final jug 50% of the time. On the day of the ascent I hit it every time in practice before I committed to the lead. From the jugs, the route is over with easy slab climbing to safety at the top. From the rest to the top is somewhere between french 7c-8a. When practising it felt closer to 7c, on lead definitely closer to 8a...!'
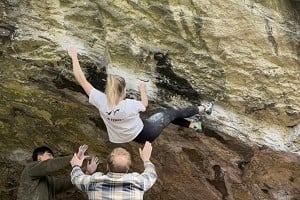
When going for the lead, Joe fell off the bottom crux multiple times and was fortunate to have climbing partner Kyle Rance spotting to take most of the sting out of the impact with the floor. Higher up on the route, every trad climber's worst nightmare became a reality:
'Having got through the crux and committed to the top section, I gently worked through the easy moves, arriving at the wet sidepull and placing the final gear, making sure that it was seated well. I set off through the top crux, and as I arrived at the difficult final set-up, I watched the one piece of gear that was really doing anything fall out and drop to the ledge below.
'I ignored it and committed to the final dyno. After catching it and pulling up, the emotion kicked in, very aware that if I had dropped the jug I was pretty certain I wouldn't have stopped til I hit the floor, especially if the now final piece of gear hadn't held - which in retrospect I don't think it would have, given its size and the questionable nature of the rock where it was.
After taking a minute to stop shaking and compose myself, I put a final sling around a small tree and set off to the top via much easier climbing.'
Typically a boulderer, this is Joe's first of the grade - his previous best being a second ascent of The Kraken E7 at Birchen Edge. He would welcome opinions on the grade from other climbers in a position to try the route and comment:
'I found grading it very difficult. I have tried other hard trad routes in the past but for me the risk very rarely seems worth it when repeating routes. When doing first ascents, I'm more inclined to put myself in a more risky position. I ended up having to grade the route based on speaking to others and based on what I know about other hard trad lines with confirmed grades. I would like to add that I encourage others to go and try the route and if people have different opinions on the grade, then I will gladly take any grade changes that are suggested. The grade seemed justified in my head but I'm sure there are others who are more qualified to comment. I'm fairly happy with the tech grade, however. I found the moves at the upper end of 6c but I don't think anything firmly pushes the grade into 7a. I hope that by grading it 6c/7a people will be able to get a good understanding for how hard the climbing is.'
More photos and a video of the ascent to follow.
Visit Joe's Facebook Athlete page.
Joe is sponsored by: Five Ten, Friction Labs, Monkey Fist and Pitch Climbing


Comments