


At 20,320 feet / 6194m Denali towers over the National Park that bears its name and takes the prize of North America's highest peak.
Often referred to as one of the hardest '7 Summits' to climb due to its extreme northern latitude, a fast team can nevertheless climb it in a round trip from the UK of under three weeks if they get the weather and logistics right. Though many guiding companies can offer a full guided service over 3-4 weeks up the mountain this article is aimed at those wishing to climb the classic route on their own terms without a guide and help to answer any queries on logistics that you might have.

© Jon Griffith / Alpine Exposures
Alaska is a truly amazing place. I've always thought that it resembles Chamonix on steroids- it has the same bomber granite but everything is way bigger. In a way an expedition to Alaska can seem a bit daunting at first. However you get to take advantage of the fact that this is a first world country and therefore that means big supermarkets, fast transport and minimal red tape. The beauty of Alaska is that it's efficient. You can book and organize pretty much every part of your trip before you even leave the UK meaning that you don't have to leave anything up to chance when you are out there.
Climbing The West Buttress
The easiest route up Denali is the West Buttress. First climbed in 1951 the route covers a whopping 16.5 miles of horizontal distance and 13,570ft of ascent from the air strip. Whilst the route itself does not involve any technical climbing it does involve some pretty serious glacial terrain and combined with the intense cold and wind higher up makes this a route not to be underestimated. Due to its extreme northerly latitude, which leads to thinner air, its height is equivalent to a 22,000ft (6900m) peak in the Himalayas.
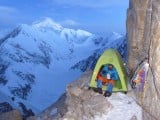
Snow shoes or skis are a must and I would definitely recommend skis if you can. Short approach skis in climbing boots really come into their own here. Don't scrimp either on your tent choice; you're going to be spending a lot of time in it. If there are two of you get a 3 man tent with a decent size porch. I have had a spare tent with me as well in the past for taking on routes which has been really useful to have as a food tent.

© Jon Griffith / Alpine Exposures
Sponsored Content
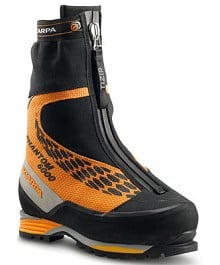
Phantom 6000
The new Phantom 6000 from Scarpa sets the benchmark for lightness and technical ability on the mid height peaks of the Greater Ranges and the cold environments of Alaska and Patagonia.
The new Mountain Lite removable liner boot with removable insulated footbed, insulated inner boot and the new insulated Multilayer uppers combine to give unsurpassed lightness, warmth and durability.
The new Pentax Speed sole unit is also another innovation of combining specialist materials with the proven Vibram Mulaz outsole to create an ultra light weight and comfortable yet tough and functional sole.
- More Info: Scarpa Website
A 40 minute jaw dropping flight takes you to the Kahiltna Glacier landing strip- also known as 'Base Camp.' There is a permanent ranger station here as well as Lisa who is the Base Camp manager. There are great tent sites here and it's worth spending the rest of the day setting up your tent and organizing your sleds ready for an early start the next morning. Most teams will also leave and 'emergency' cache of a few days food and fuel in case they get stuck at the airstrip in bad weather on the return. There is a designated area for this.
Aim to leave as early as possible the next day. It gets very hot on the lower glaciers in the sun especially when pulling a heavy sled and wearing a laden backpack. The first day covers a lot of horizontal but very little vertical gain- most guided teams will make it to the base of Ski Hill before stopping for the day but if you can keep going and make it to the 9,800 ft camp even better- there are plenty of areas along the way to stop and camp if you don't make it all the way to the 9,800ft camp so it's worth pushing on up anyway.
Some parties will decide to double carry up Ski Hill as it is pretty steep but if you can make it up to the 11,000ft camp with only single carries it will make the whole trip a lot faster. The goal really is to get yourself to 14,000ft camp as fast as possible so that you don't get stuck in bad weather on the lower mountain (getting stuck in bad weather up high means that you are at least acclimatizing rather than just wasting time).
From the 9,800ft camp to 11 camp is a nice and short day but one where you'll be starting to feel the lack of oxygen. Some groups will opt to stay in 11 camp for a few days but again if you are feeling strong there is no harm in continuing up the mountain.
We double carried from 11 to 14 camp as the hills are pretty steep for skis with all that weight behind (we had approach skis). Plus it's nice to shed some of the weight even if it means doing the trip twice by this point. The extra benefit of double carrying here also means that you sleep two nights at 11,000ft which will allow your body a little extra time to get used to the drop in oxygen.
Most parties will stash their snow shoes and skis at 11 camp but that is a personal preference. You wont need either one higher up but on rest days there is some skiing to do around 14 camp if you wish.
14 camp is on a huge flat glacial plateau so there are plenty of flat tent sites. The NPS also mans a ranger station here all the time but you are asked to not camp right next to it and leave them a bit of space. If you are lucky enough to find a vacated camp site then you don't have to worry about building walls but otherwise it's highly recommended for when that first storm comes in. Don't underestimate how long this takes though.
Once established at 14 camp you will probably want to have a day or two off to acclimatize and rest and socialize. There are two options really from here: you can either head on up to the highest camp (17,200 ft camp) or you can try and summit from 14 camp. The advantage of heading up higher is that you will have half the height gain to do on the summit day and technically you will be more acclimatized. The downside is that everyone up at 17 camp has a pretty miserable time and you feel pretty sapped of strength and energy for the big day. I think its fair to say that if you think you can go light and fast and summit from 14 camp then I'd highly recommend doing it that way. If however if you feel like you prefer to go a bit heavier and, therefore, slower then it would be better to head up to 17 camp.
If you choose to summit from 14 camp then there are plenty of little forays you can do to get acclimatized for the big day. You can head up to 17 camp and back down again via the normal route on the West Buttress or by the Rescue Gully which is just to the side and offers a slightly different climb up to the camp. Directly above 14 camp lies the Messner couloir and to the right the West Rib and Orient Express couloir- however if you end up climbing these you may as well continue on up to the summit. They do however make great little acclimatization ski runs if you have them with you.

© Jon Griffith / Alpine Exposures
17 Camp
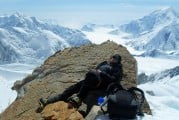
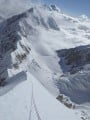
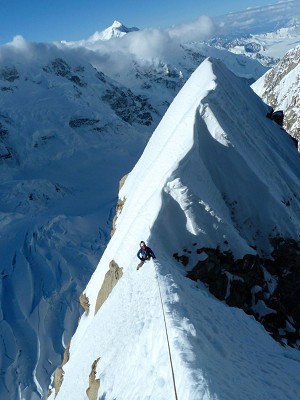
The climb from 14 to 17 camp is perhaps the most scenic and most technical part of the route. The technicalities are found on the 50 degree snow slope that brings you up to the crest of the West Buttress. This is actually the only time that you find yourself on the actual West Buttress itself. The 50 degree snow slope is equipped with fixed lines.
Once on the crest you have a long ridge climb up to 17 camp. Whilst not technically difficult it does involve some care but again it is also equipped with fixed pickets courtesy of the NPS.

© Jon Griffith / Alpine Exposures
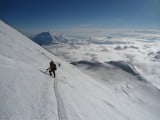
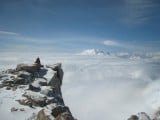
17 Camp to Summit
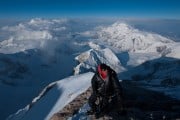
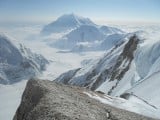
17 camp is not somewhere you want to hang about for too long. It's cold, exposed and high up. However the climb from 17 to the summit is still a pretty long undertaking so make sure you are prepared for it. From 17 camp you make a long traverse across an exposed ice slope (the 'autobahn'). Whilst technically not difficult this was the site of 4 deaths this year alone. Fatigue (especially on the descent), acclimatization, and a lack of crampon techniques mean that many people trip over here and pull their rope mates down the slope- like most of the upper reaches of Denali it is very windswept meaning that it's very hard snow to ice axe arrest on. From the top of the Autobahn you can actually see the summit but you still have a long way to go horizontally as well as vertically so don't get too carried away. After a while you will arrive on the Football field which takes you to the final summit slope- Pig Hill. A short traverse across a scenic snow arête brings you to the top of America's highest peak and a pretty immense view.

© Jon Griffith / Alpine Exposures
Descent
Depending on your tactics you can either head straight on to 14 camp if you came direct from there or return to 17 camp. You should be able to make it from 14 camp all the way to the Kahiltna airstrip in one day- with or without skis. The last slog up heartbreak hill is a long one so keep some energy reserve for that. Be wary of the lower glacier and how much it will have opened up whilst higher up on the mountain- a lot of parties travel at night to avoid heavy snow bridges. Once back at Base Camp though it's a simple matter of informing the rangers that you are back and getting psyched for the luxuries of beer and burgers that you've been craving for over the last three weeks!

© Jon Griffith / Alpine Exposures
Logistics

© Jon Griffith / Alpine Exposures
How to Get There
Flying to Anchorage from the UK is pretty easy but not cheap unfortunately (approx. £750). KLM have traditionally offered the cheapest flights but be ready to do 3 stop overs and arrive with a very bad case of jet lag- though KLM do stop over in Amsterdam which can alleviate the travel boredom. Trans-Atlantic flights are restricted to one piece of 23kg baggage now meaning that it's definitely worth looking into the excess baggage policies of the flights on offer- there is quite a big difference between the airlines that will make a huge difference to which fare is actually cheapest if you find yourself checking in with 5 bags between the two of you.
Anchorage
Arrival in Anchorage is always a bit of a shock- over 20 hours of travelling and an 8 hour time difference is never nice to get your head around. Anchorage is best passed through as quickly as possible but this is your first stop and you're going to need a car to get around. It's not essential but it's highly recommended. All the usual car rental suspects can be found at the airport. Pre booking your rental car online is definitely worth doing as you can save up to 40%.
Accommodation Advertise here
No Premier Listings found in this area
Accommodation in Anchorage is not cheap. Most climbers favour the Earth B&B which is run by a very friendly Lori and Rhonda who will not only make you feel right at home but bake a cake or cookies every day for you to snack on. Count on $125 for two people per night for a private room, and $45 per person for a shared hostel style affair. They also offer a shuttle service from the airport and to the local super market for those wanting to save money on renting a car. Otherwise there are plenty of hotel options to go for but as they come in at the same price or more expensive than a B&B there doesn't really seem to be much point. For the more price conscious there is a Hostel as well but reports are that the early season lodgers at the hostel are a bit of an odd bunch!

© Jon Griffith / Alpine Exposures
National Park Service
All parties entering the Central Alaska Range are required to register with the National Park Service. Those who wish to climb Denali and/or Foraker have to apply in advance for a permit to do so. You can do this online on the NPS site but you have to submit it 60 days before you intend to fly into the range. The permit costs $200 per climber. You will also be required to attend a brief presentation by one of the rangers explaining the dangers of Denali and the logistics involved. You have to book this in advance so it's worth calling ahead when you know your dates so you don't get stuck in Talkeetna for too long.
When to Go
Dates are April- July. April is incredibly cold and July can be very hot and dangerous when negotiating the lower reaches of the mountain. Heading out around the beginning to the middle of May is the best time I would say.
Food and Supplies
So now that you've rested up, it's time for the shop of your life. The good thing about the West Buttress route on Denali is that you can 'inherit' a lot of food from guided parties when they head out from the upper camps (it saves them having to carry it out themselves). However if you head out for an early season attempt (beginning of May) then don't bank too heavily on this. Come end of June though and you'd be amazed how much food people are giving away. If you are planning on spending three weeks on the mountain then you'd be pretty shocked how much weight and space that will turn into on your sled. We headed out on the 7th May from the air strip and took 15 days of food for us which was ample for a month long stay.
Costco is the bulk buy supermarket in Anchorage but you do have to pay a yearly membership and have a US address to sign up so most people don't bother. Otherwise there is a Carrs, Fred Meyers, and a Wall Mart as well. I think I'd recommend Fred Meyers for choice but Carrs for price value. You can always shop at Carrs first (make sure you pick up a loyalty card as everything becomes much cheaper) and get the rest at Fred Meyers or Wall Mart.
Food wise it's obviously down to personal preferences but think variation as much as you can. Food is one of the only things that keeps a bit of excitement in your day. Breakfast treats such as dehydrated hash browns and pancakes are a must. Smash is also a real good treat but make sure you go for the pre flavoured variety- just plain is pretty horrible. The 'Idahoan' brand is a real favourite. As for fruit and veg don't get canned goods- it's more expensive but go for dehydrated for obvious reasons. There is also a small shop in Talkeetna (where you fly out from) that sells frozen mince meat and blocks of cheese and butter so you can get these just before you get on the plane and keep them cold on the glacier.
There are two gear shops in Anchorage. REI and AMH. REI is by far the bigger shop, but it is more of a general outdoors' shop than just a climbing one so if you're looking for high end gear (whether it be hardware or software) AMH will probably be the shop for you. Thankfully they are both within a hundred meters of each other which is quite handy. REI is very useful for stocking up on any kind of energy gels and powders that you might need, as well as a good source for dehydrated meals.
Getting to Talkeetna
Talkeetna is your next destination on from Anchorage. This is a small town on the outskirts of the Denali National Park that hosts the airstrip. Transfer companies have been working out of Talkeetna for many years now and you can get a return transfer for around $130 per person.
Talkeetna
Talkeetna is fondly known amongst the locals as a drinking town with a climbing problem. I'm not sure about the latter but the former has definitely been confirmed by just about every climber that has ever entered the range. Accommodation ranges quite a lot here. If you fly with Talkeetna Air Taxi you can stay in their bunkhouse for free- its got hot water (shower) and a kitchen but it can be a bit noisy and dirty at times.
For eating and drinking it's pretty simple really. The nicest place to eat (and it's not too expensive either) is the Twister Creek Brewery, and yes it's also a micro brewery with an awesome selection. Otherwise the Roadhouse provides an excellent bakery and 'home cooked style' meals for pretty cheap- particularly recommended for breakfasts and checking emails on their comfy sofas to digest. You can also pay for a hot shower here as well as self service laundry services.
Flying into the Range
There are 4 companies that provide ski planes into the Denali National Park. They are the only company out there that can fly in cloudy weather due to being the only aircraft within Talkeetna equipped with IFR- it means they can fly above the cloud layer. The last thing you want to do is to waste time waiting to fly into the range and especially flying out of the range. TAT tend to be the first planes in and out of the range which means less sitting around for you. They are also the only planes that will fly you pretty much anywhere you want in the range if you want to do another climbing objective as well.
Be aware that you get a luggage limit of approx. 125lb per person and any extra lb of weight is charged at a dollar.
You can buy fuel (liquid not gas- $16 per gallon) from the air taxis as well as bamboo wands ($10 for 25). TAT provide you with free sled hire as well.
Instructor/Guides Advertise here
No Premier Listings found in this area
Outdoor Shops Advertise here
No Premier Listings found in this area
 © Jack Geldard, Mar 2011
About Jon Griffith
Jon Griffith has been based in Chamonix, France for seven years. He has climbed many major alpine routes in the Mont Blanc range and beyond, including trips to Alaska (where he made the fastest ascent to date of the huge Cassin Ridge) and to Patagonia. He works as a professional mountain photographer: www.alpineexposures.com.
"Alaska is a natural progression from Chamonix climbing. It's the same granite but just on a bigger scale. The type of climbing is very similar but there's a 'Greater Ranges' feel for it. I came back for a second time because I really wanted to do something bigger than I get to do in Europe, something on the South Face of Denali, but unfortunately the weather wasn't with us." Jon on Alaska.
UKC Articles and Gear Reviews by Jon Griffith
- Desmaison Gousseault: Grandes Jorasses 3 Feb, 2015
- Jon Griffith Photography Website 10 Dec, 2013
- Jon Griffith - My Top 20 Photos, Part 2 22 Nov, 2012
- Jon Griffith - My Top 20 Photos, Part 1 15 Nov, 2012
- Alaska: Winter Climbing Expedition Gear 6 Mar, 2012
- WHAT TO WEAR FOR: Alpine Winter Climbing 7 Mar, 2011
- Hagan Extreme Approach Skis 18 Feb, 2011
- PHD Hispar Down Jacket and Minimus Down Trousers 21 Dec, 2010
- La Sportiva Spantik Mountain Boots 25 Nov, 2010
- Patagonia Backcountry Guide Pants 8 Oct, 2010


Comments