

The Get Out On Rock DVD (pictured right) is a collaboration between Neil Gresham (top-level climber and Britain foremost coach) and Libby Peter (experienced Mountain Guide and climbing Instructor). It brings you the very latest in rock climbing skills and techniques and provides instruction and inspiration whether you're venturing onto rock for the first time or getting more adventurous with your climbing.
The DVD is available from: Libby Peter's Website
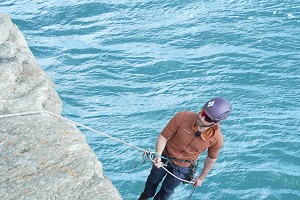
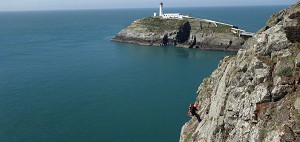
The UK has 11,000 miles of coastline. Take away the beaches, the promenades, the crumbly sections and the boring bits and that still leaves us with an extensive playground that provides some of our most memorable climbing adventures.
Climbing above the sea is both exhilarating and calming but of course there is also an extra degree of commitment and an added seriousness. Here we look at some of the techniques that will help your sea cliff climbing experiences go smoothly.
Big abseils
Part of the allure of sea-cliff climbs if that they are difficult to access except by abseil and at some venues you can't even get a glimpse of the climb until you've committed to abseil down.

© Mike Robertson
Most abseils at sea cliffs are rigged on stakes of varying length and quality hammered into the soil. You tie the rope directly onto the stake or use a sling on the stake and clip the rope to this, but either way make sure the attachment is secure. Clove hitches work well, especially if the cross of the hitch is placed at the back of the stake. This enables the clove hitch to tighten around the stake as shown here:
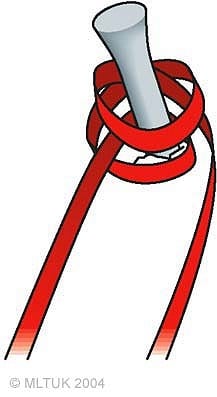
© MLTUK |
© MLTUK |
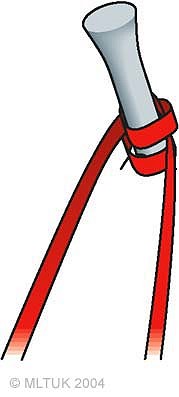
Don't automatically trust stakes, they may have been there for many years and are vulnerable to corrosion. If there's only one it's a good idea to back it up with your own gear if possible like this:
 © Mike Robertson
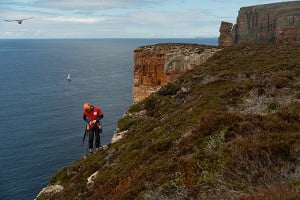
Think about what's below you and what the ropes will land on when you throw them down. To avoid dropping the end of your rope in the sea where it may tangle carry the ends down with you clipped to your harness or simply in your free hand as shown on the photo below left.

© Mike Robertson |

© Mike Robertson |

© Mike Robertson
Standing around at the base of the crag isn't always the safest place to be. In choosing where to belay make allowances for the tide and swell plus a bit extra for exceptionally big waves. The belayer will normally be attached to the rock but if the platform is spacious use a long tether so they can still move around to doge any rock-fall.
Some routes start from a very small ledge or hanging belay rather than a platform and these need particular care and organisation. A well organised stance is seen in the photo above right.
Useful skills
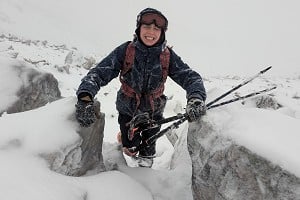
The most useful 'just in case' skill you could practise before venturing onto more committing routes is prusiking, this photo on the right shows the basic set-up.
It's a simple process of transferring your weight between two prusik loops attached to a fixed rope (normally your abseil rope). The top prusik is clipped direct to your harness central loop and the bottom prusik is extended with a sling to create a foot-loop to stand in. Then it's a case of stand in the foot-loop, move top prusik up, hang off this and slide the bottom prusik up and so and so. As you gain height add a back-up knot, like a clove hitch clipped to your harness, just in case the prusik fails.
If you can only remember one prusik knot then just use that one but the best combination is to use the ordinary prusik at the top attached to your harness as this is least likely to release accidentally, coupled with a French prusik for your foot-loop.
You probably know the French prusik already (if not you can see it in my other UKC Article on basic abseiling) and the ordinary prusik knot is shown here:
Photo Gallery - Prusik Knot:

|

|

|

|
And Finally
Don't forget to check the tides and remember that the condition of the rock can be hard to predict. Sea-cliffs can be frustratingly damp even when it hasn't rained. Keep your options open and all will be well.
UKC Articles and Gear Reviews by Libby Peter
- VIDEO: How to Protect Traverses 24 May, 2010
- VIDEO: Double ropes ? what, when, why, where and how! 5 May, 2010
- VIDEO: How to rig an abseil 1 Apr, 2010
- VIDEO: How to equalise anchors at a belay 12 Mar, 2010
- VIDEO: How To Rig a Top Rope 3 Mar, 2010


Comments