UKC

Wild Country Crack School


Overview

Categories
Trad
Training

Wild Country 'Crack School' is a series of six short videos designed to utilise the skills and knowledge of Wild Country climbers Tom Randall and Pete Whittaker to give an introduction to basics of crack climbing.

Over six episodes (shown each Tuesday on UKClimbing for the next six weeks) the guys cover all widths of crack: Fingers, Hands, Fists and Offwidths as well as looking at the skills of gear placement and taping up.

Designed for those who know next to nothing about crack climbing and who want to make their first steps, the videos are made to illustrate what the guys think are the most pertinent points for starting out on each size of crack. They look at how to use hands and feet in the crack as well as gear and overall tips on technique and the way to approach each type of crack.

Importantly, and often overlooked, is the fact that these 'crack' techniques not only allow you to climb routes defined as cracks but this new knowledge makes you a more rounded climber. So if faced with a short section of crack, or a corner or groove you have an armoury and variety of ways of placing your hands to keep you going. These techniques therefore are incredibly important if you are making a transition from indoors to out, when holds move from 'sticking out' to 'going in' and thrusting, poking, camming and jamming become more important than simply grabbing and pulling.

As Tom Randall says: "Crack climbing well is a fantastic feeling and learning how to climb cracks opens up a world of routes, and indeed some of the best routes in the world: from Brown and Whillans' classics in the UK (try doing Cenotaph Corner or the Sloth without being able to jam) through to Yosemite and Indian Creek in the USA. And remember, the best climbers always have a variety of techniques at their disposal and having a variety of techniques always makes you a better climber!"

In association with Wild Country

Part 6 - Taping

Welcome to the final episode of Crack School – Taping

The epitome of style - the 'gaffatape' glove in construction  © Wild Country Collection
The epitome of style - the 'gaffatape' glove in construction
© Wild Country Collection
This is an important and often overlooked subject and protecting your hands is pretty essential as as you get more serious about cracks – or simply want to turn up at work on a Monday not looking like you've been to 'Fight Club'.

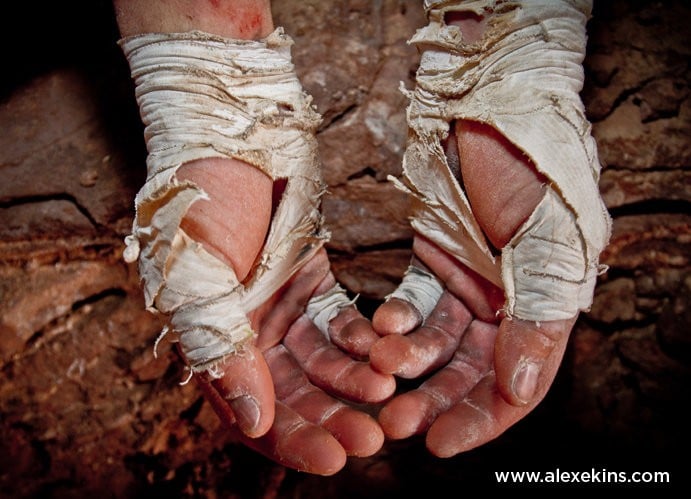
So taping up properly becomes an essential skill as you move through the grades – and becomes even more crucial if you're on a trip of more than a few days. It only takes a minute to destroy your skin but can take days and days to repair, harming your chances on other routes and possibly ruining your trip - so basically the golden rule is that prevention is better than cure.

There are many methods of taping but Tom Randall gives us the lowdown on his personal favourite – the tape glove. It's probably easier to watch the video to understand how to do this but a brief overview would be:

• Start on the back of the hand & lay strips (approx 15mm wide x 10cm long) knuckle to wrist with a small overlap and making sure the skin is tight as you lay them! Note: a double layer from the first finger may be useful especially on thin hands.

• Make a 'thumb loop' with a slightly longer tape (15mm x 15cm long) coming from the back of the hand round the thumb, to finish at the back again. Build this up in layers – probably 3 - starting at the same point but taking a slightly different route around to finish at a slightly different place.

Wild Country's webmaster Richie Patterson regrets not taping after climbing with the Wideboyz  © Wild Country Collection
Wild Country's webmaster Richie Patterson regrets not taping after climbing with the Wideboyz
© Wild Country Collection
• Then starting at the thumb, do a wrap around the thumb then come back round to finish at the back of the hand.

• So when we have the back and the thumb done we layer up on top of these to complete the glove and hold it all together. So we take the roll of tape open up a 30 to 35cm strip and start across the back of the hand, at the little finger, (pressing really firmly!!) to wrap it 2 to 3 times round the top of the hand just below the fingers. Wrap firmly but don't wrap too tightly or you'll cut off the blood and cause yourself problems.

• Once you are back at the little finger for the 2nd or 3rd time go diagonally down and across the hand (covering the ends of previous taping) and start to move into making a wrist loop.

• Wrap the wrist 2 or 3 times – again, importantly making sure it's not too tight for blood supply reasons – and finish at the outside of your wrist at the bony protrusion.

• Finally, from there, go diagonally up and between the thumb and the little finger finishing on the front of the hand - and if you sneakily wrap the tape end under the previous loops (sticky side to sticky side) your glove will last a lot longer!!

A final word from Wild Country:

Thanks for everyone who entered our competitions and if you still haven't receive your prize don't worry we are sending them out – but Wild Country moved offices at the start of May and now with the Bank Holidays things have piled up a bit – so please be patient!

And remember you can still enter our fantastic competition to win a day out for you and three friends here: UKC Competition

Loading Notifications...
Facebook Twitter Copy Email