


Onsight climbing is to many the ultimate style of rock climbing, whether it be sport, trad, boulder or DWS. There is something special about picking your way up a rock face, taking on what nature has to offer and figuring it all out on the go to best suit our own strengths and weaknesses. When it all goes well, there's nothing more rewarding.
What is onsighting?
The definition of 'onsight' is to climb a route with no prior knowledge. The absolute purist may argue that even knowing a route exists blows the true onsight, and only new-route onsight climbing is actually 'proper' onsight style. In a way, this is actually true, as just knowing a route exists (and even more so the grade) has a huge impact!
I remember on a trip to Greenland attempting to climb a new route on a 1000m wall and having sketched my way up a blank and bold arête with only one lone wire about 20 metres below, was faced with about four metres of desperate and irreversible moves to what looked like a horizontal break. I paused for ages; if the break was good, with gear, I'd be OK, at least able to lower off if the climbing above was hard (which it looked). If the break was bad with no gear, I'd be in a whole world of trouble, being 600m above a glacier in the middle of absolutely nowhere with no chance of rescue. And so I bailed, reversing the entire pitch to eventually find a different way.

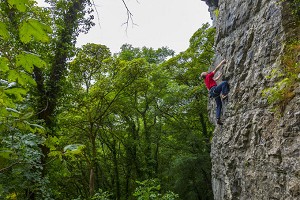
© Keith Sharples
Though onsight new-routing may be the ultimate, most people would rather stay well clear. Knowing the line and grade and a guidebook description is what most people consider an onsight style. In fact, the less we know the better, as in terms of the onsight experience, less is definitely more! Picking our way carefully up a wall and figuring it all out as we go, working out the moves, spotting the protection, and the continued risk assessment makes for a physically and mentally absorbing challenge unlike any other in climbing.
The key to onsighting at your limit is to gather as much information as possible before setting off! Obviously, this doesn't include 'beta' from other people. With information from others, the ascent becomes a 'flash' attempt. However, for 99% of climbing situations, the lead attempt will be onsight because there is no source of information from others, even if you wanted it! You arrive at the crag, and there is the route! This is not a discussion about the ethics of what is an onsight or a flash, it's about how best to tackle your attempt, which in most cases will be onsight. Arming yourself with as much information as you can see will give you a huge psychological advantage, and there are many other tips to really give you the best chance of success.
Choose your route carefully. If you are really pushing yourself, then the route has to inspire! It could be a historical route, a classic or a three-star. If you are really psyched you'll try your best, but more importantly, you'll bother to prepare and not just walk up to the cliff base, set off randomly, and immediately end up off-route, carrying a massive rack of hexes on what ends up being a hairline crack, or falling off the low-down crux because you weren't warmed up.
Do read the guidebook. The guide will usually provide the grade, the line, perhaps a brief description, and maybe even some specific details. Many will argue guides offer too much information but most of us will happily take this minimal bit of 'prior information' and enjoy tackling the right kind of challenge on the right day! If anything, the guide is available to all and as such the playing field is level.
Occasional mentions of 'crucial rock 2' or 'essential cam 3 in shallow pocket' are rare, and probably mentioned because the guidebook writer wanted to keep you alive. However, especially for long or wandering routes, a good read of the description, or even a copy of the page (or a photo of it if you are taking your phone) can save a huge amount of effort and stress. Commit to memory if you can; know what is coming up! View the whole line from the ground to ensure no surprises.

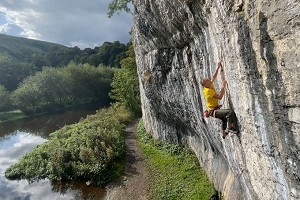
© Tony Stone
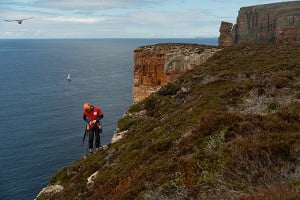
Soak up as much info as you can from the ground. And by ground, I also mean out to the side if possible (though not on an abseil rope!) Walk back a bit to get the best view, look down from the top. Try and get as much information as possible. This is 'route reading', but unlike what many regard as route reading, we aren't really trying to work out actual moves. If you can, then well done. It may be possible close to the ground, but if the crux is at 30 metres then spotting an exact hand and foot sequence is pretty unlikely, and even if you thought you could, you'd probably forget it anyway. What is more important is spotting that the crux is 30m above you! And spotting that it's a short crux above what looks like good gear, or a long section with no gear to an in-situ thread, or to a lie down ledge…this kind of information really helps.
Route reading is not about moves, it's about arming yourself psychologically with information that will help you attack the route in the best way; to go for it when you need to go, rest when there are rests, be careful when there may be danger, and run it out when you'll be safe! The 'on-ground' route reading is probably the most important part of preparation and could vary from a 10 second glance to a whole hour of wandering around. And this is the crunch, the preparation WILL help. If your chosen route is important to you, then put in the groundwork.
I recently climbed Always the Sun (E7 6b) in Pembroke, a route I'd fancied for years. A huge amount of information could be gained by looking across at the imposing arête. I could see there was apparently good gear at 2/3 height, with the crux surely above, and a clean fall all the way. Though I'd rather not take a massive whipper, that knowledge was golden, to know that I could go for it and be safe. My basic route reading was; 'assess gear at 2/3 height, if it's solid then go for it!'
Take the right gear. Trad gear has developed to incredible levels, but a full rack still weighs a ton! Some people live by the motto 'be prepared', others by 'light is right.' I'm more of a 'be prepared' kind of guy, though combine that with a bit of common sense and intelligence (I like to think). If you are about to try a single finger crack, don't bother with your massive cams. And if it's 10 metres long, 20 quickdraws are probably overkill.
Ditch unnecessary gear on route. This is more of an advanced technique, though actually isn't that advanced! There is no doubt that we will move better and climb harder without a heap of metal hanging from our harness, and if your careful route reading has shown that the last 10 metres of the route is the crux and protected only by an in-situ thread, then you may as well ditch most of your rack and hang it somewhere and give your second the pleasure of carrying it! This is of course slightly committing, and there have been a few times where I've wished I'd not ditched my rack of Dragonflies, but it nearly always works out. Especially when you know there is a big metal stake or thread to belay off at the top of the crag!
Considering Always The Sun again, the first 2/3 looked 'standard Pembroke', requiring a full rack of cams and wires. The potential 'good gear' at 2/3 looked to be fairly big sizes; so maybe worth taking doubles on the cam size two up to three, plus extra slings for potential threads. From 2/3 there are clearly just a few thin horizontal breaks. So, no point taking surplus big stuff, and no point carrying loads of quickdraws. I'm thinking a single rack of wires and maybe four or five quickdraws. This can of course be totally altered on route as you get closer and see a hidden cam 3 spot. But the key is to be thinking about this kind of stuff. Sure, if you normally climb E5 and are on an E2 then what does it matter if you are carrying 200 extra bits of gear, but if you normally climb E5 and you're going for an E7…

© Keith Sharples
Buy a set of microwires. They don't weigh anything, and you can hang them on a lightweight carabiner out of the way. Often, they go in where you least expect and where normal sizes don't fit. Despite their size, these little things are often a lot stronger than you'd imagine! If you have a few extra quid it's well worth investing in a few microcams too.
Single or double ropes. Usually, we use two ropes when trad climbing. But let's get one thing straight, we don't use two ropes so we can alternate clip. There is a misconception that if we use an 'alternate clip method' we won't fall so far if we skid off when trying to make a clip. Though slightly theoretically true, a good belayer is needed for this to actually work. Actually, we use two ropes, termed a 'double rope system', to avoid excess rope drag as the ropes slide through 'not in a straight line' protection points. A lot of Americans can't figure our double rope shenanigans because their routes are straight-up vertical cracks from bottom to top. If the protection will be in a straight line, then maybe a single rope is better.
In general, a single rope is easier to use and lighter to carry, and so if it makes sense, go single. Switching between the two methods has been made so much easier with the advent of triple rated ropes. When trad climbing I'll often take an 8.5mm half rope and a 9.2mm triple rope, knowing I'm covered for any option.
Pre-placed protection. When we're talking trad climbing, pre-placed kit is a bit of a no-no, in any style. However, there is a difference between pre-placed and 'in-situ' gear, with 'in-situ' being the stuff that can't come out* like pegs or old aid bolts. In-situ kit is part of the route. Take care with this, in many cases the first ascensionist will have placed any pegs, which may now have corroded badly or disintegrated completely. Just because the guide mentions a peg does not mean it's there, or can even support the weight of your quickdraw! We also often come across in-situ threads which are either impossible or very difficult to place on lead and so were potentially put there by the first ascensionist and have become fair game. If you can, get the low-down on these. I don't think that blows your onsight.
Hearing 'the threads have just been replaced' on a given route will give a huge boost of confidence, and at least make the route the same as when it was first climbed as opposed to when the bits of string became all frayed and faded. Old-looking threads should be pulled through (rotated) a bit to see what condition they are in all the way around. (Beware the 'white' thread, that actually turns out to be bright pink but the exposed part has been totally faded through UV).
*when I say can't come out, I mean 'shouldn't' come out!
Don't get any Beta from others. Kind of obvious. Though you could define the guidebook as 'others'. But avoid any chatter about moves or gear and stop your buddy before they launch into the crux move description. Sometimes a bit of information is useful, and a 'flash' ascent will be fine, and there are more than a few routes much harder to onsight than flash (hidden pockets, weird sequences etc), but as mentioned earlier, for most of our climbing situations beta is unavailable even if we wanted it.
Personally, I usually find information on how to do specific moves doesn't help me at all, and there have been tons of times where I ended up blowing the flash, knowing an onsight would have been more likely! I'm far better at making my own decisions, with the biggest influence being my ability to find the holds, which brings us to….
Do wait till the route is chalked. It could be argued that chalked holds are the biggest source of information, and make the biggest difference to how hard a route will ultimately feel. A chalkless route will probably feel considerably harder to onsight than one recently climbed with all the holds covered in white patches! However, despite the blatant differences, and all-round acceptance that a chalkless route is harder to onsight, you'll rarely get any extra brownie points for waiting until the rain has washed all the chalk away. Hence, you may as well follow the chalk, but beware, someone else's holds may not be the best for you.
Keep an open mind; this is key. For all you know with your 160cm height, the only person up this route before you was 190cm! I see chalk as an indicator that the route is dry, and that some of the holds will perhaps be more obvious. But I try very hard to remain in 'onsight mode' where I'm NOT following that chalk. Though the chalk can be a help, it can also be a hindrance, and the key is to trust your onsight skills.
Warm up. Typically we arrive at the crag, choose our route and just go for it, warming up on the route as best we can. Sometimes it works, especially on trad as often the route is not at our physical max, and perhaps has an easier start and plenty of time to warm up as we bumble around placing kit. But if your careful route reading shows a tough crux low down, then be prepared.
It's been scientifically proven that a warm up helps, and don't assume your long uphill walk-in has got your fingers ready to pull on a bunch of tiny crimps. Traverse about for a few minutes or hang on some holds, the difference will be noticeable. Don't let your partner go first on their route and follow them as a warm-up though, because they'll take ages and you'll be colder than ever!


Comments
Well that's my onsight of always the sun blown ;)
Good article Steve!
Good stuff Steve.
Top tip: I always make sure to check logbook comments and watch some beta vids on YouTube before going for my onsights. 👍
Wise words from a master.
So what else blows an onsight?
A few specifics I was wondering about…
1) If your belayer shouts things at you (“swap feet”, “put some gear in”, “try the red cam”), does that blow the onsight?
2) You arrive at the route and someone is already on it, you watch them intently or you try not to look but catch glimpses, does that blow the onsight?
3) You head out without a partner to solo some stuff below your limit. You jump on a route and after climbing a significant portion, you decide to back off as the move above is too committing without a rope. You downclimb, completely in control, then come back another day with a belayer and lead the route. Did you blow the onsight?
4) One final scenario. You climb a route a short way, you place some gear and arrive at a very physical move. You downclimb back to the ground, completely in control, take a bit of a rest (never untying) then get back on and make the clean send. Did you blow your onsight?
I would love to get an opinion from the collective on the above. Be that a resounding one-way conclusion or just a discussion around my points.
I really enjoyed the article, thanks Steve!
1. Probably not, unless they've climbed it before or know specific details.
2. No if you catch a glimpse, yes if you watch them climb the route (although this makes more of a difference in shirt cruxy routes than longer wandery routes like right wall).
3,4. No, if you don't fall off or weight the rope, it's all good.