Restricted Access
Fly Wall and Woodcroft Quarry: the current owners have not given permission to climb on this section of crag. If you do climb on this part of the crag, please be careful not to damage any fences in the area.
GO Wall: topping out now allowed year round for all routes from Feline/Jackal leftwards. King Kong ab. bolts removed. No topping out any time for right hand end – ab. stations in place where required. A large rockfall has recently (Jan 2013) been reported at the righthand side of the Pedestal on Go Wall - care should be taken with any remaining loose rock that may still be in place in this area.
North Wall: following a change of ownership of the house above this section of crag, the previous arrangement to exit through it’s garden is not longer possible. Please do not top out on any North Wall routes - only abseil descent from below the top of the crag is allowed. For those who don't wan't to climb above the Great Ledge, an abseil descent can be made from one of the two bolted abseil stations above The Tap or Joe’s Route. Two further abseil stations have been established just below the top of North Wall (using rope slings and rings around trees) allowing the last pitch of the more popular routes to be climbed and an abseil descent to the Great Ledge be made.
All rock north of the North Buttress and south of Fly Wall is privately owned and all climbing is prohibited.
Seasonal Restrictions
Dates: 1 March to 15 June
Reason: Nesting Birds
Ravens nesting on Wurlitzer. The restriction applies to all routes on Fly Wall between Flypast and Gendarmerie.
Peregrins nesting on North Wall. Avoid top pithes of left hand route (from the great ledge)
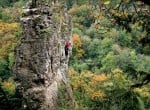
Rockfax Description
A long and sustained traverse of the North Wall - very exposed at times and one of the most popular of its genre anywhere. The whole party must be competent at the grade and have a good grasp of ropework. Start as for Left-hand Route.
1) 4b, 25m. Pitch 1 Left-hand Route.
2) 4b, 35m. From the iron spike, move up and right to a bulge guarding the traverse line (peg). Keeping low, move around to another peg, then follow a line of footholds right with in situ gear high and low (mainly pegs). When the footholds finish at a gap, reach right - peg - then move slightly up and continue the traverse until finally picking a way through a vegetated patch to gain a tree belay shared with Right-hand Route/Nibelheim.
3) 4c, 12m. Continue the traverse below a strip roof, first by stepping down from the belay and passing a peg via a tricky sequence, then moving up and rightwards over easier ground to a peg belay in a niche.
4) 5a, 40m. Good ropework required to reduce drag and protect the second. Move up and right to an in situ thread around an old nut (maillon sometimes in place). Consider how to protect the second, and then downclimb on good holds for 6m until a move right gains a ledge (pegs). Move down 1m and traverse right with difficulty, (can be eased by moving down again) and continue on the same line until 3 holes are encountered. Move boldly right over small ledges to meet Joe's Route at its short wall and peg. Finish up this past a ledge (peg) and follow the short corners above to a belay on abseil rings. © Rockfax
UKC Logbook Description
Absorbing and Rewarding climb. 4b,4b,4c,5a.
Start up P1 of Left Hand Route. From the belay traverse right all of the way across the North Wall in 2 pitches. From the thread on the Angel's Eye, climb down 20ft then around the arete, finish up Joe's Route.
J Willson, S Smith, N Smith 15/Mar/1975.
Ticklists
The 100 Best UK VS routes? , Orange Spot Lower Wye , Wye's it a trad classic (up to HVS)? , CC Wye Valley and Forest of Dean trad stars, blue list (VS and HVS) , Traverses of trady radness , Extreme Girdle , Bristol Area Easy Trad Ticklist , HS-HVS adventures
Feedback
| User | Date | Notes | ||
|---|---|---|---|---|
| PaulJepson | 20 Aug, 2023 |
Show βeta
βeta: Left an offset and quickdraw to backrope to the belay of p2 after an accident. If anyone retrieves these we would be grateful for their return! The description of p2 in the guidebook is not very helpful. If you 'climb up to the sapling', you end up going up Notung (I think?) for a couple of moves before being deposited on the last part of the E1 traverse. | βeta? | |
|
Show beta
βeta: Left an offset and quickdraw to backrope to the belay of p2 after an accident. If anyone retrieves these we would be grateful for their return! The description of p2 in the guidebook is not very helpful. If you 'climb up to the sapling', you end up going up Notung (I think?) for a couple of moves before being deposited on the last part of the E1 traverse. |
||||
| Mattress | 23 Jul, 2021 |
Show βeta
βeta: No sign of the bees! | βeta? | |
|
Show beta
βeta: No sign of the bees! |
||||
| martinfindlay | 19 Jul, 2021 |
Show βeta
βeta: Great route, but the traverse on pitch 4 seems much harder than VS (since when did two-finger crimps followed by a dyno feature on a VS?!). Not sure if any locals know whether a hold has come off recently? The leader downclimbed a bit and traversed, but this didn't sound much better. | βeta? | |
|
Show beta
βeta: Great route, but the traverse on pitch 4 seems much harder than VS (since when did two-finger crimps followed by a dyno feature on a VS?!). Not sure if any locals know whether a hold has come off recently? The leader downclimbed a bit and traversed, but this didn't sound much better. |
||||
| miriamclaire | 28 Sep, 2020 |
Show βeta
βeta: I led P1,2&3; Dave led P4. Didn't read the comments below and got surprised by the bees. Finished up Angel's Eye. | βeta? | |
|
Show beta
βeta: I led P1,2&3; Dave led P4. Didn't read the comments below and got surprised by the bees. Finished up Angel's Eye. |
||||
| simoncov | 2 Aug, 2020 |
Show βeta
βeta: Beesnest immediately after the P4 crux ("at three holes") but they were happily minding their own business today (28/7/19). | βeta? | |
|
Show beta
βeta: Beesnest immediately after the P4 crux ("at three holes") but they were happily minding their own business today (28/7/19). |
||||
| JGriffiths47 | 14 Jul, 2019 |
Show βeta
βeta: Large amount of bees /wasps near the crux on p4 so must be a nest nearby. Didn't get stung but is quite off-putting | βeta? | |
|
Show beta
βeta: Large amount of bees /wasps near the crux on p4 so must be a nest nearby. Didn't get stung but is quite off-putting |
||||
| Jonno30 | 12 Jul, 2019 |
Show βeta
βeta: Great route and worthy of 3 stars. | βeta? | |
|
Show beta
βeta: Great route and worthy of 3 stars. |
||||
| badgerjockey | 7 Jul, 2019 |
Show βeta
βeta: Tat and maillon in place at time of our visit. There is a bolt above this though. Useful for backroping the downclimb for the second. | βeta? | |
|
Show beta
βeta: Tat and maillon in place at time of our visit. There is a bolt above this though. Useful for backroping the downclimb for the second. |
||||
Logged Ascents
Guidebooks for Wintour's Leap
Not all climbs appear in all guidebooks


Please Login to view more details on the logged ascents
Whitt
Grade: VS 4c ***
(Symonds Yat)