


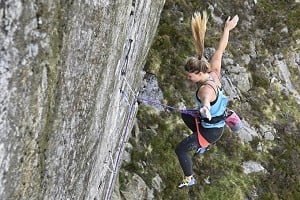
There is a wonderful feeling of freedom when you can run it out above gear, climbing as hard as you can, totally consumed by the moves. If you don't fear falling, you can enjoy your position, shake out and relax on good holds, clip gear without fumbling and revel in a sense of achievement when you reach the belay. I think we can all agree that we would like to lead near or at our physical limit on well protected trad routes and sport routes.
 © Pod
© Pod
Some of us can do that, but many of us can't. Most of us operate well within our comfort zone, holding lots in reserve. We may be able to push it right next to protection and can climb above and beyond protection if the moves are easy for us, but once we have to push the envelope we retreat like a gibbering wreck. Holding something in reserve is an essential tactic of course, especially if the protection isn't good and a fall would have nasty consequences, but all too often climbers fail on a well-protected route because they lack the necessary mental strength to climb above protection. Many of us down-climb, grab quickdraws or sit on gear when faced with challenging moves or run-outs.
Often it's not because we can't do the moves but because we are frightened of falling. This doesn't apply to all of us, but it is common.
If you are okay climbing above your gear near your physical limit, this article and video isn't for you.
If you have this fear of falling, a fear of what will happen if your fingers uncurl and you drop into space, this article, video and discussion may help you. Perhaps you are always looking at your harness to check that your knot is tied or that your waistbelt buckle is doubled back. You may not trust your belayer to hold you, or you may have an irrational fear that your rope will snap. All these things can be overcome.
We can train our fingers, power, flexibility and stamina. We can learn how to place protection, but can you train your head? Can you become a bolder climber?
Some say that you either have it or you don't. Others say just get out and climb, one step at a time and you will gain confidence and feel more comfortable.
Getting out there and climbing regularly is very important for confidence but there is also a technique which you can use to get bolder. This Clip-Drop Technique can be practised down your local climbing wall. You may not end up like Dave MacLeod, John Arran, Lucy Creamer or Dave Birkett but you will certainly be able to enjoy your climbing more if you can become comfortable with the thought of falling off above your protection.
The Mind by Adrian Berry
Irrational Fear
The number one irrational fear is simply fear of falling off. Our primitive instinct that falling is bad is powerful. The rational knowledge that you are relatively safe is no match for millions of years of evolved instinct. One thing is key, if you want to reach your potential in sport climbing, falling off needs to be accepted as an inherent part of the sport. Falling is the most stressful because you can spend a lifetime climbing and never take a leader fall. This unfamiliarity makes the fear of falling grow and the longer you climb without falling, the harder it will be to overcome that fear.
Here is five point plan to get rid of the irrational fear of falling.
1. Avoid grabbing quickdraws.
2. Avoid gripping the rope when lowering off.
3. Get on a route and do the Clip-Drop Technique.
4. Take falls.
5. Incorporate falls into your climbing.
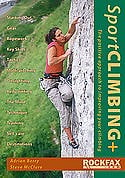
Summarised from Sport Climbing+ by Adrian Berry and Steve McClure.
Read more about the Rockfax book SportCLIMBING+
In this article and accompanying video we are concerned with point 3 in Adrian's five point plan : Clip-Drop Technique
What is Clip Drop Technique?
You climb a route at a climbing wall and when you reach a safe height you clip your rope into a bolt, then simply let go and fall. You then climb to the next bolt, clip it and fall, until you reach the anchors at the top of the wall.
There are variations on this theme but that is essentially it.
Kendal Wall (The Lakeland Climbing Centre) in conjunction with UKClimbing.com and Steep Media have put together the video below that demonstrates Clip-Drop Technique.
Watch the video, then it is essential that you read the notes below if you want to learn more.
The Fear of Falling - Clip-Drop Technique
correction: Kendal Wall is closed on Mondays during the summer - from May to August.
SUMMER OPENING - May to Aug
Tues, Weds, Thurs, Fri 10am to 10pm
Sat, Sun & Bank Holidays 10am to 5pm
REST OF THE YEAR - September to April
Mon 4pm to 10 pm
Tues, Weds, Thurs, Fri 10am to 10pm
Sat,Sun & Bank Holidays 10am to 7pm
Tips For Clip-Drop Technique by Kate Phillips of Kendal Wall (Lakeland Climbing Centre)

The Clip-Drop Technique is something you could incorporate in each wall session. The aim is to become comfortable with falling by small incremental stages and to slowly condition yourself to enjoy the feeling of swooping down. Pushing yourself to take a big fall - 'you just need to jump off above a bolt a few times and you'll be fine with it' - for many people simply reinforces the feeling that falling off is SCARY because you experience a great deal of fear before jumping off (well I do!) and all you have achieved is to confirm that you have the will power to overcome your fear. How does that help you not think about falling when pushing a hard lead?
You need to push yourself slightly outside your comfort zone and experience some low level stress repeatedly until you become comfortable with the practice, then move on to the next level. This then extends your comfort zone. The fear of falling on wall routes and well-protected sport routes is an irrational fear. Eliminate this irrational fear and your head is clearer for you to enjoy your climbing and perform better. Below are some tips to help you with the Clip-Drop Technique.
Your Partner
You need a partner that you trust. It is essential that they have good belay skills. They need to be able to give you a dynamic belay but not drop you miles. You both have to communicate well. It helps if you are sympathetic to each others climbing weaknesses and are supportive of each other.
"During fall training sessions I like to stress the link between climber and belayer.
Both should feel linked by the rope and the climber should feel encouraged and followed by the belayer. This is of course the essence of the dynamic belay - the belayer literally follows the falling climber through the fall and catches them.
The belayer is not simply a passive, mobile Gri-gri, but an active and essential part of overcoming the fear of falling."
Alan Carne, certified guide (Brevet d'Etat Escalade)
Your Gear
If you are climbing and thinking that the harness you are wearing has seen better days, and thoughts like "When did I buy it?" or "Is it too worn?" come into your head you can't relax and get on with the task at hand. Your harness and rope should be in good condition. You should have complete confidence in all your gear (and that on the wall – ask the staff about their maintenance schedule if necessary to reassure yourself).
 © Mark Glaister
Your Belay Device
Your belay device should be one that your belayer is used to using and be appropriate to the diameter of your rope. But if you are using a 9.1 mm single rope with an ATC there will be a lot of slippage and the leader will get the ultimate dynamic belay – possibly resulting in an unwanted ground fall!. A Gri-gri (good for 10 - 11m ropes) or Eddy (good for 9- 11mm) is good for Clip-Drop, if you know how to use them.
The Dynamic Belay For Climbing Walls and Sport Routes
When you fall off a sport or wall route, no one wants to come to an abrupt stop that will shock your internal organs, jolt your back and slam your feet into the wall.
To achieve the above, climb with a well used, furry old rope that lacks any stretch and that has just been fallen on, use an auto-locking belay device, be quite a bit lighter than your belayer and make sure that your belayer stands tight against the wall, stays rooted to the spot or uses a ground anchor and better still jumps backwards in the event of a fall.
This will ensure that when you fall you come to an abrupt stop and slam into the wall. The result of such a static fall can be at the least discomfort or worse injury.
What we want from a belayer on sport and wall routes is a soft catch, or cushioned catch, using a dynamic belay. You fly through the air and gradually come to a stop, like falling on a bungie cord without the rebound. The falling leader decelerates rather than coming to an abrupt stop.
John Arran has come up with a good analogy,
"If you catch a cricket ball with your hands dead still it will hurt, as the ball will stop dead as all the energy has got to go somewhere fast. If you let your hands give and move with the ball a little so that the ball comes to a stop more slowly, the energy will be absorbed more slowly and there won't be any painful impact force."
Catching an egg without it breaking is another good analogy, says Adrian Berry.
 © Ray Eckermann
How to give a dynamic belay
A dynamic belay is dynamic because the belayer moves. How it is given depends entirely on the weight difference between the belayer and the falling climber.
A lighter belayer will naturally give a dynamic belay because they are automatically pulled into the air. (See page 62 for a note on using ground belays where the weight difference between leader and belayer is significant).
A heavier belayer needs to be more alert and should aim to adopt a position a couple of meters away from the base of the route -1. To dynamically hold a fall, the belayer must anticipate the split-second before the rope goes tight and at that moment, lock off the belay device and move quickly to the base of the route - 2. As the belayer moves, the rope will be tight, but the full force will have more time to be dissipated, resulting in a soft fall with less risk of slamming - 3.
A dynamic belay will result in the climber falling further than they would otherwise. The important thing is that the fall is arrested slowly, not that the distance of the fall is minimised.
Learn more at this UKC article Dynamic Belaying by by Adrian Berry
Summarised from Sport Climbing+ by Adrian Berry and Steve McClure.
- After a very large fall or repeated falls you need to rest the rope. It needs to recover. Either swop ends or rest your rope for 20 minutes.
- A dynamic belay is possible with any type of belay device.
- Rope slippage through the belay device will increase the dynamic effect of a dynamic belay.
- Rope slippage through the belay device increases if you use a thin rope.
- Make sure you use the correct belay device for the diameter of rope that you are using.
Further Reading on the Web
From The BMC

The Route
Initially choose a route that you have done before and that is vertical or overhanging. Make sure that it has no features like corners or arêtes or large volumes that you could slam into and hurt yourself should your belayer over or under do the 'dynamic' element of the belay. It is also better if you choose a route that doesn't have a preponderance of large protruding holds that you could catch your feet on. Choose the tallest part of your local climbing wall, and don't start doing Clip Drop until you are three or four bolts up. You don't want to be dropping and hitting someone on the head with your feet as you fall – or worse hitting the floor!
If you progress to taking falls above bolts it is better if the route is slightly overhanging to very steep.
When
It is best to do Clip Drop at a quiet time at your wall, or on a route with no one on neighbouring routes.
When you are ready
There is another aspect to 'when' and that is when you are ready. To some, doing Clip Drop can be quite daunting, that is normal and you must expect some trepidation or worry before you do it. But at the same time being well rested and in a positive frame of mind about doing Clip Drop is more likely to lead to a positive learning experience.
Every Wall Session?
It can be a good idea to incorporate Clip Drop into every one of your wall sessions. After warming up your body, see Clip Drop as warming up your head ready to take on leading.
OK Let's Start
The pre-flight check might seem like overkill to some. Its purpose is to assure the leader that all is good with the system before they leave the ground. Do your 'risk assessing' on the ground and not half way up the route. Then when climbing up the route the leader has no need to check their knot or worry that the belayer's screwgate is tightened up. If all these boxes are ticked the leader can concentrate on climbing the route and doing the Clip Drop.
Some may find it useful to verbalise the initial pre-flight check to add extra reinforcement. Note that this practice is helpful for your psych before any climb!
Before Setting Off
- Pre-Flight Check
- Make sure your rope is in good condition and flake it out loosely in a good position relative to the belayer (consider how much movement they will undertake whilst dynamically belaying).
- The leader ties in, the belayer threads the rope into the belay device. Now check each other.
- the belayer checks the leader's harness, buckle threaded back, knot correctly tied.
- the leader checks the belayer's harness, buckle threaded back and that they have threaded belay device correctly and that the screwgate is locked closed. - Look at quickdraws on wall and check that they all hang straight and look good (did you check with staff about their maintenance? – Do it if you register any doubt in your mind when you think about falling on them)
- Verbally agree on a low bolt where the belayer will take the rope tight and the leader will sit on the rope.
- Start Climbing
- The leader climbs clipping the first two or three quickdraws as normal
- On arriving at the agreed bolt, the leader clips the quickdraw, the belayer holds the rope tight and the leader sits on rope. This gives confidence that the system is working. Leader then says that they will start Clip Drop at the next clip.
- Leader climbs to next quickdraw, clips at shoulder height then drops. Belayer gives leader snug belay.
- Belayer asks leader if that was enough rope out or too much and if the fall was comfortable. Leader responds and belayer acts on leaders requests. Do not be tempted to drop the leader further than they are comfortable when in early stages.
- Leader continues to Clip Drop to the anchors at the top of the route. Then descends.
- Rest your rope before doing another Clip Drop session, or use the other end.

What to do when falling.
We tend to practice falling, or anything stressful, to get it over with. This will not only delay our learning of the skill but will also cause us to learn it incorrectly. Our body will learn to tense up. Learning how to fall means we learn to remain relaxed while falling. Here is a learning-based approach to practicing falling.
1. Small increments: Begin on toprope
First, simply hang on the rope and swing around.
Second, take toprope falls
Third, take lead falls
2. Gauge for learning: Comfort
First, stay at the same increment until you are comfortable
Second, you know you are comfortable when...
B: You're breathing throughout the fall
E: You're looking down during the fall
R: You're relaxed throughout the fall
P: You're arms are out; not grabbing the rope
3. Belaying: Giving a cushioned catch
First, do not progress to lead falls until your belayer learns how to give you a cushioned catch during toprope falls.
Second, a cushioned catch is: the belayer gives in to the pull when you fall. Your belayer should end up about five feet off the ground when your fall is ended. If he isn't, then he will need to push off as the rope becomes taut. This will be a learning process for your belayer.
Click here to read Learning How to Learn.... to Fall by Arno Ilgner at UKClimbing.com.
The Progression
If you are very nervous about doing Clip-Drop Technique a good warm up is to climb a route that is well within your ability clipping the bolts as you would normally do. Make sure you go through the belay check process and also sit on a bolt low down to get confidence that all is well with the system. When you get to the anchors clip in and instantly let go with both hands.
Then you can progress through the following stages, only moving to the next stage when you are comfortable with the previous stage. You may feel some stress when moving through the stages but that is quite normal. Some maybe tempted on their first Clip Drop to attempt to progress from clipping at shoulder height and dropping to climbing above the clipped bolt and taking proper leader falls. You run the risk of progressing too quickly by doing this.
The objective is to become comfortable and relaxed with the falling at each stage. If you push yourself too hard, maybe because of peer pressure or through machismo, and start taking proper lead falls but feel a lot of stress and fear whilst doing so, you aren't progressing.
The technique of Clip Drop can also be useful as an aid to getting yourself onto harder leads if you struggle to commit to trying hard routes (fear of failure). Choose a route beyond the grade you think you can onsight and set off to clip drop it! Afterwards you may as well work it til you get the redpoint! And just maybe you might think about trying to onsight that grade next time...
First Stage
Tope rope falls. Climb up any route on a top rope. Take top rope, rope stretch falls at each bolt as you progress up the wall. Belay style: from snug belaying to a dynamic belay. This is good training for a belayer who isn't familiar with dynamic belays.
Second Stage
Clip-Drop. Clip at shoulder height and drop. Belayer does very close snug belaying. Essentially rope stretch falls.
Third Stage
Clip-Drop. Clip at shoulder height and drop. Belayer gives normal close belay. Falls are a little longer than at the Second Stage. Falls are rope stretch plus system slack. Climber doesn't slam in as still below bolt when falling. Use this stage for the belayer to practise and progress to a dynamic belay.
Fourth Stage
Clip-Fall. Clip at shoulder height and make a move past the clipped bolt or clip at waist or in an 'awkward position' (e.g., choose route with lots of sidepulls and flagging moves) and then let go of the hold(s). Dynamic belay essential. Think about position of feet relative to rope and learn how to avoid being flipped or burning legs before next stage.
Fifth Stage
Clip-Climb-Fall. Clip at waist height and climb until next bolt and then let go of the hold(s). Dynamic belay.
Sixth Stage
Clip-Climb-Jump-Fall? Clip at waist height and climb up to next bolt, slap for next hold and fall trying to move up. Dynamic belay. DO NOT ATTEMPT THIS BELOW 6th BOLT!
Transferring to Outside

© Craig Ingram
Hopefully after progressing through some if not all the stages outlined above you will have confidence in the system and will feel less stressed about climbing above bolts and your fear of falling off will have diminished. It may never totally disappear, but will be manageable. The next step is to get on a sport route outside that pushes you physically. Choose one that has good bolts and isn't too run out between them. You may even want to do Clip-Drop Technique on an outdoor sport route, again choose your route wisely and make sure go through the pre-flight check; check knots, belaying, screw up screw gates, even sitting on the first bolt.
A word of caution: Sport climbing is relatively safe although the act of falling can never be guaranteed to be injury free. Act on your instincts and take heed of rational fear.Adrian Berry in Sport Climbing+
Don't do Clip-Drop Technique on trad routes. It is dangerous and will also erode nut placements. The new found mental strength that results from doing Clip drop technique may help you when climbing trad routes where you have to place your own gear. You may be more confident and may be able to relax more which will enable you to climb better and focus on rational fears - like gear placement, gear quality and the potential danger if you fall. Falling on trad routes is a totally different proposition to falling on bolted sport routes. The gear you place maybe marginal and the fall line potentially dangerous. Often on single pitch trad routes, even when high up the route, there may only be one piece of gear between you and the floor - will it hold?

Fall Practice Outdoors
Some guides and instructors use fall practice with their clients. We asked Alan Carne (www.alanduverdon.com), a certified guide (Brevet d'Etat Escalade) based in the Verdon Gorge how he uses fall practice in outdoor sessions
Flying Lessons - or falling practice in the Verdon Gorge
Before starting any outdoor fall practice the initial warm up is vital. This sets the scene for the day and starts with the approach walk in the cool of the morning or evening. Concentrating on breathing well helps create calm in preparation for what to many can feel like being made to walk the plank.
As I'm trying help the leader become comfortable with the sensation of falling and overcome the fear of losing control I choose small, quiet cliffs with a choice of clean well bolted slabs and walls.
We start with a gentle warm up, leading or on top rope, designed to improve co-ordination, breathing, and to prepare emotionally by building confidence in the equipment and the belayer. The climbs should be very moderate, non strenuous and the mood should be quiet and focused.
With the top ropes now in place we can start to do some small top rope drops. Initially on rope stretch but gradually introducing the dynamic belay and the sensation of a free fall. As we're trying to develop trust in the belayer it's also important to resist the temptation to say 'take in'.
During fall training sessions I like to stress the link between climber and belayer.
Both should feel linked by the rope and the climber should feel encouraged and followed by the belayer. This is of course the essence of the dynamic belay - the belayer literally follows the falling climber through the fall and catches them.
Communication is important but it isn't simply a question of yelling 'c'mon' or 'I'm watchin yer' at every opportunity. That only serves to break the leader's focus and the mood of concentration. The belayer should try to feel the action of the climb themselves and give encoragement at moments of hesitation or increased intensity in the climbing.
The belayer is not simply a passive, mobile Gri-gri, but an active and essential part of overcoming the fear of falling.
Once confident taking dynamic top rope falls we move on to short leader falls on a steep slab with the bolt at waist level, gradually working up to letting go with the bolt at foot level.
Falls should be dynamic and taken with at least 10m of rope between belayer and leader, and with several bolts clipped.
Training for longer falls or where the bolt is below foot level, should be done on steeper rock (gently overhanging is ideal), but only once the dynamic belay is mastered.
With steeper rock comes an increased sensation of exposure so it's a good idea to start fall practice with the bolt at chest height and work down till comfortable with the bolt below your feet.
Once at ease with short 'set up' type falls I try to choose climbs with more demanding or precarious moves near to bolts and with a high chance of the leader falling off. While doing this I encourage the climber to concentrate and continue climbing, letting them know that I'm with them and following them through the moves, always ready to give a dynamic catch in the event of a fall.
Although I've stressed the importance of the dynamic belay, it's not always a wise choice when climbing outside. Falling off a climb outside is a serious business demanding concentration and application from both climbers and is not some silly 'bungy jumping' exercise.
The consequences of a fall can be serious.
Climbing teams need to use judgement and be aware of dangerous landing zones or potential falls where it may be wiser to downclimb than take the fall. The belayer should be aware of this and react according to the situation. It may sometimes be better to step back or reel in a load of slack if the falling climber risks hitting the ground.
Once accustomed to taking safe falls on small sport crags the next step is to take this new extended comfort zone into the Verdon Gorge itself. This isn't for everybody and it may take time and long experience to overcome the irrational fear of taking falls in the bigger arena, with lots of exposure. Making practice falls a part of your warm up routine will however help you to climb more relaxed and you will become more skilled at falling and belaying when on the big stone.
It's good to be aware of the following points when practicing falling outside.
- Try to keep your eyes open.
- Master the dynamic belay.
- Don't hold your breath, try to breath normally.
- Allow yourself to drop off, don't jump off backwards, you could slam the rock.
- Choose climbs with plenty of bolts.
- Be careful not to backclip quickdraws
If you need professional guiding or instruction in the Verdon Gorge - or just want to know where the best routes are you can contact Alan through his website.
- www.alanduverdon.com
- or email: alan@alanduverdon.com
Thank You
UKC would like to thank Kate Phillips and all at Kendal Wall, Sally Wheatley, Neil and Dave Gill of Steep Media, Adrian Berry at Positive Climbing), John Arran (www.thefreeclimber.com), Arno Ilgner of the Warriors Way and Alan Carne (www.alanduverdon.com) for their contributions to the Video and this article.


Comments