


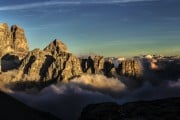


The Dolomites are exceptionally popular in the winter and boast one of the largest pisted ski areas in Europe. The 'Sella Ronda' - a circular network of lifts and pistes that can be completed in either direction around the Sella Massif is particularly popular and draws thousands of visitors every year. However away from the hustle and bustle of the piste lies an intricate network of peaks, ridges, couloirs, open faces, snow-covered valleys and pastureland; a winter paradise for those willing to venture off the beaten track and get into the backcountry. Whether you're looking for technical ski mountaineering, steep couloirs or simply a relaxing snowshoe up a remote snow-covered valley, the Dolomites has something for every ability.
Read James Rushforth's other Dolomites articles:
The Dolomites
Climbing the Comici
Dolomites - Ice, Mixed and Drytooling
Ski Mountaineering / Touring

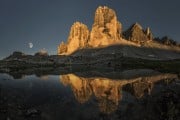
© James Rushforth
The characteristically steep faces of the Dolomite peaks means there is generally less face skiing (with a few obvious exceptions like the Marmolada) than in the rest of the Alps. Yet through these faces lies a spectacular landscape of steep-sided valleys and impressive couloirs that offer a huge variety of possible itineraries in a scenically stunning environment.
Whilst there is something for everyone in terms of difficulty, it is important to note a degree of mountain experience is required for all the itineraries.
Gear - As ever, ski and climbing equipment preferences are very subjective and the source of much debate. Below is a list of items you might need for travelling in the backcountry, although exactly what you take depends on personal preference and your chosen itinerary. For big or multiple days with lots of ascent try to keep the kit to an essential minimum. Even for multiple days I can fit everything I need into a 30 litre pack.
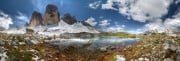
 © James Rushforth
- Skis - This is a massive subject and could easily cover an article in its own right; every person you ask has their favourite skis and advice is rarely consistent. Despite what the manufacturers would have you believe, there is no perfect 'do it all, quiver of one' ski. You're always compromising performance with weight, edge hold with powder float. Here are a few over-simplifications to demonstrate the various trade offs:
Shorter skis advantages:
You can make smaller turns in technical terrain
They are obviously lighter than their longer counterparts
You're less likely to hook them when you're climbing with them on your rucksack
Shorter ski disadvantages:
You get less float in powder
They're less stable at speed
They generally don't handle chopped up and tracked snow as well
Large waist (ski width underfoot) advantages:
You get more float in powder and variable snow
Large waist (ski width underfoot) disadvantages:
You get less edge hold on hard and icy snow
You often require a more burly binding if the size of the waist gets to large
Typically for ski touring / mountaineering you're looking for a set of planks around or slightly taller than head height, with a width underfoot of between 80 and 100mm that are as light as possible. That said, recent innovations in skiing technology particularly with regards to weight mean it is now possible to size slightly larger than in the past, especially at the waist. I'm currently skiing a set of 172cm Black Diamond Carbon Converts in conjunction with some ATKRace Raider 14 bindings. The 105mm waist gives enough float in all but the deepest snow, the turn radius is short, the bindings have a high enough release value to feel secure in the steepest terrain and best of all including the bindings they weigh in at under 2kg per ski.
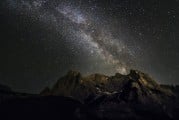
 © James Rushforth
- Bindings - There are an increasing number of touring binding options but minor differences aside they essentially break down into two categories. Frame bindings such as the Marker Royal Family series are compatible with standard downhill boots and work in much the same way as a standard 'alpine' step-in binding. The difference is the frame which hinges off the ski to allow walking and uphill skinning. They are excellent for the descent and large drops / air time. However picking up the whole binding on each step is extremely inefficient, and this combined with their weight means they are unfortunately less than impressive on the way up.. The second type of binding is the Dynafit style 'AT (alpine touring)' or 'tech' binding. Here the toe of the boot pivots on two points that connect to the front of the ski boot. They are much more efficient on the ascent, but with the exception of the Marker Kingpin are not DIN certified. For more reading Evo have some excellent information on their site.
- Ski boots - Ideally a nice light touring boot with good sole and walk mode.
- Ski poles - Again, lots of makes and varieties. Big baskets are a must for getting purchase in deep powder. Collapsible poles are more convenient for stowing on the rucksack but are more likely to break on a long tour. It's nice to have a long rubber grip down the shaft so you can drop your uphill hand when traversing. A few companies do poles with an ice axe head on the top; these are often a bit of a mixed blessing as they can be useful for recovering quickly on steep terrain but are equally good at poking holes in your clothes and yourself in the event of a fall.
- Transceiver, shovel and probe - Never leave home without them and know how to use them. There's no point in having one or even two of the above, as you need all three for them to be effective. Make sure you have spare batteries for the transceiver if you're doing a multi-day trip in cold conditions.
- Rucksack - Whether you choose an ABS rucksack is personal preference and the subject of much debate. Whilst it makes sense to try and stack the odds in your favour in the event of an avalanche unfortunately the packs are still very heavy if you're planning on doing multiple days of ascent and technical climbing. Make sure the rucksack can carry an ice axe on the outside and has loops for stowing skis when you need to boot pack. I use a 28 litre pack for both single and multi-day tours but many friends use bigger ones.
- Skins - These come in a variety of shapes and sizes, colours and makes. Personally I find skins with applied glue stick better but at the expense of removing the wax from the bottom of your skis faster. I'd always recommend skins that attach at both the front and back of the ski, as the 'three quarter lengths' have a nasty tendency to roll up.
- Ski crampons - In good snow you will never need them and they may seem like a waste of time. However when you're making an exposed traverse on hard snow they become invaluable.
- Harness - Ideally with buckled leg loops so you don't have to worry about trying to get them over a ski boot with crampons attached.
- Rope / Rack - This very much depends on the itinerary you're doing. For steep couloirs a short rope of 30m in conjunction with a couple of crabs and some slings is often ideal for abseiling unskiable sections. For technical climbing a light winter rack with a longer rope is often required.
- Ice axe(s) - A single walking ice you can arrest with is sufficient for the majority of tours. If you're planning on technical mixed climbing then you'll need two.
- Crampons - It's nearly always worth putting a set of crampons (make sure they fit your ski boots before getting on the mountain) in your rucksack for narrow ridges, steep hard snow and small sections of mixed climbing.
- Climbing helmet / ski helmet - Again personal preference depending on the itinerary. Consider a climbing helmet for technical ascents and a ski helmet for difficult 'freeride' descents.
- Water / food - Generally in the winter I find 1 litre sufficient but again it's personal preference.
- Extra layers
- Sunglasses / goggles
- Map / Guidebook
- Suncream
Snowboards and ski mountaineering / touring
 © James Rushforth
Whilst backcountry skiing / mountaineering is undoubtedly more difficult on a board, thanks to recent innovations in split boards it is now very possible. Whilst these obviously don't perform as well as a standard board on the descent they do narrow the gap with skis on the ascent. It is generally harder to fit crampons to snowboard boots as opposed to ski boots due to their softer nature. Make sure you pick up a crampon-compatible boot. It is possible to snowshoe with a board on your back but if you're doing long or multi-day tours it's hard work keeping up with skiers in deep powder. For very steep couloirs and slopes with no fall zones it can be useful to board with an ice axe in hand.
 © George Nunn
Some general tips
- Learn to ski short sections of downhill with your skins still attached; this greatly increases efficiency as it saves the inevitable faff of constantly taking your skins on and off. Try and resist the urge to clip your heel down as invariably you will be thrown foreward as you reach shallower ground and the best way to save this is to go into a telemark-style lunge.
- Put your skins and ski crampons somewhere easily accessible (ideally in a different compartment if you have one) to reduce faffing.
- It sounds obvious but put your harness on before you start a descent over a glacier or down a steep couloir where you may need to abseil past an unskiable section.
- Despite what various outdoor retailers may tell you, skins don't stick as well when they're wet (whether they be glue based or otherwise). Make every effort to keep them dry when taking them on and off.
- Learn to operate the heel lifts, toe release plates, brake levers etc with your pole.
- Turn your transceiver on as soon as you put it on, even if the approach is flat and perfectly safe. It's easy to forget it when you reach the descent and are getting excited about the prospect of perfect powder…
- Know your gear - no bindings are perfect and every make I've tried suffers from some form of icing up. The Marker Royal Family series are notorious for being difficult to lock back down in icy conditions. The Dynafit-style pin bindings often won't engage properly if there's snow under the front springs or if the pin holes on an AT boot are iced up. Learn what to watch out for and how to quickly clean it before beginning a descent.
- Carry a small repair kit - this particularly applies to long and multi-day tours. A broken binding can be massively debilitating when you're in a remote environment. It's surprising what can be achieved with a multi-tool, some heavy duty tape and some glue / sealant.
- Binding release settings (Sometimes DIN) - if you're skiing a really steep couloir, particularly if it has a large abseil halfway down it, prematurely ejecting from a ski can be fatal. Crank the release values up accordingly.
- Gloves - learn to attach crampons, skins, ski crampons, adjust bindings etc whilst keeping your gloves on.
 © James Rushforth
Guidebooks
 © Versante Sud
There are a number of guidebooks detailing ski touring / mountaineering routes in the Dolomites. Here are some of the ones I find most helpful:
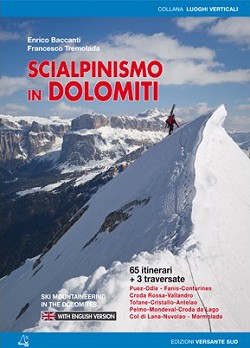
Scialpinismo in Dolomiti
Written in Italian and English this excellent guidebook covers 65 itineraries within the northern and central Dolomites.
Scialpinismo a Cortina d'Ampezzo
Written in Italian this excellent offering from Idea Montagna covers the majority of routes around the immediate Cortina area.
Skitouren Dolomiten
A German book again covering 60 of the classic routes in the northern Dolomites. The book features 3D-rendered maps instead of photo topos - some people like them, some don't.
Scialpinismo in Val di Zoldo
A comprehensive guide in Italian to the tranquil and rarely-frequented Val di Zoldo.
Freeride in the Dolomites

© James Rushforth
Whilst freeride off-piste doesn't really fall under the umbrella of UKC / UKH there are again hundreds of excellent routes to be had with a focus on the descent. Many of the itineraries are located within easy access of the lifts with minimal approaches.
For those interested in freeride descents, Francesco Tremolada's Freeride in Dolomiti published by Versante Sud is the obvious starting point.
Snowshoeing in the Dolomites
 © James Rushforth
Whilst snowshoeing is undoubtedly less efficient than ski touring it does have several advantages. The enforced slower place, particularly on the descent, gives you time to enjoy, contemplate and appreciate the surrounding scenery and environment. Snowshoeing is also very easy to pick up: you strap them on and start walking (often like John Wayne), there isn't really a learning curve. Finally snowshoeing is cheap as a set of good snowshoes will set you back £150. Contrast this with an AT touring setup of skis, bindings, AT boots, ski crampons and skins that will probably set you back the best part of £1500.
Gear - list as above with the exception of:
 © James Rushforth
Snowshoes - These come in many shapes and sizes and again everyone has their favourite make and model. A larger snowshoe gives greater deep snow performance at the expense of been more cumbersome. I'd always look for a model with good crampon points on the bottom, front points and a heel plate that you can lock down for kicking steeps on deep snow in steep terrain.
Guidebooks
Ciaspolando nelle Dolomiti
This book covers 76 snowshoe routes in the Northern and Central Dolomites, available in German and Italian.
Ciaspolando in Alto Adige
Snowshoes in the South Tirol, available in Italian and German.
Racchette da neve in Dolomiti
A small book written in Italian covering 26 itineraries.
 © James Rushforth
Route Recommendations
There are simply too many itineraries to even begin to create a 'best of' list. Instead here are a few ideas to whet the appetite...
|
Val Mesdi F / 3.1 (PD- / 3.3 including an ascent of Piz Boe) (Ski)
|

© James Rushforth |
|
Monte Pore - F+ / 2.3 (Ski / Snowshoe)
|

© James Rushforth, Feb 2015 |
|
Canale della Nonna with ascent of Via Ferrata Col dei Bos - AD- / 3.2 (Ski)
|

© James Rushforth |
|
Cinque Torri - E (Snowshoe)
|

© Collett's Mountain Holidays |
|
Citta di Fiume - E (Snowshoe)
|

© James Rushforth |
|
Tofana di Rozes - F+ / 3.3 (Ski / Snowshoe)
|

© James Rushforth |
|
Marmolada - Punta Penia - PD / 3.2 (Ski)
|

© Andy Griffiths |
|
Tre Cime Circuit - M (Ski / Snowshoe)
|

© James Rushforth, Jan 2015 |
|
Pelmo AD+ / 3.2 (Ski)
|

© Francesco Tremolada |
| Colac AD / 5.1 (Ski) Rising above the Alba ski area, Colac presents an impressive north face that can be skied with favourable spring conditions. The ascent along the knife-edge ridge is spectacular and requires good mountaineering experience. The descent requires careful navigation as you track to the right to avoid ending up over the substantial cliffs found at the base of the face. |

© Francesco Tremolada |

© James Rushforth |

© James Rushforth |

© James Rushforth, Mar 2015
Weather and Avalanche forecast / Safety
 © James Rushforth
Having an up-to-date weather and avalanche forecast is essential to moving safely in the winter. I find Arpav is by the far the best forecast in the region for both weather and avalanche information.
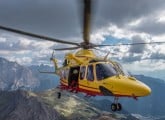
If you need to contact the emergency services the number is: 118
Make sure you have appropriate insurance before venturing into the backcountry. There are so many options these days but BMC and AAC are two of the most popular.
Logistics
When to Go
Though it is possible to complete climbs during the winter months (some of the via ferrata make for excellent ski tours) generally speaking the best season runs from June to the start of October. However at the beginning of the season there is often still a lot of snow about and it is usually necessary to seek lower altitude south facing routes.
Lifts
Most of the lifts open around the third week of June and close in mid September, but it is worth contacting the local tourist offices for exact information if you are planning on using specific lifts during your trip.
How to Get There
The Dolomites are easily accessible from three airports all a similar distance away. Innsbruck is the closest airport within 2 hours driving distance of the Sella over the Brenner Pass. Cars can be hired from the airport from a number of different companies. Venice Marco Polo is the other main airport within 2 and a half hours drive from the Sella. There are again a number of car hire companies. Alternatively there are several public transport options from Venice; a direct bus runs throughout high season from Venice to the villages surrounding the Sella, or alternatively a more frequent train service runs to Belluno, from where it is then possible to catch a number of buses.
Treviso airport though only small is actually 15 minutes closer than Venice if you can get a flight there. Public transport is available to the centre of Treviso or into Venice, and then you can take a train / bus as above.
Alternatively it is possible to drive from the UK via Germany and Belgium before approaching the Dolomites from the North entering at Pedraces (recently renamed Badia). I usually stay in a hotel near Munich and do the trip in two days.
Hire cars are expensive, around £150 per week. BMC members can get a discount through Hertz.
Accommodation Advertise here
No Premier Listings found in this area
The towns of Arabba, Canazei, Cortina, Corvara, Colfasco, La Ville, Pedraces and Selva are all good locations from which to reach the popular climbing areas. Camping is available in both Colfosco, Cortina and Canazei, and hotels can be found in all of the towns. UKC regular Mike Kann is very knowledgeable about the area and runs a nice set of apartments (Casa-Alfredino) near the Marmolada.
Gear
There are a lot of outdoor shops in any decent sized town. The best are:
Sportler - Treviso - A huge complex and only 2km from the airport there.
K2 - Cortina - A small but fantastic gear shop.
Sport Amplatz - Canazei - One of the best shops in the area.
Sport Kostner - Corvara - A good shop with attatched super-market.
Outdoor Shops Advertise here
No Premier Listings found in this area
Instructor/Guides Advertise here
Other Activities
There is climbing and walking, the zipwire at Kronplatz (supposed to be the longest in Europe), a high ropes course at Colfosco, horse riding is becoming increasingly popular, as is mountain biking, there is also white water rafting at Brunico, canyoning at Cortina.
Road biking has long been an integral part of the Dolomite mountains and numerous prestigious races take place up the winding and tortuous passes. Apart from the Giro d'Italia, which usually passes through parts of the Dolomites and in particular often features a famous stage by the Tre Cime, the Sella Ronda and the Maratona dles Dolomites see thousands of cyclists taking to the passes.
Wet Weather Options
One of the most relaxing wet weather options is taking advantage of the many spa facilities in the boutique hotels. Many of these are open to non-residents and are an indulgent way to rest aching muscles and generally get pampered.
There are numerous cultural options with excellent museums such as the Messner Mountain Museum in Brunico, the South Tyrolean Museum of Archeology - home of Otzi the ice man - in Bolzano, and the two Ladin museums in San Martino in Badia and San Cassiano. The three Regole di Cortina museums - Paleontology, Ethnography and Modern Art - offer interesting insights into the history of the rocks themselves and the heritage of the people who lived around them.
Anyone with an interest in more recent history may be interested in the First World War Museum at the Tre Sassi Fort on the Valparola Pass or at the Marmolada mid station.
James Rushforth is an accomplished skier, mountaineer, climber and professional photographer. He has just completed the new Rockfax guide - The Dolomites : Rock Climbs and Via Ferrata and is currently working on another guide to Finale Ligure, also in Italy.

James Rushforth is a professional photographer and you can see his portfolio on Smugmug, and follow him at JamesRushforth.com
UKC Articles and Gear Reviews by James Rushforth
- DESTINATION GUIDE: The Dolomites - Via Ferrata 12 Jul, 2015
- The Dolomites - 5 Easy Route Recommendations 4 May, 2015
- CAPTURING THE STARS: Night Sky Photography 16 Oct, 2014
- DESTINATION GUIDE: Dolomites - Ice, Mixed and Drytooling 22 Mar, 2012
- DESTINATION GUIDE: The Dolomites 22 Apr, 2010
- Climbing the Comici - VII / E3 5c, Dolomites 21 Apr, 2010


Comments