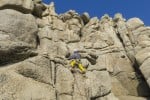
38m, 2 pitches.
No description has been contributed for this climb.
Feedback
| User | Date | Notes | ||
|---|---|---|---|---|
| Salvo1 | 1 Nov, 2022 |
Show βeta
βeta: Route wasn’t clear from the description in cc guide book. Andy led 1st pitch. Good exposure from the inset as traverse leftwards to join the diagonal right trending crack. Nice climbing throughout. From the belay block I climbed a traverse frim the left to right joining the bigger crack then up to finish. Well enjoyed this! | βeta? | |
|
Show beta
βeta: Route wasn’t clear from the description in cc guide book. Andy led 1st pitch. Good exposure from the inset as traverse leftwards to join the diagonal right trending crack. Nice climbing throughout. From the belay block I climbed a traverse frim the left to right joining the bigger crack then up to finish. Well enjoyed this! |
||||
| Simon Caldwell | 5 Sep, 2022 |
Show βeta
βeta: Pitch 2 description is poor as the crack is neither thin nor on the right. My suggestion: From the belay, climb onto the slab on the right (overhung at the bottom) then follow blocks to the foot of a wide crack in the tower above - finish up this. | βeta? | |
|
Show beta
βeta: Pitch 2 description is poor as the crack is neither thin nor on the right. My suggestion: From the belay, climb onto the slab on the right (overhung at the bottom) then follow blocks to the foot of a wide crack in the tower above - finish up this. |
||||
Logged Ascents
37 users have logged this
3 users have this on their wishlistPlease Login to view more details on the logged ascents
Route of Interest
Dowser's Route/Porthgwarra Face
Grade: VD ***
(Porthgwarra Buttress and Hella Point)