


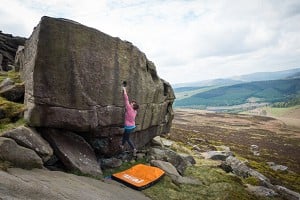
Making the transition from indoor bouldering to rock can open up incredible climbing opportunities both at home and abroad, from Froggatt to Fontainebleau. As one of the most accessible (and social) disciplines in our sport, bouldering indoors has grown in popularity, leading some newcomers to wonder what lies beyond the climbing gym and get outdoors.

© Nick Brown
If swapping plastic for rock from time to time appeals to you, here's a list of the equipment you'll need (not much) and some advice to help you make the most of your first outing.
What you need
Shoes - whichever shoes you wear at the wall will be fine for your first time out. As you progress, you might find that certain types of shoe suit different rock types better (softer shoes for smearing on sandstone, stiffer shoes for support on granite edges, etc.). Don't overthink it for now.
Bouldering Pads - the more the merrier. They tend to be just over 1m² in area and 10cm in thickness, but there's a range of sizes and cushioning options, from mega crash pads to smaller, thinner pads for making sit-starts more comfortable/keeping bums clean and plugging gaps.
Chalkbag with chalk/liquid chalk/brush/tape - your usual indoor bouldering kit and accessories will be perfectly adequate outdoors.
An old towel - to keep your climbing shoes clean and dry in order to minimise erosion of the rock.
Warm/weather-appropriate clothing and plenty of food and drink - just like indoors, bouldering outdoors can involve a lot of sitting around between climbs. The big difference is that hanging around outdoors can cause you to get chilly very quickly (especially in the UK!). Bring warm layers, and plenty of snacks and sustenance.
Guidebook/App - in order to locate the crag, its sectors and specific problems, a guidebook is essential, whether in physical book or app form. The UKC Logbooks also give a useful overview of areas, including parking and approach notes, a list of problems and their grades plus plenty of photos and videos for inspiration. Check out our Rockfax guides and app.
Top tips for getting started
1. Find an experienced friend to take you, join a local beginner session or hire an instructor
Although bouldering outdoors is among the purest forms of climbing (no ropes, less faff, lots of fun), it's still worth heading out with people who know what they're doing in order to have the best introduction to the activity. It's likely that you will meet people at your local wall who have bouldered outdoors and wouldn't mind taking you along. Alternatively, there are numerous indoors-to-outdoors courses and days out organised by walls across the country. Ask at your regular haunt, or keep an eye out for adverts online or on site.
Going with an experienced person or group should also mean that you start at an appropriate place, with a range of lower grades, shorter problems with relatively clear landings and some easy top-outs — and hopefully a short walk-in to approach the crag! If you have any questions or preferences regarding the location, ask your expert.

© Nick Brown
2. Practise falling and spotting indoors first
Falling is often less predictable and comfortable outdoors compared to what you might be used to indoors and it can be intimidating, no matter your level of experience. When climbing, think about targeting your landing zone as best you can as you fall, and controlling your fall and softening the impact as you land. Bend your knees and never land on straight legs, or your legs won't be straight for much longer. Roll your weight into the mat and avoid tensing up your muscles as you land. Think and act like a cat and you'll be most of the way there.
When spotting (gently guiding a climber's fall, as gymnastics coaches do with their athletes), don't aim to catch the climber, but keep your hands ready just above their waist to gently direct their centre of mass to ensure they land upright and not on their back or head.
On rock, the area you have to dampen the impact of a fall is typically smaller, and the padding might be uneven. This can make for slightly less comfortable falls. Practice landing more neatly at the wall by imagining you have just a 1x1 metre-squared area to target.
Outdoors, spotters aim to direct a fall onto the matted area and protect the climber from rolling off the pads (especially if the ground is steep or uneven). They are also in charge of covering exposed rocks or hollows with mats or standing on/in them and guiding the falling climber away from them.

© Nick Brown - UKC
3. Lower your grade expectations
Bouldering on rock can be a shock to the system, especially when it comes to the grading systems you're used to at the wall. On rock, the holds are not as obvious and are usually far smaller and lower profile than many indoor equivalents. Bouldering on rock can feel a lot harder - there's so much more body tension involved due to smaller footholds - but that's not a reason to feel disheartened. Experience on rock will help, but many climbers will never reach the grades they are capable of indoors on rock.
Grades - and grading systems used - don't translate directly between indoor walls and crags, but nor are they uniform at every climbing centre in the country, either. There is variation in the grading system used (V grades, Font grades, a made-up difficulty system at the wall, etc.) Most crags in the UK use the Font grading system. You can use this chart to roughly compare correlations.
If you start bouldering outdoors with the goal of having fun and finding your feet, you won't be disappointed. Lower your max indoor grade by a few notches (say, if you can climb Font 7A indoors, warm up on some 5s and expect to take a few goes on some 6s and find 7A to be quite different). Some areas are renowned for being hard for the grade. Fontainebleau is a boulderer's paradise and is accessible to all, but the grades are hard!

© Nick Brown - UKC
4. Practise reading the rock
Sequences are not as straightforward outdoors as following a line of coloured holds indoors, but this just adds to the challenge. You'll be amazed at what counts as a hold on rock, and how little you can get away with using.
In this modern age, there is no shortage of 'beta videos' on YouTube and social media, where users upload footage of their climb with the intention of showing off and the more altruistic goal (maybe) of helping others to figure out how they might approach a problem. While there is a lot of fun in figuring out the 'beta' (information on how to do a move or problem/route) for yourself or with friends, it's a convenient way to research an area and get a virtual helping hand if you are stumped on a problem, want to go for a flash attempt or if you have limited time on a trip.

© Nick Brown - UKC
5. Learn to trust your feet
Friction on rock differs to the level of friction offered by indoor holds (especially dual/no-texture holds...there's nothing that slippy outdoors, trust me). Coarse rock types such as gritstone, granite and gabbro (all the g-words, for some reason) offer grippy friction for your rubber shoes, while smoother rock including limestone, slate or rhyolite can take a bit more pressure and trust to get used to. A major difference in the difficulty level of indoor versus outdoor climbing comes down to core and contact strength — using smaller holds for hands and feet really tests your abdominal muscles and your finger strength.
Practise smearing - pasting your feet on flat surfaces of wall - at your gym and get a feel for how much weight you need to put through your shoes and how much of the foot is in contact with the wall. Engage your core muscles to help prevent your feet from slipping. Try to climb some easier problems using only smearing for feet.
If you have access to a more old-school wall with sculpted, rock-like formations, practise using features-only for feet. Otherwise, try problems which incorporate small screw-ons or other ghastly footholds to get your footwork ready to rock outdoors. Adding a core conditioning routine (pilates, yoga or similar) would not be a bad idea.

© Nick Brown - UKC
6. Think about boulder mat placement
Mats are a portable version of the bigger, spongier matting at walls — but you have to know their limits (they're small, often quite firm and the landing surface at crags is not always level). They also make you look a bit like Spongebob Squarepants when you transport them on your back.
Learn from experienced friends or instructors about how best to protect the varied terrain below different angles of climb. More pads is generally a good thing, but avoid leaving cracks/gaps between multiple pads exposed — these are dangerous ankle magnets! Don't stack too high either, as landing on a teetering pile of pancakes is precarious!
Think about where a climber's centre of gravity (their hips/trunk in general) will take them should they fall as they progress up the climb, and be prepared to shift the pads slightly further in, out or to the side as they get higher.

© Nick Brown - UKC, Nov 2017
7. Look after your skin
Depending on the rock type, bouldering outdoors can be harsher on the skin than resin (although some very new, very rough indoor holds have a lot to answer for!). Gritstone and sandstone are especially abrasive, and you might notice that you have fewer attempts and shorter sessions on rock than you're used to indoors.
Your skin will toughen over time, but in the early days be sure to savour your attempts and use some tape if your skin grows thin or you've gone too far and 'gone through a tip.' Use a file to get rid of coarse skin. Specialist climbing creams (or fancy luxury ones — looking at you, Elizabeth Arden) can help to maintain skin for future sessions, which is especially important if you're on a multi-day trip.

© Nick Brown - UKC
8. Learn to 'top-out' and downclimb
A key difference between indoor and outdoor bouldering is that many problems on rock finish by standing on top of the boulder, rather than by simply matching the last hold. Topping-out on rock can be intimidating, and sometimes getting down is truly more difficult than getting up the climb.
Some indoor walls have 'top-out boulders' where you can practise the mantel-shelving technique required, but if not, it's worth putting some time into developing the rock-over and pushing/pressing skills and strength required to beach-whale your way over the top of boulders.
Outdoors, choose a low boulder to top-out on to begin with if possible and gather some trusted spotters who quite literally have your back. Push your bodyweight over your foot and keep your hips in while using your triceps to push down on your handholds until your arms straighten out — you might find that turning your hand outwards and 'palming-down' on the hold/edge of the boulder makes the pushing easier.
Now for the hardest part! Occasionally, the easiest downclimb might be the line you just climbed up, but often there is an easy, low-angled walk-off. Always climb down as far as you can before attempting to jump onto pads and ask for help from spotters. Sometimes downclimbing is easiest if you face out from the rock; other times, it's easier just to reverse and stay facing the rock.

© Nick Brown - UKC
9. Respect the rock and the crag environment
Always check access rules using the BMC RAD database and UKC Logbooks — sometimes crags are closed for nesting birds, ecological reasons or landowners may withdraw access permission. Disrespecting these rules can harm the environment and jeopardise future access for all climbers — don't do it!
If the weather has been wet recently and/or if it's still raining, make sure that the crag you're going to won't be too damp to climb on. Some rock types dry quicker than others. Do not climb on wet rock - especially on gritstone and sandstone - as the moisture makes the rock more friable and you can cause permanent damage to the rock (plus, the friction is awful, anyway). If the rock is dry and the ground is wet, be sure to clean and dry your shoes using a towel before stepping onto the rock to minimise damage.
Park in designated areas and don't block access to farm gates or hinder other road users. Make the most of the (often limited) space available in rural areas to help others park sensibly too - don't take up what could be two spaces, etc.
Leave the crag as you found it and leave no trace. Don't leave tick marks (chalked lines that 'point' to holds to make it easier to spot and target them mid-climb) behind, brush them off.
Toilet responsibly and respectfully, away and out of view of other crag users and walkers. Always try to use facilities before or after climbing if possible.
Don't play loud music or leave your kit strewn around. If you have a crag dog, make sure that dogs are permitted (is there livestock in the area?), that it's a safe and comfortable location for a dog, and that you have trained the dog well enough not to run away or disturb other crag-goers (if you follow these simple rules, you might even find a few very willing volunteers to play with/feed/cuddle the dog).

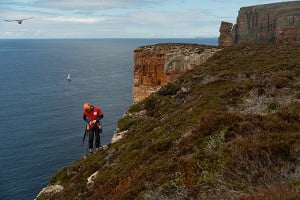
Rockfax, Apr 2014
© Alan James
10. Get to know your limits and take things slowly
Bouldering outdoors takes some getting used to — the intensity of movement for the grade is often just that bit higher than you'll find at an indoor wall. Don't push too hard and risk getting injured.
Before tackling bold highballs (very high problems, usually above 5m), stick to shorter problems — traverses are a good way to get used to rock and practise your footwork without the exposure.
You've also got to walk-in, keep warm (or cool and shaded) in the elements, constantly assess your landing and move pads, keep your feet clean and spot others carefully, making for a more tiring day overall. This will have an impact on your performance.
Take your time to get used to protecting the ground below boulders and learning to fall well. Don't push through the grades too eagerly at first, as you'll likely find yourself getting shut down and demoralised. Build up the mileage slowly and you'll soon be ticking off your wish list climbs and maybe even matching your level indoors — or surpassing it!
One final point: if you feel that outdoor bouldering isn't for you after your first time, maybe give it another try — but don't feel pressured to enjoy something just because others do and you think you have to.
UKC Articles and Gear Reviews by Natalie Berry UKC
- SKILLS: Top Tips for Learning to Sport Climb Outdoors 22 Apr
- INTERVIEW: Albert Ok - The Speed Climbing Coach with a Global Athlete Team 17 Apr
- ARTICLE: International Mountain Day 2023 - Mountains & Climate Science at COP28 11 Dec, 2023
- ARTICLE: Did Downclimbing Apes help Evolve our Ultra-Mobile Human Arms? 5 Dec, 2023
- ARTICLE: Dàna - Scotland's Wild Places: Scottish Climbing on the BBC 10 Nov, 2023
- INTERVIEW: Loki's Mischief: Leo Houlding on his Return to Mount Asgard 23 Oct, 2023
- INTERVIEW: BMC CEO Paul Davies on GB Climbing 24 Aug, 2023
- ARTICLE: Paris 2024 Olympic Games: Sport Climbing Qualification and Scoring Explainer 26 Jul, 2023
- INTERVIEW: Malcolm Bass on Life after Stroke 8 Jun, 2023
- ARTICLE: Alexandr Zakolodniy - A Climbing Hero of Ukraine 26 Apr, 2023


Comments
Nice wee article that; one I’m sure many will find useful. Although, I’d be inclined to put tip number 9 first!
On an editorial point, either some of the photo captions need updating or Rob should be listed as the author…
Please put advice about not climbing on wet rock closer to the top. This is the biggest advice that new climbers need, not what shoes to use.
I would like to say that if you think that there is nothing as slippy as dual or no-tex holds outside you've never been to Dinas Rock...
Why? Genuine question.