Rockfax Description
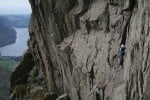
The second pitch is one of the finest at the grade in Langdale. Start at the lowest point of the cliff below a short arete.
1) 10m. Climb the groove just right of the arete until a pull left gains the arete, then a large ledge and tree belay not far above.
2) 4b, 22m. Directly behind the tree is a wide groove feature. Pull up into it and climb to some good gear placements. Make a delicate traverse right for three metres then head up to the base of a corner. Bridge up the corner and move left to finish up an awkward corner/groove in a fine position. © Rockfax
UKC Logbook Description
Start below a shallow right-facing groove, just above the toe of the crag.
P1: 10m Climb the groove until a move left leads onto the rib. Follow this to a spacious ledge and belayon the small ash or larger oak to the right.
P2: 27m Climb the shallow square-cut groove immediately above the ash tree to two horizontal bands of good pockets at around 6m. Embrace good runners, choose your level and make the crux traverse right across the slab for 3m then up leftwards into a corner. Climb this until a swing left gainsthe overhanging rib. Finish rightwards up the awkward chimney break.
Ticklists
ROCKFAX Lake District: Top 50 , 2020/21 Trips , A Lakeland Apprenticeship , 50 more great HS routes , Turbo-Punter's Tradification , ROCKFAX TOP 50s upto e3 , Lake District To Do List , Exploring Lakeside
Feedback
| User | Date | Notes | ||
|---|---|---|---|---|
| Rhys Williams | 4 Mar |
Show βeta
βeta: Keep walking and walking for the belay boulder. 60m single was fine but belayed far away from crag edge. | βeta? | |
|
Show beta
βeta: Keep walking and walking for the belay boulder. 60m single was fine but belayed far away from crag edge. |
||||
| Graeme Hammond | 16 Feb |
Show βeta
βeta: WHOLE CRAG BANNED MOST YEARS for nesting birds:15 February to 31 May. CHECK RAD FIRST! There should also be a very obvious on the gate as you approach the crag. | βeta? | |
|
Show beta
βeta: WHOLE CRAG BANNED MOST YEARS for nesting birds:15 February to 31 May. CHECK RAD FIRST! There should also be a very obvious on the gate as you approach the crag. |
||||
| FieldofBen | 3 Sep, 2023 |
Show βeta
βeta: The tree at the mid-way belay is loose and should probably not be used as a belay. The whole root system moves when the tree is pushed. A large block also came loose 3 meters up the route when stood on. This was trundled as the second nearly pulled it out with a slight touch. | βeta? | |
|
Show beta
βeta: The tree at the mid-way belay is loose and should probably not be used as a belay. The whole root system moves when the tree is pushed. A large block also came loose 3 meters up the route when stood on. This was trundled as the second nearly pulled it out with a slight touch. |
||||
| paulinepavlova | 12 Sep, 2022 |
Show βeta
βeta: There is a big boulder around 30m back from edge top that you can use as anchor | ||
|
Show beta
βeta: There is a big boulder around 30m back from edge top that you can use as anchor |
||||
| Neil Henson | 15 Sep, 2019 |
Show βeta
βeta: Led pitch 2, which proved to be exciting. Great route though. | βeta? | |
|
Show beta
βeta: Led pitch 2, which proved to be exciting. Great route though. |
||||
Logged Ascents
Guidebooks for Raven Crag (Walthwaite)
Not all climbs at crag may appear in this book 122 users have this on their wishlist
Please Login to view more details on the logged ascents
Tophet Wall
Grade: HS 4b ***
(The Napes)