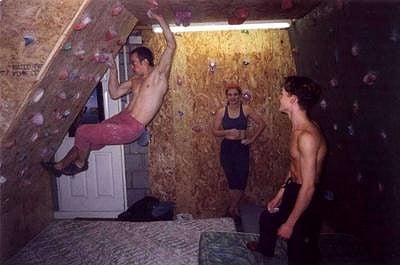

An indoor wall is not a difficult thing to construct. If, like me, your total DIY experience to date consists of putting together furniture from MFI, then don't worry. Buy some power tools and soon you too will have a manic glint in your eyes and a vastly inflated sense of confidence ... Having invited some climbers along from the Cambridge University club to help out, we set about transforming my garage.
Location is key. A garage is ideal (do you really need to keep a car in it anyway?). A basement or spare room also works well, but think about ceiling height (2.5m and upwards is good) and what else you want to use the space for. A tilting board can be installed in a living room, and kept flat against the wall when not in use - if you can live with chalk dust all over the place that is. A loft conversion may work as free space, but can your roof timbers take the extra stresses, and will it be easy to attach the boards?
Most home boards are made from 18mm plywood (or equivalent), drilled with a regular grid of 13mm holes, into which M10 T-nuts are placed. This means that the plywood boards can be permanently attached to whatever frame/wall you have - bolt-on holds can then be easily attached with M10 bolts and an allen key. Smaller holds, or home made wooden holds/features can be simply screwed into the board.
Think about the space you have available, and how best to use it. An inclined or vertical board is almost certainly useless, since you won't be climbing very high, and even with very small holds it will be hard to get a good workout. A variety of overhanging boards (and if possible, a roof section) is the way to go. If you don't have much space, or want to cut costs, a tilting board, hinged at the bottom with chains, will allow a range of angles. Whatever design you choose, vertical foot boards about 400mm, covered with screw-in smears make for good starts on each wall.
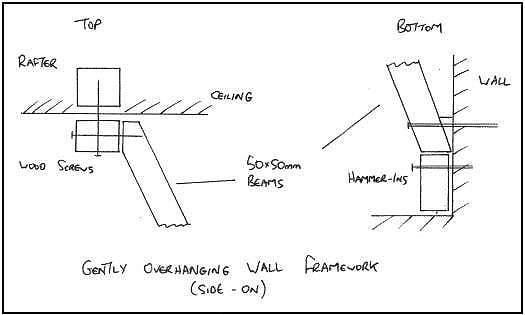
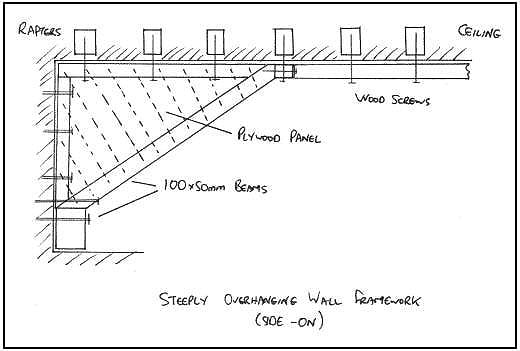
Once you have a rough design on paper, look at the walls and ceiling you have available - what sort of framework and attachments are appropriate? The plywood needs to be spaced from the wall & ceiling (the M10 bolts will stick out the back upto 10-15mm) and more importantly, the plywood will flex and break without a reinforcing framework behind it on overhangs. For most of our wall, we used 50 x 50mm (2x2") timber beams to reinforce the plywood, with 50 x 100mm (2x4") beams for the steep overhangs.
To attach to bricks or breeze blocks, large hammer-in fixings straight through the frame into the brick give a solid attachment. For 50mm wood, get 100-130mm long fixings. To attach to the ceiling, screwing 50mm beams straight into timber rafters works well (use 120mm wood screws). We drilled pilot holes through the plaster ceiling into the rafters.
Our main wall (15 degree overhang) had a frame that was attached to a 4m long beam screwed into the rafter directly above. Additional rigidity was gained by having one end attached to brick and the other end had a triangular plywood end-piece (see diagram below) If you have wide (1m or more) boards, you'll need to attach a 50mm reinforcing beam running horizontally for each metre of height, to reduce flex.

The overhanging walls (25 and 40 degrees) used 50 x 100mm beams for the supporting frame, and the same attachment to ceiling rafters was reinforced with plywood sheets attached back to the wall and ceiling via 50 x 50mm beams. (see diagram below)

With a revised design, taking into account appropriate framework and fixings, you should be able to estimate how much wood you'll need. Shop around and buy from a timber merchant, not a DIY store. A much cheaper alternative to plywood (which can cost as much as 50 pounds for a 2.4 x 1.2m sheet) is Sterling Board, which gives similar strength at less than 10 pounds for the same sized sheet. Rough sawn timber boards can cost between 60p and 5 pounds a metre, depending on where you buy it. Buy plenty of screws - we used over 400, again from a builder's merchant.
The main tool you'll need is a power drill that can take a 13mm drill bit (ie, a 13mm shank or get a more expensive reduced shank 13mm drill bit, since many drills can only take upto 10mm shank). You'll obviously need drill bits appropriate to your fixings, but 3mm wood (pilot holes), 8mm and 10mm wood and masonry (for fixings) and 13mm wood (for M10 T-nuts) will probably do. A separate power screwdriver is useful, although not critical if your power drill doubles as a power screwdriver. Unless your board is very small, doing all those screws by hand just isn't worth thinking about.
For larger walls a jigsaw is a must, and cheap ones start at 25 quid (make sure it will cut 50mm of wood). Unless you're very confident, don't cut a lot of wood at once - measure, cut and fix one piece at a time. That way you don't have to be so accurate.
Cut your plywood boards to size last of all, and then prepare them with M10 T-nuts and optionally coat them with friction paint. You can buy the M10 T-nuts and 50mm M10 bolts from your bolt-on supplier, or you may be able to find them cheaper from a builder's merchant. You'll need 1 T-nut per hole, and 1 bolt per bolt-on. These should be pretty cheap - we paid 15p/T-nut and 50p/bolt. You'll probably use 15-20 T-nuts per square metre.
Drill a regular grid of holes on each board (use an 8mm wood bit for a pilot hole, followed by the 13mm bit. It may be difficult to find a 13mm specialist wood bit, but a general purpose wood/metal bit will work fine so long as you have smaller pilot holes). Space the holes 200-300mm apart, remembering that some board space will be taken up by the frame at the back (so leave a 80mm gap at the edges of the board, depending on your frame).
Before attaching the T-nuts, you may want to paint the boards. Plain plywood is impossible to smear on, and so for foot boards and other vertical sections, friction paint is worth considering. Wall manufacturers sell friction paint, but this is designed for coating the floor of garages, and it is actually cheaper in DIY stores. Be warned though - it is evil stuff that needs to be applied outside, and can take upto a week to dry completely.
We found that knocking T-nuts into the holes with a hammer worked well, and remember to test-thread bolts into each T-nut before attaching the board to the frame - some are bound to be out of alignment, and need another tap or two to make attaching holds easier.
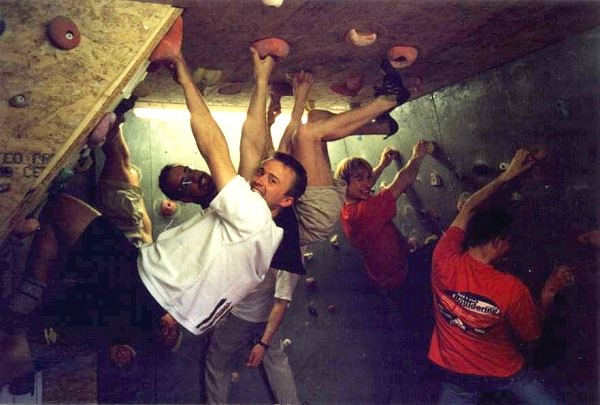
If you can't afford bolt-on holds, then carving your own from scrap wood can work well, however prices for professionally made holds are very reasonable and a good set can give you an instant wall, which can then be added to with more bolt-on's or home made holds over time. It really pays to shop around - a good set of 50 holds might cost 100 pounds from one manufacturer and nearly 250 pounds from another! Our wall consists of 140 holds from Entre-Prises Ltd (makers of the World Cup final wall). Buy medium, small and extra-small (screw-on foot holds). Even for a roof section, a bouldering cave wouldn't really benefit from large holds (which are huge and expensive).
Setting routes is an art that is perhaps less useful in a bouldering cave where you want lots of routes in a small area. Sponsored climber, Stu Littlefair placed the holds on our wall, but he claims that a mostly random scattering, with some adjustments over time, works pretty well.
It's worth thinking about how badly you want to be hurt when you fall off your board. If you can get enough old mattresses (preferably for free) to cover the floor, with an extra layer underneath high risk areas like the roof section, then that works very well. An alternative is 50mm thick sheets of polystyrene (available in 2.4 x 1.2m sheets from a builders merchant for a fiver each), together with mattresses/spotters in high risk areas.
Possible additions to a wall include a finger board, campus board, etc, although a campus board really needs 3m of height to be worth building.
Now you have your own wall, you'll want a training program, so go and read back issues of On The Edge for Matt Smith's articles.

Our wall:
25 sq metres climbing area
140 bolt-on holds
550 M10 T-nuts
125 M10 50mm bolts
5ltr Friction paint
11 of 2.4 x 1.2m sterling board 18mm sheets
42m of 50x50mm roughsawn timber beams
22m of 100x50mm roughsawn timber beams
400 50mm crosshead wood screws
50 130mm crosshead wood screws
50 80mm hammer-in fixings
25 130mm hammer-in fixings
Power screwdriver
Jigsaw, 60mm wood blades
Hammer, spirit level, tape measure
Power drill, 13mm general purpose, 10+8+3mm wood, 10+8mm masonry bits
Total cost (excluding tools): 500 pounds, 2 weeks building evenings and weekends
References:
- Entre-Prises (UK) Ltd, Tel 01756 797978, http://www.entre-prises.com/
- Indoor Rock, Tel 0114 2669301, http://www.indoor-rock.co.uk/
- Bendcrete Climbing Walls Ltd, Tel 0161 338 3046, http://www.bendcrete.com/
- PME Ltd, Tel 01538 308043, http://www.pmeclimb.co.uk/
- DR Climbing Walls, Tel 0113 284 2369, http://www.drclimbingwalls.com/
- "Freeclimbing" by Thomas Strobl & Martin Zeller has a section on building a wall, and has several sample designs.
Nick "gollum" Smith used to live in his cave in Cambridge but has since discovered Sheffield. He lives in a ... house there.
This article first appeared in On The Edge no.75 in March 1998.


Comments