


 © Alpine Guides
Reference Altitude:
In order to get going you need to first set your watch at a known Reference Altitude at the start of each day - that is, set the altitude reading on the watch at a point where you know the height accurately on the ground (eg. at a definite point on the map or a place of known altitude such as a mountain hut, cable car station etc). For maximum accuracy, set the watch at a reference altitude within the height range you will be operating (eg at the top of the cable car rather than at the bottom), then ideally reset it several times during the day at known points along your route - as any significant changes in altitude and changes in the weather will all affect the accuracy of the reading.
 © Alpine Guides
There are a number of situations where knowing your exact altitude can help pinpoint your position or help with planning your route. Obvious examples include: knowing how much height you still have to gain to reach a summit, or indeed whether you have reached the summit at all, not just a subsidiary peak! When travelling up or down large uniform slopes and ridges, accurate height knowledge is often the only way of determining your exact position. This is especially true in poor visibility (cloud and darkness) or situations where a map is of limited use - such as midway through a climb for example.
Ascent Rate
Combining the timing abilities of your watch with it's altimeter function gives you a powerful tool for monitoring your progress through the day. Obviously, if it has taken an hour to climb the first 300m and you have another 600m to go - then you can expect it to take at least 2 more hours to get there. If this is about what you planned on then fine, but if not then you've an early warning sign that things may take longer than expected or you should be thinking of a shorter route. Some altimeters show real time ascent and descent rates in meters per minute, which can be especially useful for maintaining a steady uphill pace, monitoring personal performance or predicting accurately how long it's likely to take to reach future destinations.
Height Gain and Descent
Not a navigational tool - but certainly of interest to many outdoor users is the fact that most watches also have a memory function to record the highest and lowest altitude reached, as well as total ascent and descent for the day - so you no longer have to tediously count dozens of contours in order to boast to your mates in the pub how fit you are. Skiers always love to know how much descent they've done too - so remember to reset the memory on a perfect powder day before you set about trying to notch up 10,000m of descent before dusk.
Traversing and Contouring
On to more useful things though: being able to accurately follow a contour line for any distance is no easy task - when you throw in the complication of having to lose say 50m of height over 2 kilometres across the same slope, then it takes years of practice and even the best can still make mistakes. It's not without reason that all top mountain marathon runners now use altimeters to save time in these situations - as simply keeping an eye on the watch confirms your current height when you move along the slope.
 © Alpine Guides
So you know you've got to head down a steep slope and cut right just over half-way down to avoid some cliffs below. Hmmm, it's a bit cloudy too - any idea exactly how long that will take, or how far down half-way is? Whether you are on foot or on skis, the answer is never going to be easy until you use an altimeter.
Checking the map for the height you need to turn off at and maybe even setting an altitude alarm provides you with an accurate solution. Obviously the same technique can be used for going uphill too, should you find yourself doing a similar leg in reverse.
 © Alpine Guides
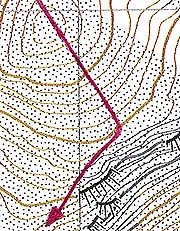
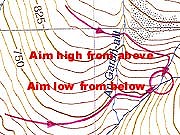
Now for the more advanced stuff. Anyone familiar with the technique of 'aiming off' (taking a compass bearing slightly left or right of an intended destination, so you know which way to turn when you hit the feature you are looking for) will be glad to know that the same technique can be used when navigating on slopes with an altimeter. Just note the target altitude from the map, then if possible always 'aim high' when coming down from above and 'aim low' when coming up from below.
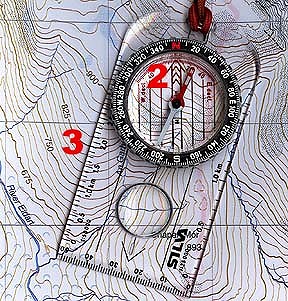
Compass and Altimeter Combined
Traditionally, on shallow angled ground navigators rely on compass bearings and accurate distance judgement (using pacing or timing) to cross featureless terrain or deal with poor visibility. However, what do you do when you cannot measure your distance accurately because of deep snow, uneven ground or sliding along on skis for instance? When accurately calibrated, an altimeter provides a good solution here as you can follow the bearing and stop when you reach the required height as indicated on the map. Ski mountaineers have been using this technique for years to navigate complex slopes and broad glaciers, but it is worth stressing that accurate altimeter calibration is always needed, particularly on shallow ground because in these situations a small change in height may mean a big difference in your position on the ground.
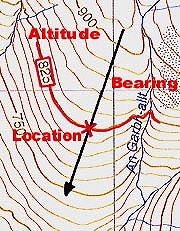
Aspect of Slope
Pull this one off and you will really impress us! Using the aspect of slope together with an altimeter is a really useful advanced relocation technique. Or in other words: a very good way of finding exactly where you are on a big rounded mountain side should you become 'temporarily unsure of your position!' - you do need to have some idea which bit of hillside you are on though before you start.
This is how it works:
 © Alpine Guides
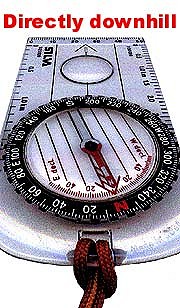
Stage 1: Take a bearing down the slope:
Take a compass bearing directly down the slope you are standing on: ie at right angles to the contour lines - then take away the magnetic variation (this is currently about -4dg in the UK).
 © Alpine Guides
Stage 2: Line the bearing up with the map:
Put the compass onto the map, over the section of mountain side you are standing on and line up the north arrow with the north lines on the map.
Stage 3: Find where the bearing points straight downhill on the map:
Move the compass around till you find a place where the bearing lies at right angles to the contours - just as on the ground.
 © Alpine Guides
Stage 4: Check your altitude
You now know your position lies somewhere along the bearing as it is laid out on the map. To find out exactly where, just check your altimeter and look to where the appropriate contour crosses the bearing to pinpoint your location.
Easy peasy, eh?
 © Alpine Guides
The barometer and thermometer on your watch can also be used to monitor changes in the weather over time, which can be useful if you are unable to get up to date forecasts because you are on an expedition to a remote region. Obviously, the air pressure needs to be monitored at the same location in order for any changes to be meaningful. This is easy enough overnight, but if you are leaving camp and returning later it may be worth noting the pressure in the morning and evening to keep an eye on any significant changes (a barometer memory function is very useful here).
In general, rising air pressure is a good sign - as high pressure systems usually bring stable, settled weather. Conversely, a rapid or significant drop in air pressure (decreasing at 2mbar an hour, or a 10mbar drop overnight for instance) is invariably a warning that bad weather may be on the way.
NB If your watch doesn't have a barometer function, you can still use it to monitor changes in air pressure by keeping an eye on the altitude reading when you are at a fixed location. A 30m increase in altitude roughly equates to a 2mbar drop in air pressure - so, if the altitude reading has gone up by 120m overnight for example, then the air pressure has dropped by around 8mbar and you would be well advised to keep an eye out for further signs of deterioration in the weather. On the other hand, if the altitude reading has dropped - this means the air pressure is increasing and good weather may be on the way.
Limitations and Accuracy
Knowing how your altimeter watch works, what it's limitations are and how to avoid various pitfalls will all help you get the best out of it in terms of performance - so we include the following for those really keen to know more.
The Pressure Graph: Air pressure doesn't drop uniformly with altitude, but altimeters usually approximate that it does over small ranges. This explains why an altimeter calibrated at 1000m in the valley will give significantly less accurate readings when used up at 3000m. For maximum accuracy, try and reset to a new reference altitude after changes in height of several hundred meters.
Weather Changes: Similarly, even small changes in air pressure over time will significantly alter the altitude reading as we've already mentioned, so re calibrating every few hours is a good idea - particularly if there is an active weather system around.
Temperature Effects: If you remember all those gas laws you did at school (No, I thought not), then you will already know that temperature has an effect on air pressure, so to allow for this the altimeter uses a list of average air temperatures for different altitudes. The problem is that the air temperature in your location is unlikely to be exactly the world average for that particular altitude. There is an equation you can use to estimate the size of errors caused by this, but it is of little practical use on the hill. Your best bet again, is to regularly set the altitude at known points to minimise any effects.
It is worth knowing however, that in cold weather (below 15c at sea level/freezing level of 2400m) the altimeter will tend to under read any altitude changes (If you start at 2000m, then go up or down by 1000m then you might expect it to only record a change of 950m. It will read 2950m instead of 3000m or 1050m instead of 1000m) whereas conversely in hot weather, it will tend to over read changes.
NB: Whether you wear your altimeter on your wrist or not shouldn't make a difference to the reading, as the unit will be compensated in order to be able to deal with different operating temperatures.
Wind effects: A number of guides have reported that if you reset your altimeter in a very windy spot - such as an exposed col on a ski tour - then move to somewhere out of the wind (ski down the far side) then the altimeter can read up to 80m too low. This effect may be caused by the fact that an increase in wind speed due to air flowing around an object creates a drop in pressure where the wind speed is highest. Conversely, if you set the altimeter out of the wind then use it somewhere much windier it might be expected to read too high.
 © Alpine Guides
Al Powell holds the UIAGM international guides carnet and runs the ski and expedition programs for Alpine Guides. Al is a well known Alpinist and winter climber with regular trips to South America, India, Pakistan, Russia, Nepal and Greenland, and many major first ascents to his credit. In his parallel world as an endurance athlete Al has won the prestigious KIMM (OMM) Elite and other mountain marathon events and finished top ten in the legendary Mont Blanc Ultra Trail race. More recently Al has entered into the highly competitive (and insane) world of ski mountaineering racing - representing the UK in the world championships. Al lives with his family in Otley, West Yorks.


Comments