30m.
Rockfax Description
Only a small independent section but worth a separate entry.
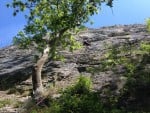
Climb the short wall to a good ledge (possible belay). Climb through the bulge then continue direct up the slab. Move left to the finish of Ten Craters.... © Rockfax
Feedback
| User | Date | Notes | ||
|---|---|---|---|---|
| Dr Matt | 30 Jun, 2022 |
Show βeta
βeta: Building on from, but disagreeing in part with, the Feedback from Paul Sagar - I DID follow the original described line of Simeon straight up from the mid-way ledge to the ring-peg and continued onward straight up as per Simeon Direct, and certainly agree that the initial moves to and past the peg were harder than VS 4c. But it was doable, if reachy (I'm tall), very good, and combined with the 'Simeon Direct' section above and then the crux finish of Ten Craters made for a really good sustained and direct line at tough HVS 5a/b, though one of my 2nds, a better (and shorter) climber than me, thought maybe the whole combo was worth E1 5b. This certainly does IMO bump up the grade of the start of P2 of the normal Simeon, and the right trending part of that is becoming ivy-clad to boot. | βeta? | |
|
Show beta
βeta: Building on from, but disagreeing in part with, the Feedback from Paul Sagar - I DID follow the original described line of Simeon straight up from the mid-way ledge to the ring-peg and continued onward straight up as per Simeon Direct, and certainly agree that the initial moves to and past the peg were harder than VS 4c. But it was doable, if reachy (I'm tall), very good, and combined with the 'Simeon Direct' section above and then the crux finish of Ten Craters made for a really good sustained and direct line at tough HVS 5a/b, though one of my 2nds, a better (and shorter) climber than me, thought maybe the whole combo was worth E1 5b. This certainly does IMO bump up the grade of the start of P2 of the normal Simeon, and the right trending part of that is becoming ivy-clad to boot. |
||||
| Paul Sagar | 21 Apr, 2021 |
Show βeta
βeta: At the optional belay ledge, do NOT follow the line of Simeon through the bulge. Holds have gone on this section and it is now much, much harder than VS and even if the peg holds you will hit the ledge below (I did). Go up the start of Ten Craters and traverse over to do the HVS section of this, then finish up Ten Craters because the top of Simeon is smothered by the yew tree now. | βeta? | |
|
Show beta
βeta: At the optional belay ledge, do NOT follow the line of Simeon through the bulge. Holds have gone on this section and it is now much, much harder than VS and even if the peg holds you will hit the ledge below (I did). Go up the start of Ten Craters and traverse over to do the HVS section of this, then finish up Ten Craters because the top of Simeon is smothered by the yew tree now. |
||||
| Chris the Tall | 13 Aug, 2007 |
Show βeta
βeta: Nice route on great holds, pretty logical line, as good as 10 craters and not much harder | βeta? | |
|
Show beta
βeta: Nice route on great holds, pretty logical line, as good as 10 craters and not much harder |
||||
Logged Ascents
81 users have logged this
Guidebooks for Dovedale
Not all climbs appear in all guidebooks

Please Login to view more details on the logged ascents
Route of Interest
John Peel
Grade: HVS 5a ***
(Dovedale)