


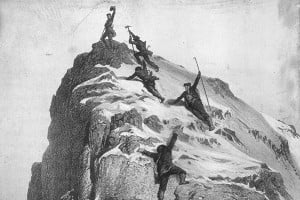
At a whopping 4808metres, Mont Blanc is the undisputed heavyweight of the Alps, and the highest peak in Western Europe by a margin of 500 feet. A huge white dome surrounded on all sides by thundering glaciers, huge alpine faces and some of the world's most stunning alpine scenery. Whilst the peak itself might not be the most visually spectacular of the Alps when compared to the giant triangle of the Matterhorn or the perfect spire of the Petit Dru, it inevitably attracts the crowds. Surely there's a part of every mountaineer that wants to climb the "big one"?
The good news is that Mont Blanc is an achievable target not only for climbers but also for competent winter walkers. But with the rigours of altitude, the potential for some serious weather in any season, the objective dangers of stonefall, seracs and crevasses, and the need for some basic mountaineering skills, it remains a massive undertaking for most teams. So what does an unguided ascent entail?

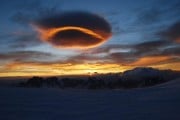
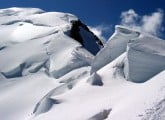
© Charlie Boscoe
In spite of Mont Blanc's fame and the number of people who climb it, you need only glance at online forums to realise that there is a real lack of English information out there about the peak. Basic questions such as "what kit do I need?" and "how technical is it?" crop up constantly. So in this article I'll cover everything you need to know about the two most common French routes – The Gouter & The Trois Monts.

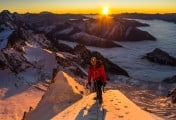
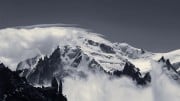
© Charlie Boscoe
The Gouter
Although sometimes referred to as the "normal route", the Gouter route still commands respect, and requires fitness and acclimatization, as well as basic skills in scrambling and cramponning.
The Route
Take the Tramway du Mont Blanc to the Nid d'Aigle at 2372m, either by taking the tram from St Gervais, or by meeting it half way having taken the Bellevue cable car from Les Houches (this has the advantage that it can be reached from the rest of Chamonix Valley using public transport).
"Mont Blanc is achievable not only for climbers but also for competent winter walkers"
From the Nid d'Aigle, walk south for 50 metres on the wide track before branching off left on a smaller path, which is marked with regular dabs of red paint. Initially the path twists and turns, before straightening to reach the Baraque Forestiere des Rognes (a small, unmanned hut). From here the path gets gradually steeper and more exposed as it zig zags up to the ridge dropping down from the Aiguille du Gouter. The ridge divides the Griaz and Tete Rousse glaciers, but both have shrunk considerably in recent years and are not especially attractive, although the rest of the scenery around here is excellent.
*At the top of the ridge is a warden's hut, where you may have to show proof of a hut booking, or at least demonstrate that you are not planning to camp in the vicinity of the Gouter hut. Camping seems to be tolerated around the Tete Rousse hut, and there is normally a large collection of tents just East of it.*
If you are stopping at the Tete Rousse hut, cross the Tete Rousse Glacier easily to reach the refuge (crampons may be necessary). 2 – 2.5 hours from the Nid d'Aigle. Staying at the Tete Rousse has two main advantages: a) it is quieter and therefore easier to get a reservation (and a good night's sleep!) than the higher Gouter hut; and b) starting here on day two allows you to cross the Grand Couloir in the cooler temperatures of the night rather than in the heat of the day. The glaring downside is that it adds three hours of uphill to your summit day.

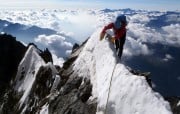
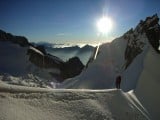
© Charlie Boscoe
If continuing up to the Gouter hut however, take a more direct line towards the Aiguille du Gouter West Face, and cross the Tete Rousse Glacier diagonally, heading for its SE edge, and the ridge which divides it from the Bionnassay Glacier. Having reached this ridge, follow it to the Grand Couloir, which is made obvious by the metal wire which crosses it. This is the most dangerous part of the ascent to the Gouter hut, and serious rockfall accidents occur here regularly. Some of the path before the Couloir is exposed to rockfall too, with only the very last few metres before the crossing being sheltered. Here's a few top tips on how to deal with the Grand Couloir:
- The Couloir is busy, so wait in a safe spot until you have a clear opportunity to cross without interfering with other groups.
- Move quickly up to the Couloir, pause to check for rocks, and then move quickly across it.
- Don't be afraid to jump the queue – if a group is putting you in danger by making you wait, ask to go ahead. Etiquette and a desire on everyone's part to keep moving normally ensures that you don't wait around for long.
- The wire across the Couloir can be useful, but consider whether you need it. The Couloir is roughly 30 metres wide, and 40 degrees, but usually with a very good path across it. Many people prefer to quickly dash across rather than introduce ropes and other things that may slow them down. The best way of staying safe is to be quick.
- If you use the wire, clip a karabiner to it, clip your rope through the karabiner and then tie each party member on to the rope with plenty of slack and carry the slack in your hands to avoid tripping over it. The wire is only there for an emergency in case of a fall and it is not a to be used like a via ferrata. Do not clip into the wire with a sling – the wire is several metres away from the path across the Couloir, so if you clip into it with insufficient slack it will pull you off the path.
- Once across the Couloir and headed for the Gouter hut, you are still threatened by stonefall (but less so) for the first 50 vertical metres or so. Keep moving!
- Higher up the ridge, you can often see into the couloir, and will be able to shout to people crossing lower down if you see any rocks falling. The word normally shouted is "caillou" (French for pebble/stone, pronounced ky-oo), but any loud shouts of expletives should work.
Having crossed the Couloir, a vague path leads you up and right onto the south side of the ridge up to the Aiguille du Gouter. From here follow the vague path, polish, crampon scratches and occasional red paint marks up the ridge, over some enjoyable and straightforward scrambling, until at roughly 3600m, where cables have been installed as hand rails. Follow these to the now disused old Gouter hut, which is now completely locked up, but which does have a fantastic view of the route you will just have completed. Go around the hut to the right and climb a short snow slope (often equipped with a handrail) to reach the top of the Aiguille du Gouter. Having taken in the superb view of the Aiguille du Midi, walk south for 100 metres along the flat snow ridge to reach the new Gouter hut. 3 hours from the Tete Rousse.

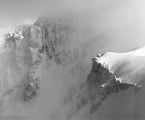
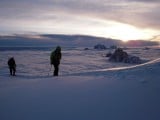
© Charlie Boscoe
Breakfast is served in the small hours of the morning at the Gouter (the exact time depends on what month it is and when the sun will rise), so the ascent to the Dome du Gouter is usually climbed in the dark. Luckily the route is straightforward, and after two small rises have been passed on their eastern sides immediately after leaving the hut, the route climbs up the north-west face of the Dome du Gouter. There are occasional crevasses, but generally the climb is a series of gentle switchbacks with little to worry about.
The route narrowly misses the summit of the Dome du Gouter, but few people bother tagging the top. Having passed under the Dome, descend gently to the Col des Domes, at the foot of the Bosses ridge. 2.5 – 3 hours from the Gouter hut.
From here, 100 metres of steep snow leads up to the Vallot hut. This is an emergency shelter but many climbers sleep in it, and it has become fairly disgusting, with human waste and rubbish piled up in the corner. It does provide some warmth though, so most people pause here for a bite to eat before the Bosses ridge.
Having passed to the right of the Vallot hut, a short, steep snow slope leads to the two distinctive humps which mark the beginning of the Bosses ridge. Go over the Grande Bosse and the Petite Bosse (which, confusingly enough, is the higher of the two), and follow the stunning and exposed snow ridge to the summit, staying mainly on the west side of the ridge. 5 – 6 hours from the Gouter hut.

© Charlie Boscoe
The Trois Monts
Although considered a more objectively dangerous route than the Gouter, the Trois Monts has a number of factors in its favour. The main benefit is that the Cosmiques hut is a short walk from the Aiguille du Midi cable car, so whilst getting to the Gouter hut is a tough 5 hours, doing the Trois Monts route involves virtually no effort the day before you try for Mont Blanc. The Cosmiques hut usually has space last minute too, so logistically things are simpler. On the downside, the ascents of Mont Blanc du Tacul and Mont Maudit are threatened by serac fall, and fatal accidents do occur.

© Charlie Boscoe
The Route
From the Aiguille du Midi, descend the famous snow arête that makes up the Midi E ridge, before turning back west and reach the Cosmiques hut in 40 minutes, having passed under the beautiful south face of the Midi.
After an early breakfast in the hut, cross the Col du Midi plateau and climb the NW face of Mont Blanc du Tacul. The route varies from year to year, often from month to month, but the line usually goes roughly from the bottom left of the face to the top right, reaching the NW shoulder of Mont Blanc du Tacul in roughly 2 – 3 hours from the hut. Late in the season there can be some difficult crevasse crossings below the shoulder, but these are often equipped with a ladder thanks to the local guides!
From the shoulder, continue towards the north face of Mont Maduit, descending slightly before beginning to reclimb beneath some seracs on the left of the face. The line taken varies depending on conditions, but the route is usually bottom left to top right once again. Just below the Col du Mont Maudit is the crux step, which is roughly 40 metres of 45 degree snow. There is often a fixed line attached to an anchor at the top of the step, and an intermediate anchor half way up the slope, both of which can be used as belays.

© Charlie Boscoe
Having negotiated the crux step, traverse southwards to the Col de la Brenva. By now dawn should have broken, and you will find yourself in some seriously impressive terrain – the phrase "big country" was invented for places like this! 5 – 6 hours from the Cosmiques hut.
The climb from Col de la Brenva to the top of Mont Blanc is longer than it looks, and not as enjoyable as the Bosses ridge, but the scenery is spectacular, and the route finding non-existent (in good weather). Simply pass to the left of the Mur de la Cote rock step and then climb the seemingly never ending snow slope above. Generally the terrain is low angled (roughly 20 – 30 degrees), and straightforward.
The summit arrives suddenly, and after the snow slope below, it is very welcome! 7 – 8 hours from the Cosmiques hut.
The Descent
Remember the old truism that at the summit you're only halfway to safety. Either of these routes can be reversed, and neither is any more difficult to descend than to climb. The crux step on the Trois Monts can be abseiled (2 x 20 metre abseils), and the Gouter descent does not require any abseils. The Trois Monts takes roughly 4 - 5 hours to descend to the Aiguille du Midi, and the Gouter roughly the same back to the Nid d'Aigle. Perhaps the most appealing option is a traverse of the peak, climbing one route and descending the other.

© Charlie Boscoe
What Skills Do You Need
Well the good news is that Mont Blanc via these two routes is not very technical at all, so you don't need to worry if the thought of Scottish grade IV makes you run for cover. You will however need the following things –
- Good basic crampon skills. These can be learned in Scotland (or anywhere else with snow) but wherever you're practising you ought to be confident front pointing up 45 degree snow as well as traversing, climbing and descending moderate angled (30 – 35 degrees) snow facing in or out. This is not an especially high standard but confidence in your feet will not only make you safer but it will also enable you to use less energy and have a more enjoyable time, so the more time you can log on your spikes the better.
- Experience with an ice axe. Although non-technical, Mont Blanc does require the use of an ice axe and having well-practiced basic skills is vital. Most of the time the axe will be used as a glorified walking stick but there are times during the ascent when the ability to climb steep snow will be aided greatly by confidence in using your axe.
- Knowledge of glacier travel. One thing we don't have in Britain is glaciers and as such roping up, crevasse rescue and route finding on glaciers can seem daunting. The ability to pick a safe route takes time and experience, but you can give yourself a head start by reading any books about glacier travel and studying terrain as you pass through it. The other skills meanwhile can be learned and practiced fairly easily – get a book about crevasse rescue and just start practicing. If you don't have any glaciers nearby then walk round the garden roped up, get a feel for how far apart you need to be, and practice taking coils on and off quickly and neatly. When it comes to crevasse rescue you just need a partner and a good anchor (I find trees best). Try out different hauling systems, discuss them and try and perfect them. Once you can do that then take a day before you go up Mont Blanc and head up the Montenvers train to the Mer de Glace ice. You might be surprised how different doing it for real on the ice feels. Put a bombproof back up in and then get your partner in a real crevasse and practice building your anchor whilst lying on your belly, transferring their weight off you and onto the anchor and then finally, hauling!
As with all skills, these are often best learned from an expert, so don't be afraid of paying a guide or an instructor for a day or two to teach you. The more you know, the safer you will be, the more confident you will feel, and the more chance you have of getting to the top and enjoying yourself along the way.
One final thing: when you're on a wet glacier, rope up. Some people seem to think that a track and regular traffic means that there are no crevasses, but having twice fallen into a crevasse whilst walking along a busy track, I can confirm that this is nonsense!

© Charlie Boscoe
Gear
- Rucksack. 30 to 40 litres, nothing too fancy or heavy – you've got to carry it after all.
- Ice Axe. You can put the technical axes away here, a simple mountaineering axe is perfect.
- Crampons. 10 or 12 point C1 or C2 are best.
- Harness
- Helmet. Some people don't bother but with the rockfall in the Grand Couloir and the scrambling below the Gouter hut it is a good idea to wear a helmet.
- Sunglasses. Category 3 or 4.
- Headtorch
- Rope. 30 metres is enough for the Gouter and for climbing the Trois Monts. If descending the Trois Monts, a 40 metre rope will allow you to abseil the crux step in two abseils.
- Crevasse hauling kit. The details of this will depend on what you've worked out from practicing crevasse rescue, but a combination of ice screws, slings, abseil cord, karabiners, and pulley devices. If you don't know exactly what you need, this probably means you need to practise a bit more!
- Climbing hardware. For the approach to the Gouter hut, some rock protection may be useful. Half a dozen wires should be plenty, plus a few quickdraws. Most climbers will do without this but it depends on your climbing comfort level.
- High factor sun cream. Go lightweight and just take a little tube.
- Water bottle. 1 -2 litres, depending on how much you normally drink on the hill. Bear in mind that you need to drink more at altitude than you normally would.
- Food. As altitude increases appetite tends to decline, but a good supply of snacks is a good idea. Pick things that you know you can stomach even when you're not feeling great. Eat plenty before setting out.
- Map and Compass. Plus the ability to use them! (Check out this UKHillwalking Navigation Article)
Guidebook

Clothing
Clothing is a personal choice, but bear in mind that temperatures will range from over 20 degrees at the Nid d'Aigle to well below freezing on the summit. You certainly need a warm jacket, a thick beanie, heavy duty gloves and a good shell jacket. As for boots you could get away with B2 boots, but for optimal warmth and performance B3 is the way to go.
Fitness and Acclimatisation
Quantifying these two things is extremely difficult, although in simple terms the fitter and more acclimatized you are, the better. You will be quicker (and therefore safer from any risk of getting caught in bad weather or still being on the mountain at night) and have a much more enjoyable time.
As far as fitness goes you should be at the stage where several successive days of mountain walking (taking in around 1000 metres of ascent) is no problem. Training in the gym or doing other sports is beneficial but nothing replicates long walking or scrambling days. Try to put in successive days and do that little bit extra each day, be it an extra peak or a longer route back to the road.
Acclimatisation is often underestimated and/or misunderstood. The best programme is one which takes in summits of increasing altitude, preferably including another 4000er. Climbing a peak of around 3000 metres, one of around 3500 metres and finally a 4000er is ideal. This would almost inevitably involve staying in mountain huts, which would provide further acclimatization without breaking the old (and correct) adage to "climb high, sleep low".
Overall, Mont Blanc is a superb objective, well within reach for most fit and determined hill walkers. Climbing skills are beneficial, and will make the ascent feel more comfortable, but many of the skills required can be learned in the acclimatization days leading up to an ascent. If you have any doubts about your ability to look after yourself on the peak, take a guide. Your safety level and chances of success will rise, and you can always come back and do it independently in the future.
Most importantly, don't be afraid to turn back. Mont Blanc will be here long after we're all gone, so take your time and achieve it when conditions, weather and your ability align. Good luck!
Accommodation Advertise here
No Premier Listings found in this area
Instructor/Guides Advertise here
No Premier Listings found in this area
Outdoor Shops Advertise here
No Premier Listings found in this area
Climbing Walls Advertise here
No Premier Listings found in this area
UKC Articles and Gear Reviews by Charlie Boscoe
- ARTICLE: Tokyo 2020 Olympic Selection Explained 4 Aug, 2019
- ARTICLE: Living and Dreaming in Chamonix 10 Oct, 2016
- REVIEW: Mammut Nordwand Pro Jacket 13 Oct, 2014
- REVIEW: Mountain Equipment Compressor Hooded Jacket 7 Jul, 2014
- REVIEW: Rab Xenon X Hoodie 6 Jun, 2014
- COMPARISON REVIEW: Hardshell Pants 4 Mar, 2014
- Montane Alpha Guide Jacket 14 Oct, 2013
- MSR Reactor Stove - With VIDEO 28 Aug, 2013
- REVIEW: Gregory Alpinisto 35 Litre Rucksack 12 Aug, 2013
- Wild Country Summit and Eclipse Harnesses 24 Jul, 2013


Comments