

Toe-Hooking and Clamping
We're continuing with the theme of footwork for steep terrain in this on-going technique series. In the previous article we looked at heel-hooking and now it's the turn of its close companion, toe-hooking. Toe-hooking seems to crop-up increasingly frequently in modern bouldering and is regarded as something of a 'Marmite technique', which climbers either love or hate. However, it can't be ignored and if you are concealing a major toe-hooking weakness then now may be the time to take it on.

Fundamentally, toe-hooks can be used in much the same way as heel-hooks, to lighten the load on steep terrain. When hanging from a large hold simply swing up a foot and hook your toe over it next to your hands, then relax, dangle and let the toe take the strain while you re-group. Most climbers will default to a heel-hook in these situations; however, a toe-hook may facilitate a more comfortable position, subject to the angle of your body and the shape and size of the hold.


i) Toe-hooks on overhangs
What not to do!
So who hasn't done this before when climbing a roof? You see that jug, forget about your feet, launch out for it so that your body is at full-stretch, then suddenly realise that you can't move onward without taking a massive swing. Whilst this will always cost you energy, you may get away with it on big holds, but on small holds or slopers, you may pay the price. Page one of overhanging climbing is to keep your feet on. It's not just your arms and fingers you'll be saving by toe-hooking, you will massively reduce the amount of core tension that is required as well.


What to do instead…
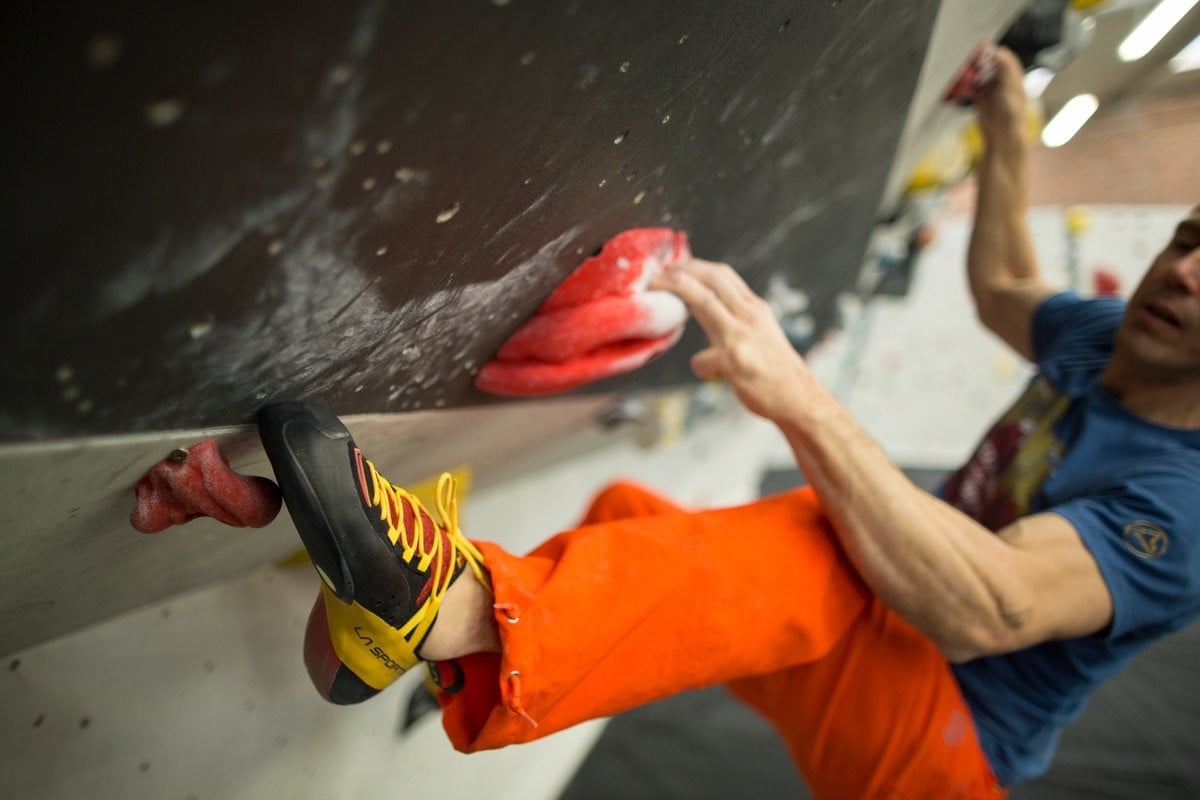
Before you make that crucial reach, have a quick scan for undercuts or features that will lend themselves to a crafty toe-hook, then go for the handhold.

Next up, engage the toe-hook with total conviction and maintain constant tension by pulling with your shin muscle. The Force the toe to stick wilfully and there is no point being tentative or you'll be in a worse position if it blows suddenly, than if you hadn't bothered with it at all! In some cases a toe-hook may be required to pull you on to a sloper that would otherwise be unusable.

Many climbers find that their shin muscles aren't strong enough to hold single toe-hooks and in which case, the 'double toe-hook can be a fantastic option on large features or when two undercuts are available.

A key tactic is planning how you're going to take the toe out in order to avoid cutting loose and the answer usually comes from trying to build your feet in small steps, rather than trying to make big ones. In this case, the solution comes from pulling on the left toe-hook and stepping out with the right foot to the foothold just below the lip. It takes a lot of experience to get this right 'on the flash' and most climbers will need to work the sequence first.
Releasing when you have to cut loose
In some cases, having made good use of a toe-hook there will be no option other than to cut loose, simply because there are no alternative footholds. Here, the trick is to take one foot off first, dangle it below you and then to tense your core muscles in order to deaden the swing. Here, Gill Peet hangs in there at Boulder UK, Preston.


Large roofs and 3D climbing

When attempting to cross a large roof and especially when turning the lip or when huge volumes are involved, it often pays to invert and go out 'feet first. Snag a high toe hook and then track your body back round. The purpose of this is to lighten the load on your arms and avoid the problems associated with your feet swinging off which occur when going hands first. Clearly, there's much scope for getting in a tangle so practice before using this earnest!
Moving sideways


Toe-hooking may seem a less obvious ploy when moving sideways. In this scenario, there is a choice between standing on the temptingly-positioned narrow rail (just below my calves in this photo) or going for the double toe-hook. Yet the toe-hook wins every time, seeing as the target hold is so sloping and it would require obscene levels of core tension to stay on the small lower foothold.
Heel-toe camming

A further refinement is to cam your heel against the wall in order to partly jam-in, the toe hook. This technique crops up infrequently but it's worth keeping a lookout as it can save the day.
Clamping


A fantastic technique for tackling roofs and steep overhangs is to place a toe-hook and then to stand on the top of the foothold with the other foot. You can then squeeze, simultaneously with both feet in order to maintain contact. This method may only be possible on larger holds, with relatively positive tops, but it will suit those who struggle with toe-hooking, as it makes it much easier to keep the toe-hook in position. With clamping, it can be tricky to decide which toe to place under the foothold and which to place on top. There's a lot to take into account here but in short, you need to decide whether to prioritise the reach (ie: the hand move) or the release (i.e.: the subsequent foot move). In other words, with your feet one way round on a clamp, the reach may feel easier but the release will feel harder, whereas if you place your feet the other way round, the opposite will be the case. On easier clamp moves, it's unlikely to be a deal breaker but on harder moves, this line of discussion may make all the difference. The answer is simply to practice frequently so that it becomes more intuitive and you gain a better understanding of the mechanics.
Shoe notes:

If you're toe-hooking behind a deep in-cut flake then it won't really matter what shoes you wear but if you're trying to gain purchase on a marginal, sloping feature then you'll need an enlarged rubber toe-patch, the likes of which has become a standard on modern bouldering shoes. For clamping, a down-turned shoe always offers superior performance to a flat shoe.
ii) Toe-hooks on features and less steep terrain

The classic use for toe-hooks on less-steep terrain is when following a sloping ramp in order to reduce the load on your arms and make it feel easier to hold. Simply swing the toe up onto the feature and 'track' it along as you shuffle your hands, the key being not to get stretched out too far. Again, many will default to heel-hooking, but a toe-hook may provide a superior option.

The other main application is to avoid barn-dooring on arêtes. In fact, a toe-hook may enable you to pause and clip or chalk-up in a position, which otherwise would have been completely off-balance.
A common mistake is to miss toe-hooks around the sides of boulders, as they lie outside the standard field of vision.
iii) Marginal toe-hooks and compression toe-hooking
Sometimes a toe-hook can be used to assist with progression on arêtes or rounded prows, as opposed to merely using them for balance or releasing a hand. This technique involves pulling hard on the toe and yarding up into the move, whilst 'compressing' (pulling inwards) with the opposing arm. In some cases, when toe-hooking on a tiny or sloping feature this will require that extra level of accuracy, not to mention a higher level of pull from the shin muscle and overall body tension.

iii) Supportive training and drills

Many climbers struggle with toe-hooking because they have weak shin muscles. Genetics would appear to play a role here and some just seem to have strong shins whereas others don't. The good news is that the relevant strength can be gained with supportive training. Simply hang from a bar with your toes, using a hand for support if necessary. For example, do 3 or 4 sets of 6 - 10 seconds but make sure you right yourself just before the point of failure! There is always a direct link between strength and confidence in climbing. If you make the effort to strengthen your shins, you'll have more faith in your ability to stick toe-hooks.
Whilst strengthening exercises are useful, there is still no substitute for practising toe-hooks in the field and a good drill is simply to climb around on a roof on a bouldering wall using any colours and to see how many toe-hooks you can find and how long you can hold them for.
Happy hooking and see you in a month or two for the next round, where we'll be looking at gripping technique and how to make the best use of handholds.
With special thanks to Boulder UK Preston and Depot Climbing, Manchester.

Neil Gresham is widely regarded as one of the world's leading voices in performance coaching for climbing. He has been coaching and writing regular training articles for national magazines since 1993 and has pioneered many of the methods that are used widely by coaches today. Neil is the current training columnist for UKClimbing.com and Rock & Ice in the USA.
He has climbed E10 trad, WI 7 on ice and in 2016 he climbed his first 8c+ at the age of 45 when he made the first ascent of Sabotage 8c+ at Malham Cove. Neil puts all his successes down to hard work, motivation and refinement of his game. He believes that work and family commitments don't need to limit our climbing goals provided we are focused and make the best possible use of our training time.
Key components of Neil's training programmes
- All programmes are based on response to a detailed questionnaire and are aimed at the ability level, weaknesses, strengths, goals and lifestyle constraints of each individual.
- Programmes can also be based on the results of optional benchmarking tests. See 'benchmarking' on this site.
- Programmes can be for all-round performance or geared towards different climbing styles: bouldering, sport, trad or competitions. They can also be targeted towards goals, weaknesses, trips or projects.
- You can choose between a full training programme (which includes all aspects of training) or a 'fingerboard-only' training programmes. Fingerboard programmes include advice on how to fit the sessions in with other climbing and training.