

Technique - Use of the Toe
Listen up. When Adam Ondra onsighted his first 8c+ he could only do thirteen pull-ups and couldn't hold a one-arm lock-off. He became the world's best climber thanks to his incredible technique and mental control, at a time when his campus-board scores wouldn't have registered in the top one thousand. Strength is currently being over-hyped to an absurd extent in the climbing media and especially on the social networks. Yet all these inhuman feats we see every day are often a mask to conceal great weaknesses. The best climbers are rarely the ones who are showing us how good they are at pull-ups, as they are too busy getting on with the climbing.

Having outlined a general approach to technique improvement and examined shoe selection in the first articles, it's time to get down to business and take a detailed look at footwork. In this article, we'll examine the main ways to use the toe, followed in the next article by use of other parts of the shoe, namely, heel hooking and toe hooking. Most will know the basic definitions, so instead we'll focus on common errors and key tips for improvement. Remember that good footwork is also about placing your feet with control and accuracy and selecting footholds in the correct order, as we will see in a separate article on movement skills.
In this article, I've consulted Steve Golley, who was a key player at the start of the performance coaching boom in Britain around 2000. Steve has run many coaching holidays in Fontainebleau and Kalymnos and specialises in technique coaching. I have also picked the brains of Gill Peet who is based at Boulder UK in Preston. An 8b+ climber herself, Gill has extensive experience in coaching adults and juniors.

Holds as anchor points
When diagnosing technique faults it often makes sense to look at the way we use footholds and handholds before examining other aspects of technique, such as balance and movement. The holds are our principle point of contact with the wall, so if you're not using a hold correctly then you can never hope to perform a move with full efficiency. Think how many times a slight re-adjustment of your grip or repositioning of a foot has unlocked a boulder problem that you've been trying for ages. When working a project it pays to be open-minded and never to rule out the option of making an adjustment. Onsight climbing is a little more complicated and we need to strike a balance between wasting time by experimenting excessively and making careless mistakes, which could have been avoided with a quick and efficient re-adjustment.
The ten key toe-moves
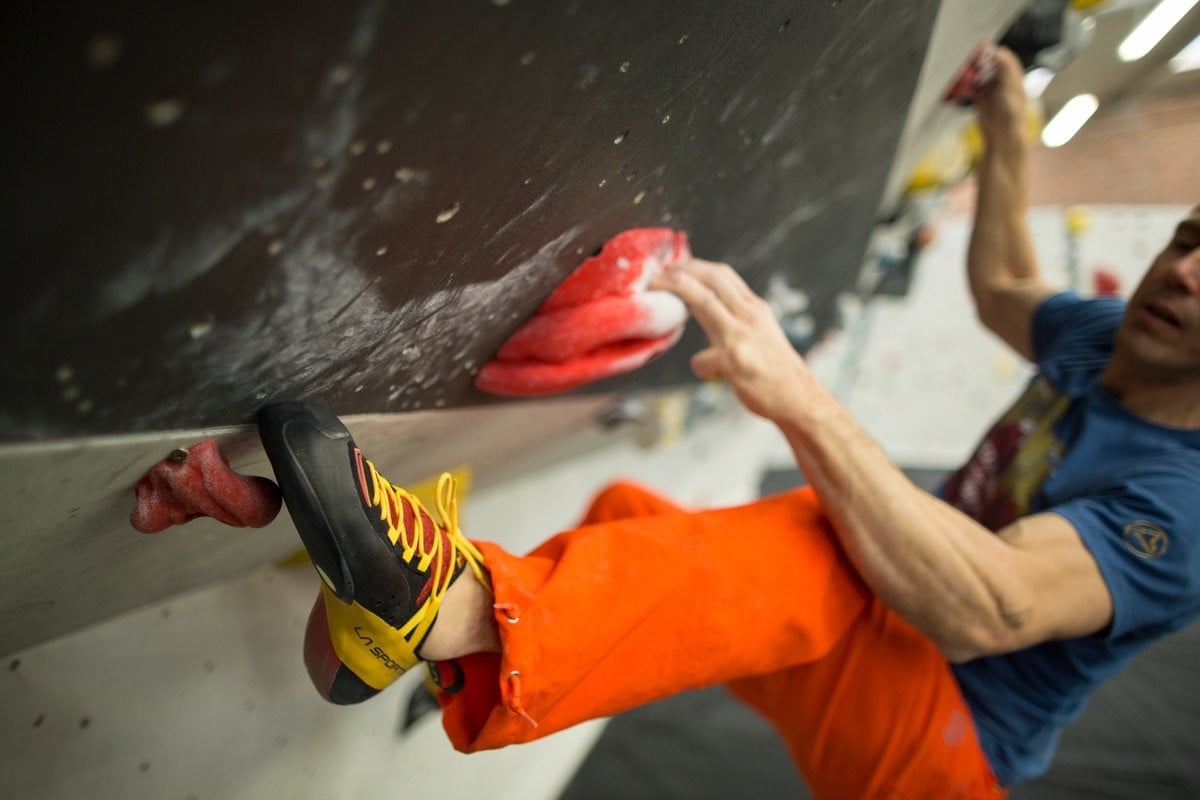
1. Edging
Every climber knows this basic technique, but are you sure you always edge correctly? The classic mistake is to stand on the rounded, 'middle part' of the edge (ie: closer to the instep) and not the front, 'toe part', as this will feel less stable and you won't be able to stand-up on tiptoe to gain extra reach. For beginners, this fault may be blatantly obvious, whereas with intermediates it may be subtle or intermittent. With asymmetric shoes that have a straight inside edge, if the hold is wide then you can line the edge of the shoe up to it like a ruler; however, beware placing your foot too parallel to the wall, so that your ankle makes contact.
Edging on the rounded part of your shoe effectively removes a rotating ball joint (your ankle). It will pin you in too close and will severely restrict your movement options from that foothold.


A general for most edging moves is that your foot should make a 45 degree angle with the wall and it is only likely to be more parallel is when you step very wide. It may be preferable to edge with your foot perpendicular to the wall if the foothold is exceptionally small (see 'smedging' below). Aim to align your foot to maximize rubber contact. For example, if the edge is pointing diagonally downwards then bring your foot high over it and point your toe aggressively downwards, or if it points diagonally upwards then drop your heel. A stiffer sole will benefit beginners or those who need support for long, sustained edging routes. However, for bouldering, higher level climbers may opt for a shoe that has less midsole stiffness and high rand tension, as this will provide greater sensitivity and promote freer movement, whilst also holding it's own at edging, provided you have strong toes.


2. Outside edging
Use of the outside edge is required frequently when lay-backing or using side-pulls and it may also help improve reach in certain positions. On overhangs, outside edging can literally transform the entire climbing experience by enabling the climber to obtain balance and save energy. This key technique is missing from the repertoire of many beginners and this is apparent when we see climbers 'duck-footing' on traverses or vertical routes and losing balance. We will examine body position for outside edging later in the series, but looking purely at the footwork component, the key, once again, is to use the front part of the edge, rather than the rounded side part. This requires you to turn your heel outwards slightly as you step through, to create a 45-degree angle to the wall, rather than presenting your foot parallel. Note that it can feel trickier to find the 'sweet spot' for outside edging if you're wearing aggressively down-turned or asymmetric shoes, but if in doubt, always stand slightly closer to the toe.


3. Smearing
Smearing is all about developing trust in your feet as well as understanding when to do it and when to avoid it. Many climbers view smearing as a last resort and will always try to stand on a positive foothold in preference; however, in so doing this may facilitate an off-balance or strenuous move. Conversely, when the handholds permit, some will be too quick to pedal their feet up the wall and haul with their arms rather than looking for a positive foothold. Either way, smearing on slabs is a technique that requires tenacity and confidence. As Johnny Dawes once said, 'anything can be a foothold if you believe it to be so!'


The required level of accuracy is higher than many climbers realise. In smearing terms, a tiny blemish in the wall, which is less than a millimetre deep, may make the difference between success and failure. If there are no obvious features then smear flat against the wall in the optimum position (this will vary according to the type of move and we'll look at specific examples in the slab climbing article later in the series).

Try to avoid or minimize testing of the foothold before committing weight to it, as this is a nervous habit, which often serves only to dislodge the initial placement and psyche you out. Maintain constant, even pressure as you execute the move. Focus on transferring your weight evenly and smoothly from foot-to-foot. It is counter-intuitive to press hard on a tiny smear but if you are too tentative you will lose friction and your worst fears will come true. Several small steps are nearly always preferable to one big one. Keep your heels down for maximum rubber conformity and beware the temptation to lean in too far for perceived security, or to stand up on point for extra reach. Soft shoes with thin soles will provide more feel and sensitivity for smearing. This doesn't mean wearing your worn-out, floppy old shoes, but instead go for something tight fitting with good rand tension.
People tend not to be confident at smearing so practice regularly. Eliminating footholds on easy climbs will force you to push off the surface of the wall for a big move or run your feet up when you can't quite get your foot up as high as your flexible friend!'

4. 'Smedging'
Keeping up with the latest jargon, for tiny edges that barely constitute footholds, the best technique is to use the front part of the toe and to 'half-smear-half-edge' it over the hold, the idea is to compress the rubber so it moulds. Compared to standard edging, the foot will usually be more perpendicular to the wall and the heel may be a fraction lower. This tactic can be useful on small screw-on holds, tiny polished features, such as those found on British limestone sport crags or for pebbles and nubbins on granite or grit. There is no blueprint for the optimum 'smedging shoe' – some climbers will prefer stiff and others will go for soft and sensitive, with plenty of tension. My personal preference is to use No-Edge shoes, as they strike the balance between support and sensitivity and they adapt superbly to the holds.

When smearing on very small marginal footholds, the relative height of the heel will always depend on the angle of the surface that you're standing on. On slabs it will be low but on overhangs it will be higher. Climbers should point and tense their toes throughout the move to ensure maximum adherence and to steer them in the required direction of travel'
5. Pockets and slots
The key with pockets is not to be lazy and simply to poke your toe in at the angle that feels easiest. Lean back to scan the deepest part of the hold and then rotate your foot so you can point your toe inwards aggressively. This always feels harder when a pocket or slot is far out to the side, but your toe will simply ping out if you don't make the effort. Stiff, asymmetric shoes with pointed toes will work well and down-turned shoes may be better still unless prolonged support is required, in which case a flatter stiffer shoe may be preferable.


With large pockets and breaks or deep in-cut features you need to strike a balance between ensuring the best contact with the hold and maximizing movement flexibility. It may be tempting to cram your whole foot into the hold for security, but this will restrict you so much that it will always prove counter productive. For pockets that are bigger than a toe's worth, we should place the toe on the edge.'
6. Drilling the feet on overhangs
When climbing on slabs or vertical walls with good footholds, we tend to use our feet passively like a platform; in other words, we place them and then forget about them while reaching for the next handhold. However, if you do this on a steep overhang, especially when the footholds are poor, then your foot will pop and you'll swing off. Instead, you must tense your hamstrings, glutes, abs and lower back in a single connected chain. A good way to do this is to imagine yourself to be 'drilling' your toe through the hold and into the wall behind it. This requires a great deal of coordination as the urge is always to focus too much on the handhold. If you're working a boulder problem then once you've established that you can get the handhold then next time try to focus on maintaining tension and making the foot stick. Down-turned shoes make life way easier by helping you to maintain tension and use your feet like a claw.

My number one tip is to climb with body tension, and this starts at your feet. To help climbers to understand this, I ask them to stand on the floor with one foot in front of the other. Then to try to pick up the carpet with the toes of your leading foot and lift your heel up at the same time. Feel the tension in your hamstring and then take this tension up into your core. Another good drill, which is performed on an overhanging wall, is to start with your hands low and your feet on small but positive footholds. Then 'walk' your hands as high up the wall as possible, whilst trying to maintain contact with your feet and visualizing the previous exercise. Alternatively, place a foot far out to the side and do the same drill. '
7. 'Side-pulling' with the feet
There are often occasions when we can place a foot out to the side and use it to pull ourselves in closer to the wall or to steer us in the required direction, for example when climbing arêtes or rounded features. In some cases, the entire sole of the foot can be placed 'flat' on a large feature, and in others, the tip of the toe will be used to 'snag' a positive foothold on which to pull. Again, down-turned shoes will help and the key is to engage the hamstring and pull with this dynamically.

8. Pivoting
This crucial technique comes into its own when traversing or climbing diagonally and especially when swapping feet, back-stepping or performing drop-knees. Of course, you can simply remove your foot and replace it using the outside edge, but this is never as neat or efficient. The key is to anticipate the pivot and to allow sufficient space on the foothold by standing on the near side, so that you can swivel onto your outside edge. If you don't do this then you'll spin off the far side of the foothold.


9. Swapping feet
Whilst the aim should always be to plan your foot sequences in order to minimize foot-swapping, there will always be occasions when the best option is simply to change feet, especially when climbing indoors where footholds are limited. If you use the self-taught 'jump-and-clump' method, swapping feet is likely to feel awkward, clumsy and perhaps even nerve-wracking. However, it is possible to turn this into a smooth, precise and controlled operation using one of two methods, or minor variations on each. If you haven't tried either of them before then you won't believe the difference.
i) 'The pivot method'


ii) 'The ballerina method'
Gill Peet's 'ballerina tip':
'I nick-named this foot-swap the ballerina as it helps the climber to think about the body position as well as the foot position. The idea is to pass the heel through, to hover your inside edge over your weighted foot, and then to quickly but carefully roll or slide this out and make the switch.'


Try to get into the habit of saving a bit of space on the inside corner of wider footholds just in case you need to make a foot-change. Note that many climbers are prone to doing the exact opposite here, and standing on the near corner of footholds by default. However, don't save space on tiny footholds or you will compromise the placement. In general, don't go so far out of your way to avoid swapping feet that you revert to strenuous flat-smearing or stepping-through too far. We'll look at further tricks for avoiding foot-swapping, such as flagging, later in the series.
10. Back-stepping
Most climbers understand the benefits of stepping through (or inside) when traversing or moving diagonally, in order to minimize the number of foot moves, or avoid swapping feet. However, a great tip is to step back around (or outside), as this may prove to be more efficient. To get this working well, you will need to pivot on one or both feet in order to make fluid transitions of your weight from foot to foot.


The devil always lies in the detail when it comes to improving any aspect of technique. If one or two of the techniques in this article are missing from your repertoire or if you're not performing others consistently or with good form, then you will be wasting energy in a surprising number of situations. As always, the key to learning or correcting techniques is to practice extensively on easy ground, for example during warm-ups, and then to 'stress-proof' them by attempting to maintain form on harder terrain.
Neil Gresham is one of the early pioneers of coaching for climbing. He has climbed E10, 8c+ and WI 7 and is sponsored by La Sportiva, Petzl, Osprey and Julbo. He offers a personalised training programme service at www.neilgresham.com.
Steve Golley is an experienced performance coach and has run coaching holidays from Fontainebleau to Kalymnos. He specialises in technique coaching.
Gill Peet is an 8b+ climber who also has extensive coaching experience and is currently based at Boulder UK, Preston. Gill was a member of the British Bouldering team for several years.
A special thanks to Boulder UK and The Depot Manchester.

Neil Gresham is widely regarded as one of the world's leading voices in performance coaching for climbing. He has been coaching and writing regular training articles for national magazines since 1993 and has pioneered many of the methods that are used widely by coaches today. Neil is the current training columnist for UKClimbing.com and Rock & Ice in the USA.
He has climbed E10 trad, WI 7 on ice and in 2016 he climbed his first 8c+ at the age of 45 when he made the first ascent of Sabotage 8c+ at Malham Cove. Neil puts all his successes down to hard work, motivation and refinement of his game. He believes that work and family commitments don't need to limit our climbing goals provided we are focused and make the best possible use of our training time.
Key components of Neil's training programmes
- All programmes are based on response to a detailed questionnaire and are aimed at the ability level, weaknesses, strengths, goals and lifestyle constraints of each individual.
- Programmes can also be based on the results of optional benchmarking tests. See 'benchmarking' on this site.
- Programmes can be for all-round performance or geared towards different climbing styles: bouldering, sport, trad or competitions. They can also be targeted towards goals, weaknesses, trips or projects.
- You can choose between a full training programme (which includes all aspects of training) or a 'fingerboard-only' training programmes. Fingerboard programmes include advice on how to fit the sessions in with other climbing and training.