Avalanche Basics Part 2: Staying Safe
Following a spate of avalanche-related deaths and injuries in the Scottish mountains recently, we are re-sharing this 2-part series on avalanche awareness and safety skills by Mark Reeves, first posted in 2012.
In part 1 of this series Mountaineering Instructor Mark Reeves looked at how avalanches occur; here in part 2 he suggests ways to assess the risk, spot the warning signs and stay out of trouble.
This article is derived from Mark's new e-book A Mountaineer's Guide to Avalanches, available on Kindle, and for ipad.
Avalanches may never be entirely predictable, but we can help stack the odds in our favour in several ways. One is reading the Sportscotland Avalanche Information Service (SAIS) forecast to the area that you are going and acting on it even before you head out - assuming of course that you're in Scotland, and specifically one of the five areas covered by the service. Another is the WARTS approach to avalanche assessment, a practical guide to spotting the warning signs when out on the hill. Anyone can use this for themselves, wherever they happen to be, and it is the key to taking responsibility for your own safety.
Planning for a trip in winter should start long before you arrive in the area. Check weather forecasts, guides' blogs and avalanche forecasts
Avalanche Forecast
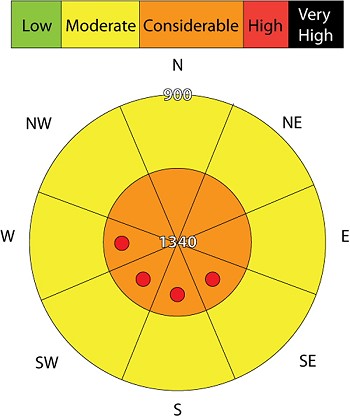
Take a look at the SAIS forecast. The first thing you see is the avalanche wheel. This is a circle divided into eight sections representing the aspect of the slope (NE,N,NW and so on). The centre of the wheel represents the highest point of the area which that forecast covers. The next ring out is a point halfway between the highest point and the lowest snow cover, while the outside ring of the circle is the lowest altitude that you will find lying snow. The colour represents the avalanche risk and most forecasts the world over use the same scale (there's a definition of this system here).
From this wheel we can see at a glance that above around 1100 metres it is 'cat 3' with pockets of cat 4 on some aspects of slope. However the wheel just gives a very general overview of the avalanche conditions, so to fully understand whats going on and what the risks are we also have to look into the written content of the report.
This often starts with an statement of the general conditions: "It will remain cold and dry. Light to moderate winds will be from the east."
A Forecast of Snow Stability and Avalanche Hazard follows this: "Little change is expected in snowpack stability. Areas of weakly bonded windslab will remain on South-East through South to West aspects above 800 metres. Patches of this windslab will also exist in shelter locations in other aspects. The avalanche hazard will be considerable"
From this forecast, we can see that the avalanche conditions are mainly due to windslab accumulations on very specific aspects. However they warn us about cross loaded slopes, where dips, gullies, ridges and hollows may have lead to pockets or pillows of windslab in slopes that are exposed to a cross winds rather than just a lee wind (see part 1 of this article). The wheel shows some general conditions: you can expect to have to avoid areas of windslab and in particular avoid all aspects from South East through South to West aspects above 900 metres.
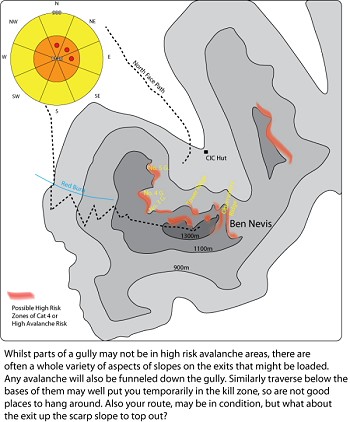
Can you project the forecast onto a map of where you intend to head? Some people draw the avalanche wheel onto their map to remind them (see pic above right).
Winter walkers and mountaineers should always supplement avalanche forecasts with risk assessments of their own. Here's where the WARTS approach to avalanche assessment comes into play
WARTS - risk assessment and planning
Always remember that any forecast is just that - a forecast. The information it offers is only a prediction of probabilities, not a cast iron guarantee.
The avalanche forecast is based on the weather forecast for the area (itself only a prediction), combined with observations of conditions from staff on the ground. Winter walkers and mountaineers should always supplement this info with risk assessments of their own. Here's where the WARTS approach to avalanche assessment comes into play.
WARTS is an acronym to help you remember all the aspects of assessing how high the risks of an avalanche are: Weather; Avalanche history; Route chioce; Terrain and temperature; and Snowpack. It should be used in the planning phases of your days out as well as on the hill. Taking time to think and act on the information is essential, and as ever when starting out you are better being overly cautious.
WARTS
W - Weather History
Read a Weather forecast:
- How does the observed Weather compare to forecast?
- Weather observations on the ground
- Visit Instructor/guides blogs for longer weather history prior to your trip
A - Avalanche History, Aspect, Altitude, Angle and Above
Read the Avalanche forecast:
- Have any Avalanches occurred/been observed?
- What Aspect are most at risk?
- What Altitudes are most at risk?
- What/Who are Above you? (cornices, windslab etc)
R – Route Choice
- Where does your route go?
- Is the route safe to approach and exit from?
- Does your route avoid known dangers from aspect and altitude?
- Can you select a safe route through the terrain by avoiding windslab or using islands of safety?
T - Terrain and Temperature
- Are there any Terrain Traps (Gullies, cornices, convex slopes etc)?
- Are there anchors in the Terrain or is it a long open slope?
- Is there a sudden rise in temperature?
S - Snowpack
The snow is the last place to look, especially when starting out, it should only be used to back up any thoughts you have made already from your observations
It is beyond the remit of these articles to go into too much detail over digging in the snow and we recommend a book to help give you an idea (reading list at the foot of the article), or alternatively book on a winter skills course.
Planning
Planning for a trip in winter should start long before you arrive in the area. Observing the weather conditions in the weeks leading up to a trip is a good way to see when major snow events occur and when major thaws followed by freezes come, stabilizing the snowpack. Then check the most up-to-date weather forecast before setting out.
It is also advisable to visit some key instructor and guiding blogs in advance, as many report daily on where they have been and what they observed on the hill. These reports often have pictures of snow accumulations and will hint at what's in condition and what's maybe not.
Finally, checking the SAIS avalanche forecasts will give you an idea of the how the weather has been affecting the conditions - at least in the five areas covered by SAIS. The observers also keep a blog of what they have seen, and provide additional information to the actual forecast.
All of this should help you to plan a few days out before you even leave the comfort of your own front room. This armchair planning is a key ingredient to helping you stay safe.
It is always good to have a few Plan Bs in reserve, routes that might not involve going too high, or on terrain that has been highlighted as low risk in the avalanche forecasts. Remember too that it only takes an hour and a half to drive across from Glen Coe and Fort William to Creag Meagaidh or the Cairngorms, so with an early start it is often possible to escape any localised high risk areas.
Leave a note
When heading out either leave a note with someone or arrange a point of contact back home who knows what you are planning and more importantly what to do if they do not hear from you by a set time. Make sure you give an idea of where you will park, type of car and registration, details of your intended route and what time the person can consider you overdue. This information will help any rescue, as the first place they will check is your car. The route info will also help them reduce a potential search area.
If you change your route and you have mobile reception text the change of plan. Whilst many mountain areas lack mobile phone signals in the glens, you might still be able to send a 'home safe' text while still on the way off the hill. If you cannot get a mobile signal then consider stopping at a pub to make that check-in call as soon as possible.
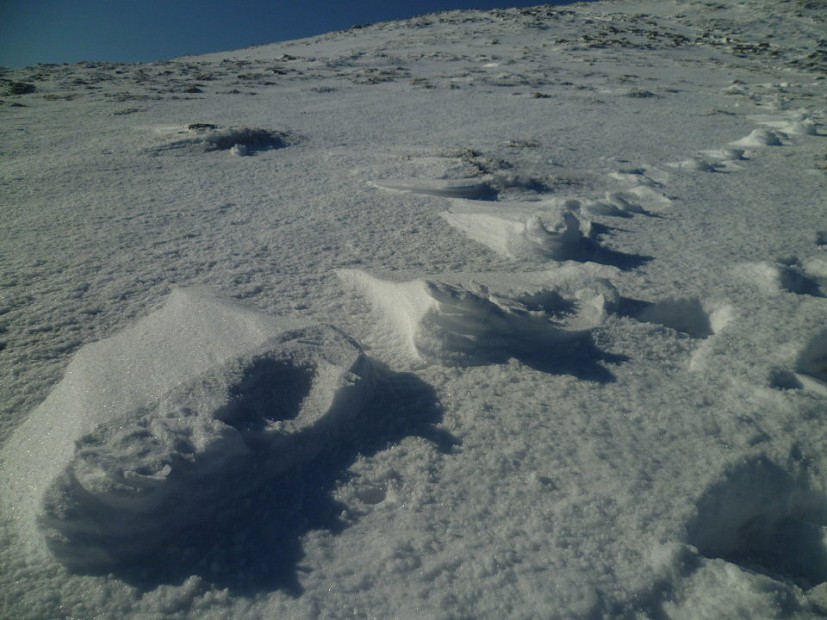
Telltale clues to wind direction include snow accumulations, sastrugi, raised footprints and rime ice
Start observing
The real-time assessment starts from the moment you wake up. Look out of the window to see whether the weather forecast has been right over night. Is there more or less snow on the ground from the previous day, and does this fit the overnight forecast on which the SAIS reports are based? When you head out and are getting ready in the car park you can see which direction the wind is coming from and potentially even the peak or corrie where you're aiming to climb. Again this can help you verify the avalanche forecast.
Observations continue as you approach the crag or mountain. You can observe where snow has accumulated, as this might help identify where windslab and heavier deposits of snow are loading the slopes and increasing the avalanche risk. Are there any wind-scoured slopes? If so these aspects will be both safer and easier to walk on.
There are several telltale signs to wind direction. These will include:
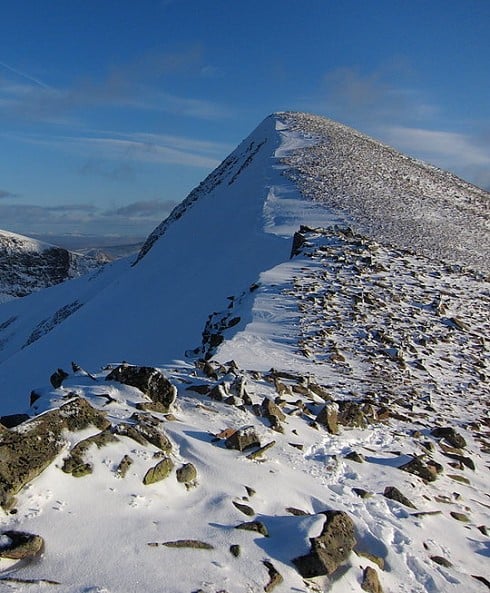
Snow Accumulations
In this photo you can see that the wind has blown the snow from the left hand side of the ridge as we are looking at it and redeposited on the right hand side. This erosion and deposition pattern can happen all over the hill due to the complex shape of mountains.
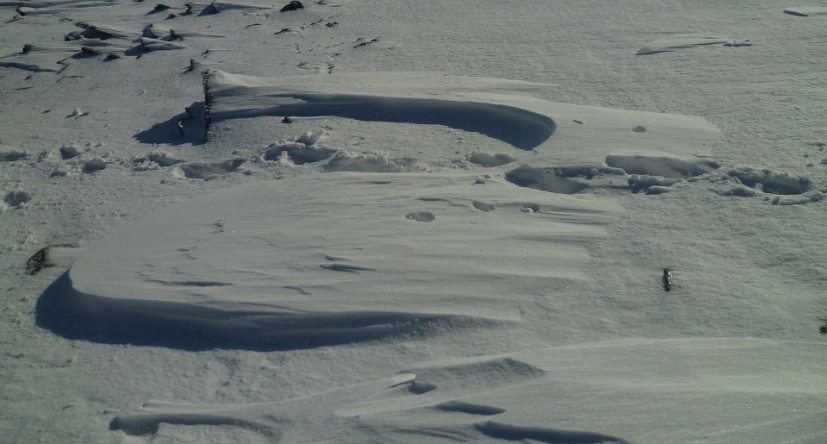
Sastrugi
These are wind-blown shapes in the snow, characterised by a steep and often irregularly shaped face, that will always face the direction that the wind has come from. The opposite/leeward side is a long gentle slope. In the example below the wind was blowing left to right.
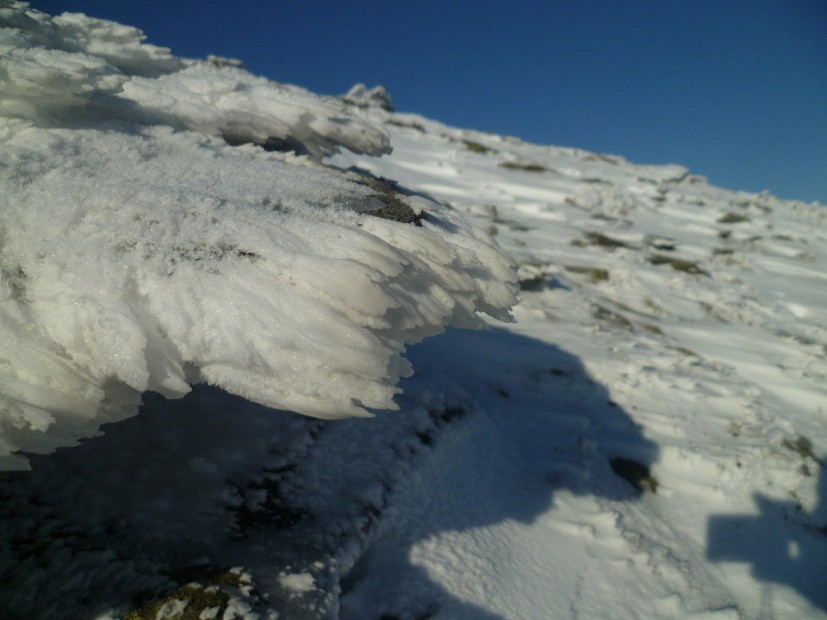
Rime Ice
Rime Ice is caused when super-cooled water vapour hits a freezing object (rocks, fence posts etc). Counter-intuitively, rime grows into the wind rather than away from it, so the direction it points is another handy indicator of recent wind direction.
Raised Footprints
Raised footprints are an interesting winter feature, caused by people walking over fresh unconsolidated snow. When stepped on the snow compacts and becomes solid, and if the wind picks up the surrounding snow is transported away and deposited elsewhere, leaving a kind of fossilised trail of footprints. How can these help you? In the photo you'll see that snow accumulates on the leeward side.
Shooting Cracks
If when you are walking you see cracks extending out from your footprints this is a sign that the snow is likely to fracture. Dependent on where you are it may be a warning to turn back. It is certainly a sign that the snow can fracture easily.
Avalanche Activity
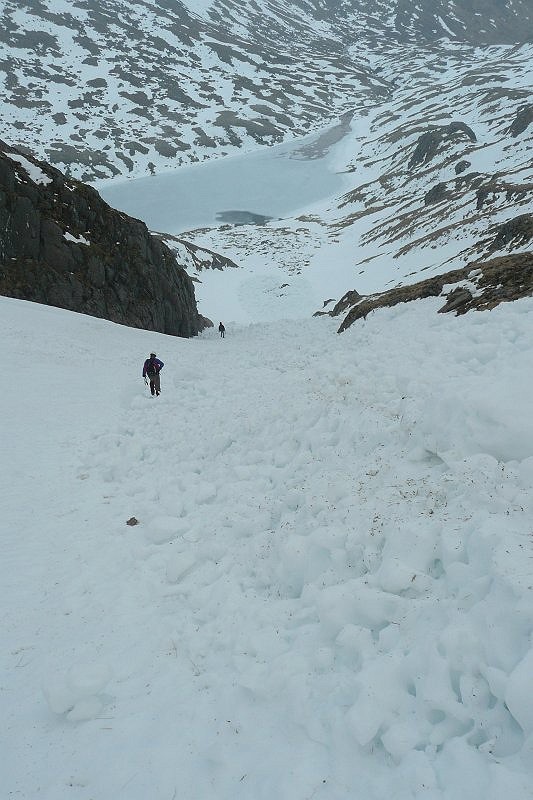
It should go without saying that if you see an avalanche or debris from a recent avalanche then there is no finer indicator that avalanche conditions are extremely high. If that avalanche is on the same aspect and altitude you intend to travel on then rethink your day or turn around and head to the pub. As they say, the mountain will be there tomorrow - the trick being to make sure that you are too.
'If it feels above freezing then watch out; higher temperatures can reduce the snow stability'
Other signs to look out for
Get a feel for the temperature. If it feels above freezing then watch out; higher temperatures can reduce the snow stability, weakening the bonds or even changing the resistance between layers. If is it warm enough for it to rain, then the snowpack will be melting and weakening and at the same time its weight will increase as the snowpack becomes saturated with water.
A lot of experienced winter mountaineers have a certain sixth sense as well. Sometimes things just don't feel right. Perhaps it's the feel on the snow underfoot, which if you get used to it can give near constant feedback on the subtle changes in the snowpack's hardness, depth and consistency. Especially listen out for the squeak of windslab, which I mentioned in part 1 of this article.
Armed with your observations...
Adding all these observations to the information given in the forecast, you can start to interpolate what you know onto a map. Either draw with a pen or use your imagination where the red no-go zones and the green go zones are. Another alternative is to draw a red zone on your compass for the dangerous aspects, meaning you can quickly judge the terrain aspect in terms of avalanche risk. You might even have to alter your route choice based on these initial assessments as you approach the mountain. p>As you proceed on your day you can use all this knowledge to help keep you on your toes and preempt areas that are higher risk than others, making decisions on the ground as to whether it is wise to continue or not. Does the route traverse slopes at the optimal angle for an avalanche, or can you avoid them? Is the slope long and uniform or are there islands of safety like protruding boulders to help anchor the snow? Does your route travel below gullies or cornices that are prone to avalanches, and if so can you quickly traverse across possible fall out zones rather than linger? Other high risk areas include convex slopes: can you avoid the apex where they are likely to fail?
Avalanche Books
These two avalanche articles are extracts from:
A Mountaineers' Guide to Avalanches by Mark Reeves – soon available on iBook for iPad. This covers the basic mechanics of avalanches, snowpack assessments, surviving an avalanche and much more.
The following books on avalanches are also recommended:
Chance in Million by Bob Barton and Blyth Wright
Avalanche!: Understand and Reduce Risks from Avalanches by Robert Bolognesi
The ABCs of Avalanche Safety by Sue Ferguson
The Avalanche Handbook by David McClung and Peter Schaerer
Winter Skills: Essential Walking and Climbing Techniques by Andy Cunningham and Alan Fyffe
Avalanche Awareness Courses in the UK
There are many providers of this type of course in the UK, including the National Centres at Glenmore Lodge and Plas y Brenin. If you're going for a freelance instructor look for people with either a Winter Mountain Leader qualification (WML), a Mountaineering Instructor Certificate (MIC), or a qualified Mountain Guide (UIAGM).
I offer courses in Winter Skills at Snowdonia Mountain Guides.
I also recommend: North Wales Climbing, Peak Mountain Training, Alpine Guides, Llanberis Guides and Get High
This article is based on A Mountaineer's Guide to Avalanches by Mark Reeves, available as a ebook in two formats: for iPad at £4.99 and for Kindle or ePub readers via Amazon at £5.14.
Mark Reeves is a Mountaineering Instructor and Winter Mountain Leader who runs coaching and skills courses through his own business Snowdonia Mountain Guides. During the winter months he spends a fair bit of time in Spain nowadays hot rock climbing and coaching through Sunnier Climbs. As well as this Mark now spends around half of his time writing guidebooks for Rockfax and a Coaching Column for Climber Magazine. He has authored North Wales Climbs and North Wales Slate for Rockfax. His current projects include a guidebook to the Mountains of Snowdonia and another to North East Spain. He has several iBooks out soon too, A Mountaineer's Guide to Avalanches, Hanging By A Thread: The History, Science, Technology and Culture of Rock Climbing and Mountaineering and Effective Coaching: A Rock Climbing Instructors guide to the Coaching Process.
Check out his blog to see what else he is up to.
