How to Rope Solo - with Pete Whittaker
Pete Whittaker takes a look at the art of rope soloing...
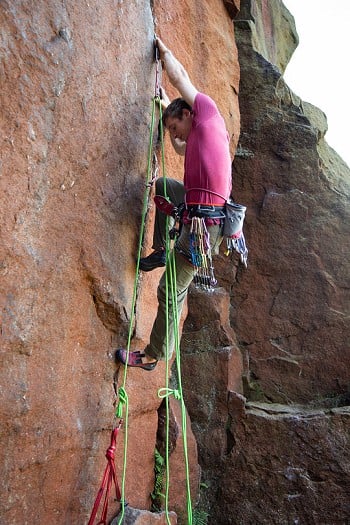
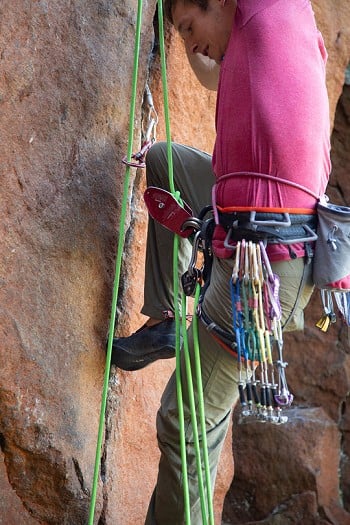
Rope soloing is simply the ability to climb alone, yet still have the safety of being attached to a rope (rather than free-soloing). It involves double the amount of work; all the work that your climbing partner would usually do for you in your team, whilst being a total loner as your climbing partner won't be there, so it's certainly not for everyone! However, I've found that preparing, climbing and completing a route or project under your own steam has produced some of the most rewarding and memorable days out climbing that I've had. You will probably know after just one pitch of climbing whether this is a style for you.
There are 3 basic points that should be noted before reading further into this article:
1. One system, piece of equipment or nugget of advice might work for one person and not for someone else, so it's important to test the water and find what works best for you. One man's smooth and slick soloing system might be a total nightmare for you and vice versa. I've found the best way is to take what information is available and rather than copy it directly, adapt it to make it fit your own objectives, goals and climbs.
2. Rope soloing is hard work, but there are numerous different tricks that can be used to make your life easier. However, I've found generally, the more tricks you use to make your rope soloing life easier, the more risk you take - so be aware!
3. I am by no means an expert on all aspects of rope soloing, however, I have learnt a few bits and bobs from recent outings which I thought would be useful to share; but remember, sometimes take them with a small pinch of salt.
3-way system
The basic rope soloing system is the '3-way system'. This method has you covering the terrain 3 times, rather than just the once. The 3 parts to the process are; climbing a pitch, abseiling a pitch, then re-climbing the pitch in some form.
1. Climbing the pitch
Climbing a pitch using rope soloing techniques is the most complicated part of the process because you can't just concentrate on the climbing. You must be in charge of anchor setups, rope handling and self-belaying
Anchor setups
The anchor acts as your main attachment to the rock, so you want to get this right, or else you're going to be in trouble! It is important that your anchor can take both an upward and downward pull. It needs to take an upward pull in case you fall off onto gear you have placed in the pitch. It needs to take a downward pull in case you take fall directly on to the belay.
If you are using a bolted anchor, then this is simple as the work has already been done for you; bolts take pulls in all directions.
If you are building your own anchors, then it becomes a little more complicated. You might have to place some pieces of the anchor in the opposite direction to normal; cams and wires that can take an upward pull. Personally, I like to place cams as they can rotate and take a pull in any direction and I like to place them tightly as if they do move, they have less chance of losing contact with the rock. An ideal situation would be to place pieces in a horizontal break as they can take both upward and downward pulls without ever moving.
A good way to judge if you are happy with your anchor is to ask yourself the question 'will I think about my anchor, when I'm climbing?' If the answer is 'yes' then reassess, and if the answer is 'no' you're good to go. You want to be 100% sure about your anchor, as when you have started climbing there is nothing you can do about it.
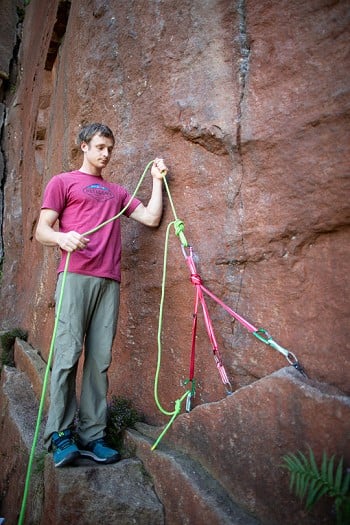
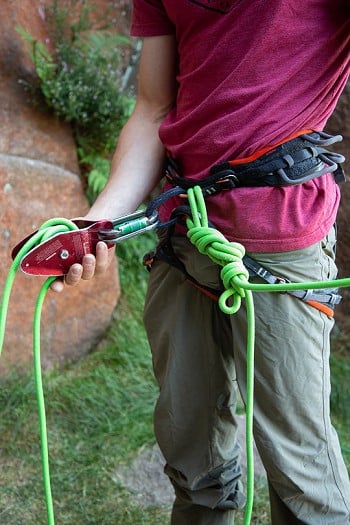
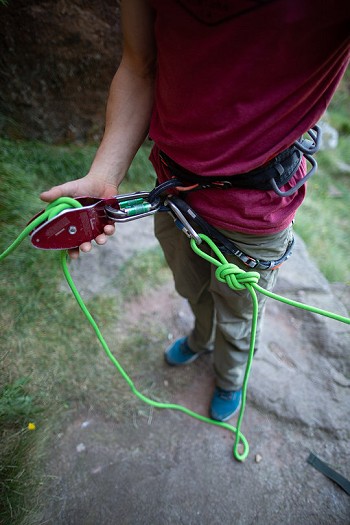
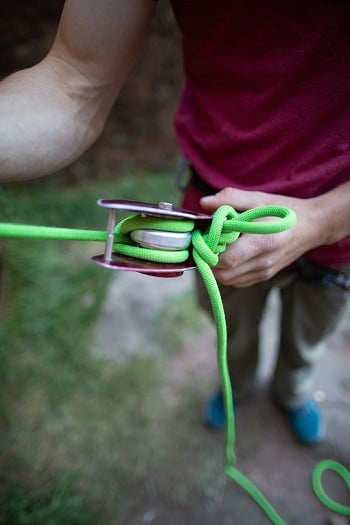
Now you have built and are satisfied with your anchor you need to attach yourself to it. Attach one end of the rope in a secure way to the anchor and then attach yourself to the rope (via your solo device) a few feet out from the anchor. Make sure you're familiar with the solo device you are using, and the rope is feeding in to and out of the device correctly.
Rope handling
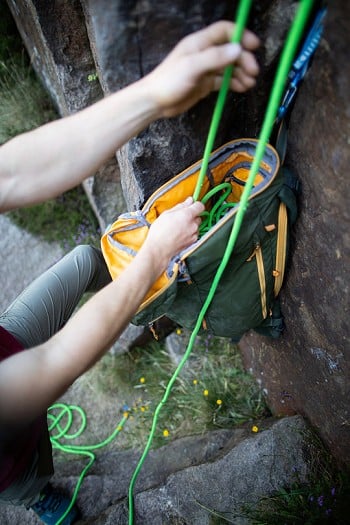
Take an extra minute of care when stacking your rope and save yourself those 30 extra minutes of time and energy sorting out your mess. There is always one phrase that sticks in my head about rope stacking from Andy Kirkpatrick: 'stack your rope like you would pack your parachute'. The quote speaks for itself.
Start the stacking process from the opposite end of the rope (the end that is not attached to the belay) and flake it out into your rucksack/rope bag/the floor or on to a ledge. Stack the whole rope until you eventually meet your solo device. A great little tip for stacking is to clip the rope through a karabiner above your rucksack and feed it down into the bag from above.
You will now have a short length of rope going from the solo device and then attached to the belay (the climbing rope) and a long piece of rope going from the solo device to the end that is at the bottom of your stack (the spare rope).
I like to leave my rope stacked at the belay, but some people seem to like carrying it in a rucksack on their back; its personal preference. If you have the rope with you on your back, you can sort any glitches easily. Also, when you are a long way up a pitch, by keeping the rope on your back you don't get lots of weight from 'the spare rope' directly onto your solo device. However, the downside is you have to carry the rope, which isn't exactly easy. It's much easier to climb with the rope dangling from your harness than it is to carry a rucksack whilst climbing. I've never carried the rope whilst rope soloing and after many pitches of climbing, I've still yet to have any rope tangles. If you stack well, it will feed out well.
Backup systems
When rope soloing, you are only attached to the rope via your solo device, so if you fell and your solo device failed, there is a possibility you could slide completely out the system and off the end of your rope. Therefore, it's important to have a backup.
A story to demonstrate the importance of back up knots: a good friend of mine was speed solo aid climbing on El Cap. He took a fall, stripped the whole pitch and took a factor two fall onto the belay. The fall snapped the karabiner on his solo device, he immediately fell completely out the system and was only saved by his back up knot catching him.
There are a few different ways to back yourself up. Like with anything in rope soloing, the quicker you want to move the more risk you take. As you can imagine the safest backup systems are also the most time consuming to do. You have to be the judge of what feels safe enough for the standard of route you are climbing.
Tying into the system - One of the safest options is to tie directly into the 'spare rope' a few metres away from your solo device. As you are not tying into the end of the rope you will have to tie in 'on the bite', so you'll have a very chunky but safe back up. When you have climbed far enough, your back up knot will eventually meet your solo device. You then have to re-tie another one further down your 'spare rope' and then unite from your current one to let the rope continue feeding through. A very time-consuming method, but very safe.
Clipping into the system - This is the same idea as above, however instead of tying directly into the rope, clip into the rope on the bite. When your knot meets the solo device, again just re-tie it and re-clip further down the rope. Remember to always tie your second back up knot before untying your first, this way you are always backed up. This method and the one above are quite time consuming and also require both hands to complete, so will only really work effectively if you are aid climbing.
Tie/clip into the system numerous times - This requires some pre-planning before you set off. Instead of just clipping into the spare rope once and always retying, tie all your back up knots before you set off. This way you never have to tie a knot on route, you only have to un-clip and undo knots, which is much easier and can be done whilst free climbing. The only problem with this method is you will have lots of loops of rope attached to your harness, making it heavy, unbalanced and clustered.
Use blocker knots - Instead of tying or clipping into the 'spare rope', you can just tie blocker knots (overhand knots) in the rope. You could pre-tie a bunch of them when stacking your rope and just undo them when they meet the solo device or tie and re-tie as you climb. This is the quickest method and the easiest for free climbing, although a blocker knot is the most dangerous option and would only prevent you sliding out of the system if the mechanism of your solo device failed - i.e. the knot would get jammed against the solo device and stop you sliding any further down the rope. It's important to note that if your attachment to the solo device failed, blocker knots wouldn't work and you would still fall completely out of the system and to your death…
Self-belaying
Now you have set up your belay, attached appropriately via your solo device, stacked your rope and decided on a backup, you're ready to climb. The process is simple; as you climb the rope feeds out from your bag (your spare rope), through your self-feeding solo device, and creates 'climbing rope' for you to progress upwards. Place gear as you normally would and clip your 'climbing rope' into it. It's incredibly important to make sure you clip the correct rope into your pieces of gear; in this case, that's the rope attached to the belay. Not the 'spare rope'. If you clip the spare rope by accident you will find yourself very unprotected and only clipped into the belay, which is a very dangerous situation to be in!
Once you have finished the pitch, you can set up a new belay and then think about retrieving all your gear… because it's not going to retrieve itself!
2. Cleaning the pitch
To clean the pitch, you have to abseil back down to your previous anchor, de-rig it, collect your belongings and take your gear out. The important part is deciding what gear to take out and when in order to make life easier for yourself.
Ideally, you want to leave as much gear in the pitch on the way down and take as much out on the way up, this saves carrying the whole rack back up the pitch and helps keep you close to the wall taking some of the stretch out the rope, all of which make re-climbing the pitch much easier. When you abseil down, just clip your rope back into the gear when you pass it.
On some occasions, it can be better to take the gear out on the way down. Well placed/stuck wires can often be easier to strip on abseil. Pieces of gear that are placed off to the side of the main climbing can be awkward to retrieve when reclimbing the pitch via jumaring, as there will be lots of weight going through the piece of gear.
Poor pieces of protection will be worth retrieving on the way down because putting weight through the piece whilst jumaring could pull it in a strange direction and it could blow on you unexpectedly.
3. Re-climbing the pitch
There are two ways to reclimb the pitch:
1. The most common method for 'reclimbing' the pitch is to jumar your fixed line back the belay. Jumaring is easy, but due to its repetitive nature, after a few pitches it can start to become tiring. If you are doing multiple pitches of climbing, then you might want to think about the most efficient way of carrying your bag/supplies/water. On single day ascents, your pack will probably be light enough to carry on your back whilst jumaring. However, if you are covering steeper terrain it can be nice to do a 'mini haul' instead of trying to jumar with it on your back. Attach your pack to the end of your fixed line, jumar the line, then use a Traxion to easily 1-to-1 haul your pack up. If you are going for longer than a day, then you will need to take a haul line and use normal big walling haul techniques. The hauling should always be done as the last part of the process.
2. Another way to 'reclimb' the pitch is to literally climb it again. You can use top roping solo techniques and just mini Traxion your fixed line back to the belay. My preference is to jumar 'real pitches' of climbing and then mini Traxion anything that feels like scrambling. Jumaring can be more difficult and time-consuming when the terrain becomes very easy.
Backlooping system
The backlooping system can be very quick, but it will only work in specific circumstances and if you mess up then in some situations it can be pretty serious. The benefit of backlooping is that you don't have to abseil, strip your gear and reclimb the pitch again. You only have to climb it once, cutting out two parts of the '3-way system.'
To make it work you will need to have a fixed belay and fixed pieces on the pitch (or be prepared to leave some pieces behind). Instead of fixing the end of your rope to the belay, thread your rope through it and tie into the end (this becomes your 'climbing rope'). Attach yourself to the remaining rope (coming out the opposite side of the belay) with your solo device, this rope becomes your 'spare rope'. As you climb your spare rope feeds through your solo device, then runs through the belay and gives you slack on your climbing rope, enabling you to move upwards. It's a running belay.
As you might imagine, fixed pieces of gear probably aren't going to have karabiners on them, so be prepared to sacrifice some. I tend to clip fixed pieces of gear with both ropes, although you can just clip one end and put yourself in the middle of a huge loop. If you clip both ropes into each piece then you run the risk of pinching your rope between the karabiner and the other rope, but the climbing feels safer. If you clip one rope into each piece, it feels less safe, but your rope will pull much more easily. This system is quicker, but it means you tend to get a lot of rope drag, which is ok if you are aid climbing but can become very difficult if you are trying to free climb.
When you reach the next belay all you have to do is drop one end of the rope and pull it back through the whole system, i.e. your fixed pieces and your previous belay.
This is a pretty serious rope soloing technique, as you are relying on fixed pieces (of which there will probably be few, so the runabouts will be huge) and a fall from soloing in this manner isn't going to be pleasant. My main advice for backlooping: don't fall.
Equipment
Solo devices
There are lots of different solo devices on the market which can be used. From simply using a clove hitch around a karabiner to some of the more modern ones like the Silent Partner. I'm not going to go into detail about all the different solo devices because I have only ever tried three of them out and because I really think its personal preference. You'll have to try out a few to see what works best for your soloing objective.
If you are particularly interested in what I use, it is the Silent Partner. However now that the Revo from Wild Country is out, I plan to give this a little test, although it must be noted that this piece of equipment isn't specifically designed for that purpose).
I tried an early prototype of the Revo for rope soloing. It was mostly positive; the device fed the rope through more smoothly than the Silent Partner and the whole unit felt less bulky and weighty, making it more pleasant to climb with. A slight downside from a safety point of view is that the Revo only has one attachment point to the harness, whereas the Silent Partner has two. I've taken some falls on the Revo and it held and locked in good time of course. However, I have yet to take a 'monster lob' (think stripping an aid pitch and factor two falling back on to the belay) on the Revo, so how it would hold up in a huge fall I can't comment.
The advice that I can give about solo devices is about the attachment point from the device to you. Remember, you are only attached to the system via karabiners (excluding your back up). If you have a high impact fall, which can certainly happen whilst rope soloing, then it would be easy to cross load karabiners and potentially break them.
Some solo devices, for example the Silent Partner, provide two attachment points for safety which is great; back to back locking karabiners can be used. As the karabiners lie next to each other and can rub, I've found auto locking ones to be better (screwgates can undo themselves). However, most solo devices only have one attachment point, in which case using a Maillon is your safest option. If using a Maillon is too heavy, you want to use karabiner which has a safety mechanism in place to prevent cross loading.
Finally, it's worth noting that some solo devices are great for solo climbing, but poor for abseiling and retrieving gear. It's worth considering taking a different device to abseil on in this situation.
Rope Bags
Again, there are lots of different options for rope bags:
For a light option, you can just coil your rope through a sling like you would over your lap when on a hanging belay with a partner. If you use this method, remember to make your bottom coils the longest and gradually shorten them so the top coils are the shortest. This way you are less likely to get loops of rope dropping through other loops and making tangles. I don't particularly like this method because it's slow to coil your rope and there is a risk of your ropes getting tangled, blown about, or loops getting snagged around features.
With a big enough daypack, you can stack your rope into it on top of your supplies. This is my preferred method and I like to use The Patagonia Cragsmith pack. The lid folds back and you get a nice large square opening for the rope to feed out.
If you are moving slowly or have both a lead and a haul line, then rope bags are the luxury item to have (remember you'll need two different rope bags for each line to be stacked in). To find a good rope bag you are looking for something with a large and rigid rimmed opening; something that keeps its shape and doesn't collapse in on itself, preventing the rope from feeding out easily.
Rack
Your general climbing rack will be similar to what you would take if you were climbing with a partner. However, what can be overlooked is the number of quickdraws that you take (due to no rope drag). In the normal '3 way' rope soloing system, the climbing rope (the one clipped through all your pieces of gear) isn't a moving rope, meaning you get no rope drag. A great advantage to rope soloing is that you can zig-zag all over a pitch, not extend a single piece of gear and never get any rope drag - winner!
Watch this great film about Pete's outrageous all free rope solo of Freerider on El Capitan:
Common Problems
There are loads of nuisances to rope soloing and far too many little things to cover in this article - you'll have to find those out for yourself! Below I've gone through some of the most common problems and different options that you can use to try and overcome them.
Back feeding
Back feeding occurs when the weight of the climbing rope becomes heavier than the weight of the spare rope. It can make all the slack in your spare rope start whizzing back through your solo device and giving you unwanted slack on your climbing end; not ideal if you're pumping out halfway through the middle of a crux sequence, or tentatively stepping onto that 'smeared into a seam' copperhead.
There are a couple of methods which you can use to prevent this:
1. Tie your 'climbing rope' directly into bomber pieces of kit at stages throughout the pitch, effectively making a new anchor. This is useful for free climbing as it can be done one-handed. By using this method, you will take the stretch out of the system and falling close to a fixed piece will be like falling close to your main anchor: harsh.
2. Use little bungees or elastic clipped to pieces of kit and then prusiked around your climbing rope to hold it. The elastic should be strong enough to hold the weight of the rope but should snap easily under any force, such as a fall. This technique is more commonly used for aid climbing as it's fiddly and you need two hands. The good thing about this method is that if you do fall you will get the full stretch and dynamism out of the system, as the shock will go back to your main anchor as the bungees snap. The fall will be a lot softer.
The weight of the spare rope
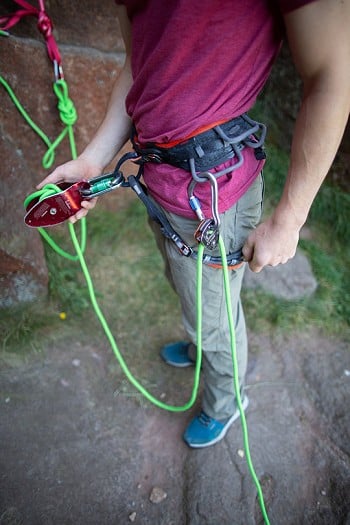
The best way around this is to use a Traxion below your solo device to hold a loop of 'spare rope' up. As you climb, rope from your 'light loop' will feed through your solo device making it shorter, so you have to keep pulling 'spare rope' through the Traxion and into the 'light loop'. This is the method I use for 100% of my free climbing, as it can all easily be done one-handed.
Traversing
The dreaded traverse. There is never an easy option for cleaning traverses, and they should all be judged pitch by pitch and against your ability. There are 2 basic options:
1. Lead the pitch, climb the fixed line back to the anchor (re-clipping all the pieces as you go). Reclimb the pitch stripping it as you go. Using this method means you get a 'lead type' feeling twice, so I tend to only use it on easier terrain.
2. Lead the pitch, climb the fixed line back to the anchor (stripping all the gear as you go). Do a lower out from your previous anchor to below your new one. Jumar the line back to your new anchor.
When you climb your fixed line it's important to use the right equipment and stay safe. There have been cases where climbers have popped both their jumars off the line on traverses and then fallen to their death. I always attach myself to the line with a gri-gri as a backup.

Pete Whittaker has accomplished some mind-boggling objectives whilst rope soloing in recent years. Perhaps the pinnacle of his achievements is his audacious ascent of Freerider in late 2016.
In his spare time, he does a bit of crack climbing as one half of the Wideboyz.
Next Spring he plans to release a book detailing all his acquired knowledge on crack climbing.


